| Deciding to build my own trailer was as much from
necessity as it was from cost. I could not find a used trailer locally to fit my boat.
Ordering one was going to cost in excess of $1200.00, but I only had $1000 in my boat!
Since I had done some welding in the past, far past that is, I borrowed an arc welder from
a friend and did a bit of practicing until I was confident I could make a trailer hold
together.
I knew that the boat was
20’x5’ with an estimated loaded weight of 600 lbs. Logic dictated that I’d
need at least 3’ in front for the winch post and hitch clearance. (Actually I looked
at several trailers and 3’ feet seemed the normal. I called my local steel supplier
using his recommendations, I decide on 4" channel 3/16" thick for the frame and
3" box, 1/8" thick for the tongue. The cross pieces where 3" channel only
because it fit nicely into the 4" channel with out needing to do fancy cutting and
shaping.
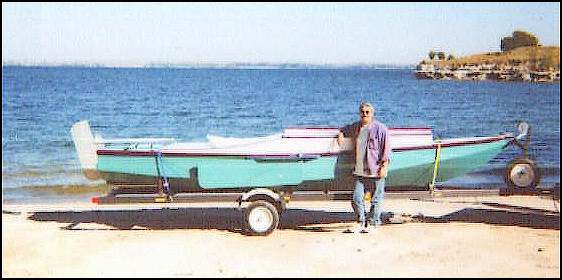
Jeff built this trailer for his Jim
Michalak designed Frolic
Materials used:
Ordered from Northern Tools
catalog:
- One 2000 lbs. Rated axle kit. This kit included everything
required to mount the axle including springs, brackets, bolts, bearings, hubs, etc.
Nothing else was needed for the axle.
- 2 Poly fenders and mounting brackets. These where cheap and a
fairly good product.
- One 2" ball hitch bracket with handle. This is the bolt on
model and can be order for 2 ½’ or 3" square tongue sizes.
- One 900 lbs. rope winch. Actually I didn’t need this at all.
My boat is light enough that it floats right up to the winch post with very little effort.
- Trailer light kit. This had everything I needed including the
wiring clips to hold the wire on to the frame. Make sure you get the submersible lights
otherwise you constantly be changing bulbs. Hot bulbs and cool water don’t mix well!
Total price to Northern
Tools: $262.15 including shipping.
Steel (Purchase locally):
- 2 lengths of 20’ X 4" X 3/16" channel.
Since I couldn’t haul 20’ pieces I had them cut into 10’ lengths.
- 4 lengths of 3" channel. I waited until I got the axle, then
measured the exact distance from the outside of the spring brackets, then subtracted
3/8". (3/16" thick frame walls times 2 frames) This will allow you to build the
trailer with outside width measurements to fit your axle width.
- 1 length of 3" channel to fit behind the 3" box tongue
that spanned between the frames. This is a guess only. I drew out my plans on graph paper
and got an estimate of the width. When I actually fit this piece, I had to move the tongue
aft about 2 inches for a good fit but this was better than cutting the channel iron.
- 1 three-foot length of 4" channel for the winch post.
- 2 one-foot lengths of 4" channel for winch post supports.
- 2 pieces of 1 ½" heavy 3/16" angle iron, 4 ‘
long. (Adjustable axle mounting slides)
Since I had all the measurements before purchasing the
steel, I had the steel supplier cut everything to length. This cost me $3.00 per cut but
is well worth it! Unless you have a power steel chop saw forget it, using a hacksaw by
hand is grueling.
Total steel price: $187.65
Finishing:
- Two quarts of metal primer. ( 3 coats)
- One quart of metal paint, final color. ( 2 coats)
- Acetone ( wipe all metal well with acetone before painting)
Total Price: $24.16 (K-Mart)
Wheels:
- Qty. 3, 4.80 X 12" wheels with tires. ( $127.55)
- Spare Tire Holder ( $11.00 )
Total: $138.55 (Local tire shop)
Miscellaneous:
- 1 Sheet ½" Plywood for support beds. $15.00
- Bolts, nuts, washers, tie downs hooks, etc. $27.00
- Rubber bow support. ( Boat shop ) $3.00
- Bow roller with mounting brackets. (Boat Shop) $16.50
Total: $51.50
Total Price for the
trailer: $674.00
Tools I used:
- Arc Welder, commonly known as a stick welder. 220V but any 110
Volt welder capable of welding ¼" steel will work just fine. A wire welder will work
great and have less splatter but cost a lot more and the welds for this project simple.
- 4" Heavy Duty Grinder. These are cheap and a good value at
Harbor Freight. I bought the Chicago Tools discounted model but found it to be a great
little grinder for the money. Cost $19.95
- 4 additional grinding wheels at $1.00 each.
- Pack of 50 welding rods. Not being a welder by trade I’m not
sure the exact type but where for up to ¼" steel and had a special low splatter
coating. Cost: $11.00
- Miscellaneous C clamps.
- Framing square.
- 3’ Level.
- 25’ Measuring tape.
- Normal safety equipment including heavy leather gloves, welding
helmet, and old coveralls.
- Slag chipper. This is nothing but a flat chisel welded to a
handle to chip the slag off the welds. I bought one for $3.95.
- Heavy wire brush. $2.95
- 3/8 Electric drill with ½", 1/8", 5/16",
7/16" drill bits.
When drawing out the trailer, I drew it to the same scale as the
boat profile on the plans. After drawing up what I though would work, I then laid it over
the boat plans to make sure everything would fit properly. At 12’ forward from the
stern I noticed that my 20’ boat really started to narrow towards the bow so I
decided this is where I wanted to start pulling the frames together. This gave me a
perfectly square box to build for the back 12’ of the trailer.
Sequence of building as follows:
- Welded my 10’ pieces of 4" channel back together so I
had two 20’ pieces.
- Laid out these two frames on the garage floor using my 3"
cross pieces to make sure they where parallel to each other. I then used the 3" level
and some wood shims to make sure they where level fore and aft as well as horizontal. I
tack welded one cross piece at the aft end using the framing square to make sure it was
square. Then rechecking for level and parallel I tack weld the other end to the second
frame.
- Checking the boat plans for the location of two structural
bulkheads, I then placed two cross pieces so the flat front edge aligned about 1" aft
of the bulkhead location. This allowed me to bolt the 2" plywood supports on making
them centered on the bulkhead.
- The fourth member was placed equal distance between two bulkhead
supports and welded it in place.
- At this point I have a box using 4 crosspieces, one at the far
rear, two for bulkhead supports and another space appropriately. With my boat, the
distance between the fore and aft supports came out to 11 feet starting at the far rear of
the trailer.
- At the 12’ point from the rear of the trailer I sliced both
edges of each frame with the grinder twice about 1" apart. This was a total of 8
slices about 1/8" wide and used up 1 whole grinding wheel to cut but this is enough
space to allow the two free frame ends now 8 feet in front of these slices to pull
together. To do this was simple; I tack weld two junk bolts to each end to keep a small
pipe clamp from slipping off. Muscle power will pull them together but the pipe clamp will
hold them in place while you align the tongue piece.
- Slip the tongue piece in until it’s about 2’ through
the two frames. Now mark the centerlines on the crosspieces and draw a string across these
marks to find the exact center of the trailer so you can align the tongue straight. Use
the smaller cross piece and insert it between the frames and move it forward until it
wedges nicely between the frames. Now slide the tongue back until it butts up against this
support piece. If it the total length of the trailer at this point isn’t close to the
boat length plus 3’, you’ll have to adjust the tongue and it’s rear support
piece. Make sure it’s all square and straight and tack into place.
- Now the frame is tacked together only. Check for square, level,
and straight then weld all seams fully, both sides. Make sure you alternate between both
sides and ends to eliminate the effects of heat induced warping.
- Assemble the axle including the spring mounts and tighten. Lay
the angle irons on the outside of the frames. I’d lay them so the ends of the angle
irons are aligned with the rear edge of the trailer to ensure they are parallel and square
with each other. Lay the axle assembles upside down on the angle irons and make sure they
are centered. Weld the spring mounts to the angle irons.
- You now have an axle assembly welded to the angle irons which in
turn can slide fore and aft on the frame, allowing you to adjust for balance once the boat
is on the trailer.
- Build the 2" wide plywood supports to match the hull form
and using the baseline on your plans you can get the height as well. Clamp these supports
on the crosspieces and set the boat on the trailer. Adjust the supports for height and
through bolt to the cross members. I used 4 -5/16" bolts on each support.
- Now adjust the axle assembly fore and aft so you get about ten
percent of your estimated weight on the tongue. For a sailboat it’s usually about 10%
length behind the center.
- Now comes the most important part of trailer building, aligning
the axle with the tongue. It it’s not exactly centered it will not track straight
behind the tow vehicle. This is fairly simple but you can’t be sloppy here. Find the
exact center at the very end of the tongue and mark with a thin line. If the measurement
from the edge of each hub to the mark you made on the tongue is EXACTLY the same the axle
will be aligned for straight towing. Mark this location on both sides; drill 4 holes
through the angle irons and frames. Paint the steel that will be cover by the axle
assembly with a couple coast of primer then use at least 7/16 bolts to secure the axle
assembly.
- Building the winch post is more or less trial and error but I
settled on a simple form. The 3’ piece of 4" channel is for the actual post
while one of 12" pieces will lie flat on top of the tongue and the other is a
support. Lay one 12" piece on the tongue, then using the other pieces try to find
what looks good to your eye for angling the winch post forward. I don’t think there
is any set rule other than looks when it comes to smaller boats. In fact you could make
perpendicular and it would work well. Once you get the winch post where you like it, lay
the second 12" piece against it to work as a brace. Again place it where it will give
the best support. You may have to grind some of the corners down for a better fit before
welding. Mount the winch post and bow support bracket after the boat has been mounted and
placed in the proper position by either bolting or large U-Bolts.
- Grind all exposed welds smooth for a finished look. Don’t
forget the slices cut to bend the frame, make sure they are welded. Now all you have left
is painting, the mounting the light kit, and safety chains which I mounted by drilling
through the tongue and bolted using a 7/16" casehardened bolt. (#8 Hardness) Mount a
couple tie down hooks where needed.
- Test pull the trailer to make sure it tracks straight. Adjust
axles if necessary though if measured accurate you’ll be fine.
Building the trailer was very straightforward and only took me
one day to weld it up, another 5 hours or so for painting, and a couple more hours to
mount the hardware. All in all, I probably spend the equivalent of one weekend putting it
together and saved my self at least 40% maybe more on the cost of a new trailer. With over
1200 miles of towing, I’ve had no problems with the trailer and needed no
adjustments. |
