|
I recently built a Bolger "Gypsy," the featured boat
in Harold Payson’s Build the New Instant Boats. The book is very thorough and
helpful, and will take any beginner and turn him into a boat builder (an awesome feeling).
Never able to leave well enough alone, though, I made a few modifications which might be
of interest to future builders: adding longer seats, tilting a bulkhead for leaning back
against, and adding flotation compartments and hatches. Gypsy is designed to be as simple
as possible to build, and my changes definitely add some steps and some material (and thus
weight) to the finished product, but they add to its comfort and sense of security, I
hope.
 SEAT LAYOUT: The seats as designed looked awfully cramped and limiting,
so I decided to drop frame #9 entirely, run a 1X3 stringer for the seats from bulkhead #12
all the way up to #6, and double the gunwale thickness to insure adequate hull stiffness
without that frame. SEAT LAYOUT: The seats as designed looked awfully cramped and limiting,
so I decided to drop frame #9 entirely, run a 1X3 stringer for the seats from bulkhead #12
all the way up to #6, and double the gunwale thickness to insure adequate hull stiffness
without that frame.
I measured off widths every six inches from the stringer edge to
the side, and cut the seat tops from 1/4" luan (which is what I made the whole boat
from). It was a bit of an inexact science, but the seats fit pretty well. When screwed to
the top of the stringer on one side and epoxied and glassed to the boat side, they are
perfectly strong and stiff -- the box effect. I also added a little 1X3 leg, just about in
the middle of the long stringer, to support weight there. I screwed and glued it to the
back of the stringer, then epoxied and glassed it to the floor of the boat. This way, too,
the seat is rigid enough that you can dig your toes under it when heeling and lean back.
Finally, before finally attaching the seat tops, I cut some 2" thick grayboard foam
flotation to exactly fit under them, and stuck it in there. By the time I trimmed it to
conform to the angle of the chine, there wasn’t really all that much grayboard left -
but some is better than none. There’s still room under the seat to stuff in one of
those FunNoodles for even more flotation, if desired.
I suppose Mr. Bolger wanted to keep the sailor's weight centered
right in the spot where the original small seats are -- and small changes in position do
make a big effect on this boat -- but I find there are plenty of occasions where you want
to scoot forward or aft, or lay out for comfort.
THE ROWING THWART: The rowing thwart now gets hinged on the
starboard stringer and lands on a 3/4" stop on the edge of the port stringer, so that
I can still stow oars under the seat. It also lands on the projection of the centerboard
case, which I cut to be perfectly level, rather than sloping downward as on the plans.
This gives the seat a good solid foundation. Seat is made of 1/4" luan, too, with
2" wide strips of extra luan glued on the fore and aft edge, for extra strength.
(Might be easier to just use 1/2" ply . . .)
I had to cut holes in form #6 to receive the blades of the oars.
They’re a little bit in the way on the floor of the boat, but mostly stay pushed out
to the sides, hovering just under the seats. I intend to hook up a little bungee cord loop
under the seat to really hold them aside. I also intend to fashion a small latch for the
rowing thwart, to keep it from opening when the boat is inverted on my cartop - hence
keeping the oars stuck in the boat during transit, too.
THE TILTED BULKHEAD: I took out Bulkhead #12, and cut a new one,
shaped to tilt back about 20 degrees, for general comfort. It’s good for sitting on
the floor of the boat during runs, when the boat wants to roll and you want to scoot back
to get the bow up a bit, and don’t want to be one side seat or the other. Also nice
if you're just sitting on the seat and leaning back on it. Coming up with the right shape
involved tracing a cardboard template and tweaking it a lot -- and still coming up a bit
short in spots. Epoxy and glass tape fixed the errors. Is there a computer program that
could calculate this shape exactly? Maybe hullforms? Or someone who hasn’t forgotten
all his 9th-grade geometry?
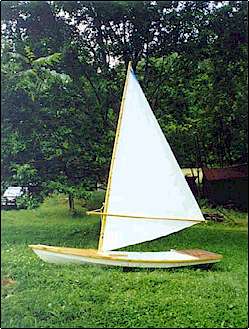
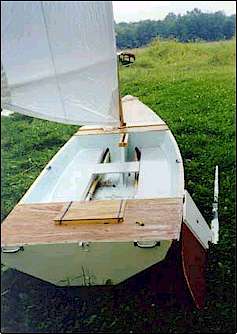 Here's a shot of the finished boat showing the seats, etc. Here's a shot of the finished boat showing the seats, etc.
Also note the handles on the transom for ease in cartopping.
A NOTE ON DOUBLING THE GUNWALE THICKNESS: I used a trick John
Bell posted in the Bolger e-group files some time ago: ripping a 16' 2X4 on a table saw,
first taking off about a 3/4" piece from either edge, then evenly dividing the
remaining 2"-wide piece with an angled cut of 21 degrees (matching the flare of the
sides) -- then placing that beveled piece on first (thick side downward) following with a
straight-cut piece, so as to make a perfectly flush surface for screwing on decking. This
is a great little system - you get gunwales that only look 1 ¼" thick from the top,
but viewed from beneath are a full 2".
FLOTATION COMPARTMENTS: I put an extra bulkhead in just forward
of the mast step, epoxied and glassed into place, to create an airtight flotation
compartment once it all got decked over. (I added an airtight hatch on deck after these
pictures were taken, so it wouldn’t get damp and rot in there over the years.) I cut
a big round hole in Bulkhead #3, for ventilation via the hatch, so everything from the bow
back to the new bulkhead (at about 4 ½ feet) is all flotation. For decking, ¼"
luan, sealed with a bead of silicone caulk all around the gunwale and across the mast step
(I added a lower flange to the mast step to let the decking fall onto), then simply
screwed down with galvanized sheetrock screws. Jim Michalak recommends this silicone
sealing method - better than gluing it down, so you can pry it up if ever you need to get
in there to fix anything.
I put foam flotation around the mast step in the area between
Bulkhead #6 and the new bulkhead, just leaving room for the oar blades to get tucked up in
there. This might sound like flotation overkill, but I wanted to be sure I could
self-rescue in fairly rough water, so I worked in as much buoyancy as possible. (Still
haven't had occasion to test self-rescue.)
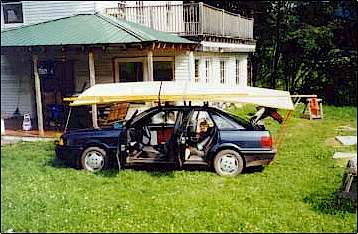 This picture shows the boat as cartopped, single-handed, for our trip to
Cape Cod. I added handles to the transom -- not terribly attractive, but helpful in
maneuvering the boat up onto the rack. This picture shows the boat as cartopped, single-handed, for our trip to
Cape Cod. I added handles to the transom -- not terribly attractive, but helpful in
maneuvering the boat up onto the rack.
THE HATCHES: If you haven’t made a hatch, it’s pretty
easy. (On re-reading this description, I think I’ve made an easy thing pretty
incomprehensible, but here it is: )
----Once your decking is on, draw a square or rectangle centered
on the centerline of the boat. I made my holes 12" fore-and-aft by 16" wide. Use
a circular saw and make plunge cuts carefully along each side. Finish cutting the corners
with a hand saw. There you’ve got a perfect hole in your deck.
---Glue some ¾" X ¾" pieces of wood along each edge
(in my case, two 17 ½-inchers and two 12-inchers, sitting on deck, flush to the edges of
the opening, completely surrounding it.
----Then cut a piece of plywood for the top, in my case, it was
17 ½" X 13 ½" (the size of the hole plus the widths of the framing sticks
around it).
----Glue similar sticks to the inside of the hatch-top, so that
they’ll fall just snugly inside the opening (12"X16" minus an eighth or
quarter inch each side).
----Add closed-cell weather stripping to the underside of the
top, around the framing sticks - so the top seals down onto the frame around the hole.
----Bungee cords hold it down tight. I actually buy 32"
bungee cords, pry off the metal hooks on each end, leaving the clamped little loop; then I
screw straight into the loops to attach both ends of the cord to the outside of the
framing around the hatch opening, at two adjacent corners. Then screws run in on the
opposite side of the hatch opening, parallel to the decking, with ½" of screw left
showing, provide the hooks on which to catch the bungee cord. I generally locate it so I
can get access as easily as possible from the cockpit.
---Something I’d like to add but haven’t yet is a
couple of nylon webs or leather straps to make hinges for the hatch opening, so it
won’t get lost or blown away if opened on the water. Anyway, these hatches are good
not only for ventilation of enclosed spaces, but also for stowing life vests and cushions
and rain gear and other piles of junk that don’t fit in your car if you’re
traveling a ways. And for keeping your picnic lunch dry once you’re sailing.
|