| Where does the infernal notion come from that suddenly instill us with the
desire to build a boat? My wife says it must be middle age dementia. I think
perhaps it’s more than that…in my case it came from two places. The first
was the desire to have a small craft in which to fish the Shenandoah River.
The other was the price of commercially available craft. Strike that…even
‘used’ craft were out of my budget, at least the ones that were still
serviceable anyway. So I began thinking.
I was pretty fair journeyman carpenter, thanks to the tutoring of my
Grandfather, from the time I could pick up a hammer and do some damage to a
hunk of wood. I have built several small and not-so-small projects over the
years, small cabinets, workbenches, end tables and the like. Home repairs
requiring woodwork and finish carpentry skills were a breeze for me, and I’ve become sort of the family go-to guy for those, building a boat should be
a breeze. I began thinking about the old wooden johnboats I used to rent at
small local lakes down home. They looked simple enough; surely I could handle something like that. But a johnboat requires a trailer, motor, state
registration fees etc to work the river…so I figured maybe I could build a
canoe. But where to start? Well, in the 21st century where every good boat
wright begins…the Internet!
 I was damn near overwhelmed with the wealth of information!!! The types,
the builders, the commercial sites, the homesites of those who have gone
before…and then I saw an intriguing word: Pirogue. Lots of different places
to get plans, help, advice, parts etc. I settled on Uncle John’s version for
the price, and for what came in his “kit”. Making compound angle cuts on a
piece of wood as soft as Cypress is not the easiest thing to do. So I figured if they will do it for me, it would be worth it. Second, the stitch
and glue method of waterproofing a boat seemed ingenious to me, although a
bit daunting since I had never tried my hand at handling epoxy resin and
fiberglass cloth before. I found out that there are many places to learn how
this process is done, including this fine site and the many posters who have
put up pictures and detailed diaries of their process (many thanks to you
all!) but they never give ALL the information. There are many things you
will find out for yourself. I was damn near overwhelmed with the wealth of information!!! The types,
the builders, the commercial sites, the homesites of those who have gone
before…and then I saw an intriguing word: Pirogue. Lots of different places
to get plans, help, advice, parts etc. I settled on Uncle John’s version for
the price, and for what came in his “kit”. Making compound angle cuts on a
piece of wood as soft as Cypress is not the easiest thing to do. So I figured if they will do it for me, it would be worth it. Second, the stitch
and glue method of waterproofing a boat seemed ingenious to me, although a
bit daunting since I had never tried my hand at handling epoxy resin and
fiberglass cloth before. I found out that there are many places to learn how
this process is done, including this fine site and the many posters who have
put up pictures and detailed diaries of their process (many thanks to you
all!) but they never give ALL the information. There are many things you
will find out for yourself.
Like just how fragile fiberglass cloth is, how hard it is to cut straight
with no fraying, how much resin can you mix at once without running out too
soon, or having too much to use up before it hardens, and what kind of container should you mix in, and stir in hardener, cream or liquid versions,
rollers or brushes? Oh the questions came fast and furious. But I persevered
and learned a few things along the way, and came out on the other side with
some good tips and couple of tricks.
Pick your Luan or fir or what-have-you carefully, knots, splits, and other
imperfections will require repair and prep-work before you start. If you don’t have a table saw or some method to ensure long, straight cuts with a
jigsaw, spend the extra couple of bucks to have them rip your long strips
for the gunwales at the store. You’ll be glad you did. Keep your block plane
SHARP and tight. It will be your most important tool when you get to the
fairing work. When setting up your scarf joints, make sure that when your
boat is assembled, the vectors of the angle point toward the outside and
aft. This will ensure when you flex the wood around to your stems, the stress concentrations will on the thicker areas of the joint, not on the
thin sections. (The engineer in me is showing). Also your leading edges will
have water flowing PAST the joint, rather than into the joint. The scarf
joint in the bottom isn’t so critical, but I made sure that the leading edge
of the scarf-angle was inside rather than on the outside as well, just seemed logical in helping to prevent leaks that way. Water will pass over
and away from the joint rather than being forced into it.
 Disposable-everything is the way to go. You’ll spend nearly as much time
cleaning up as you do building if you try to use permanent tools and such
with the epoxy. I used disposable nylon brushes to spread the Epoxy; wide
tongue depressor type sticks (available at craft stores) to mix hardener,
and those small disposable leftover containers from the grocery store to
hold the epoxy. They are cheap, readily available and easy to hold and mix
in. Don’t forget your respirator, and on this one item, buy the best one you
can afford. You’ll be glad you did. Disposable-everything is the way to go. You’ll spend nearly as much time
cleaning up as you do building if you try to use permanent tools and such
with the epoxy. I used disposable nylon brushes to spread the Epoxy; wide
tongue depressor type sticks (available at craft stores) to mix hardener,
and those small disposable leftover containers from the grocery store to
hold the epoxy. They are cheap, readily available and easy to hold and mix
in. Don’t forget your respirator, and on this one item, buy the best one you
can afford. You’ll be glad you did.
A tip from my long-suffering spouse: Cutting Fiberglass cloth into 3 and
4inch wide strips is an exercise in frustration. The weave of the cloth is
very loose and it tends to skew as you cut. Get a cutting board and wheel-type cutter from your local sewing outlet. Use the “wavy-edged” blade
in the cutter and you will greatly reduce the frayed edges you get trying to
use conventional scissors. Do all your cutting before you start, or I guarantee you, you WILL get epoxy on the wheel cutter and it will slowly
stop working as the epoxy works it way into the spindle. You can buy the
strips precut, but it’s more expensive and you will still have to cut to
length for short runs.
Brush on epoxy down the length of the tape, gently pushing air bubbles as
you go. Trying to pull them out on the short side will also pull the tape
out of place and stroking across the cut edge of the tape will pull fibers
out of the strip. Some say foam rollers are the way to go here because they
don’t pull fibers out. They’re probably right, but foam rollers saturate
with epoxy very quickly and you’ll need to clean the roller often and use
refills generously. The foam tends to tear apart as it gets heavy with epoxy. Plus, frequent cleaning increases the chances of mixing Acetone with
resin and ruining the cure with pits, fisheyes etc.
Much is made of using only real marine epoxy resin such as West Systems or
Raka. I read where only a couple people talked about Polyester resins, but
the majority of people said don’t use it. I’m gonna’ commit heresy here and
admit that I used polyester resin. It’s cheaper, more readily available and
easy to work with and sand. You also don’t need to be so exacting with the
hardener mix. I used liquid instead of the cream type hardener and just a
momentary squirt (about 1.5 seconds) into a half-inch deep portion of resin
in one of the leftover containers seemed to be about right. It held up for
about 10 minutes worth of work time at 75 degrees before it started to stiffen up. I figured I wasn’t building a boat to compete in the America’s
Cup here and she wouldn’t be shooting class 5 rapids or be transported long
distances, so the Polyester should hold up just fine…and so far I’ve been
right. Nary a leak. Plus, I wasn’t looking for that clear, blinding shine
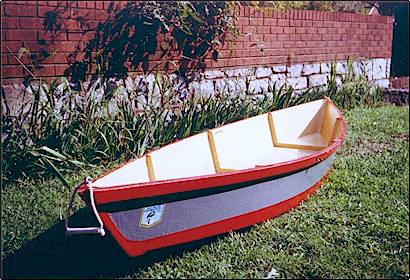
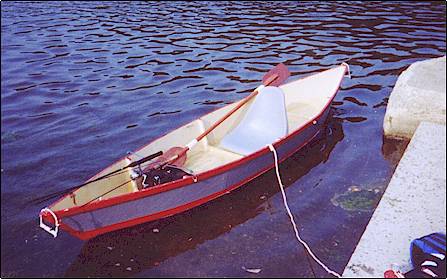
that true epoxy gives since the ‘Charldonjes’ is painted.
I highly recommend you try building a boat at some point in your life. I’ve
been hard pressed to remember a project that gave me such a feeling of accomplishment. And true to form, (and to the warnings I received if I built
one) I’m already thinking about the next boat, a bit more involved, a bit
more challenging I think. Something along the lines of Chesapeake Light
Craft’s Millcreek 15 maybe. We shall see. |
