"Conestoga
Cover"
30 Degrees; rain & sleet; gray and overcast.
No great problem with my sailboat wrapped up in my back driveway. There
is about a 20 degree higher temperature under the Silver-gray plastic tarp;
even in weak sunlight. The wind fluttering the fore and aft portions of the
cover will both ventilate {to prevent mildew} and act as a self shedding
action for snow.
It also gives me a boat workshop.
MAKE SURE the boat is SECURED to the trailer {or yard stands} and that
the TRAILER IS SECURE on JACK STANDS or HEAVY DUTY SUPPORTS.
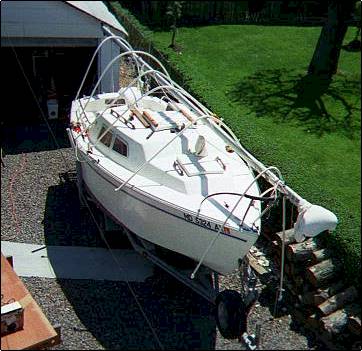
Your typical micro- or mini-cruiser has a bow pulpit. {If not, this is a
wise investment to think about installing.}. The "trailerables"
have some sort of mast crutch that fits the rudder gudgeons. If you dont
have one there are the handymans staples of 2x4's or PVC pipe readily
available. Pad the top of the bow pulpit; I use a split section of HEAVY
RUBBER GARDEN HOSE.
Suspend the mast across the protected pulpit forward and the mast crutch
aft; adjust the mast position so that only 2 or 3 feet projects behind the
transom. Disconnect any shrouds if necessary. If your trailer tongue sticks
out beyond your bow by 4 to 5 feet it can be protected by the cover and a is
a securing point as well. Make a support for the middle of the mast;
mine is a simple piece of 2 x 4 held in the tabernacle. This will prevent
"bowing". I secure the mast ends with inexpensive rubber straps.
Cheaper then Bungee Cord for winter use.
Everybody either has worked with "plastic pipe" or has seen the
stuff in the local "hardware emporium". Its usually indicated
as "Schedule 40" or 60 or 80, etc. depending on its intended
use. This, because of CODE, is printed along the length of pipe itself.
"Plastic" pipe by its very nature is a thermoplastic
material. That is it softens with heat, and printed on the pipe is the key
... " not for use above 140F". A little applied logic about safety
margins, wall thickness, volumes, and curves, and I had it.
At sea level water boils at 212F, PERIOD. No matter how long it boils it
wont get above that temperature. There was my constant. The pipe was
HEAVY gauge PVC water pipe, NOT the translucent plastic or gray drain pipe.
I wanted; several "hoops" from the bow pulpit to the aft mast
gallows, looped over the supported mast. With padded blocks of
wood for feet, resting against cleats or toerail, they would act as
"flying buttresses" and take the strain of the cover, NOT the
mast.
To get the proper "curve" I measured gunnel-to-gunnel at the
points of intended support. I then calculated the VOLUME per INCH (inside
diameter) of the pipe. I used ½ inch for pulpit and gallows, 1 inch for the
rest. A 2"x4"x 8 feet long ( my West Wight Potter,
"QUAHOG" has a 7ft max beam), a ladder and some shock cord was my
"forming jig". Depending if you have help or not, you may need to
have some pegs and a drill.
Secure one end of the pipe to the 2x near one end. (Drill a
DEEP hole, use a THICK peg, secure the pipe AGAINST the peg with shock cord)
Wrap it well with the shock cord. This will be the "base point"
for all bends. Measuring from there mark where the other end,
(beam-to-beam), will be. Now youre going to need some muscle and CARE.
BEND the free end up to which ever mark is desired, and SECURE it with the
shock cord. THERE IS A LOT OF STRESS HERE, SO BE CAREFUL. Place the 2x over
the ladder, or some other place which will allow access to the OPEN ENDS of
the pipe and the curve to hang down. Measure the CURVED AREA; tangent around
to tangent, as if it were half a circle. MULTIPLY that times the VOLUME per
INCH for how much BOILING water to use. DONT FILL the
pipe, it will form a CIRCLE, you may lose your attachment points and be
scalded. For a SMOOTH curve, use a funnel and pour HALF
the calculated quantity of water into EACH END of the pipe. [If you
do this when its cold the curve develops almost magically; its fun to
watch it equilibrate itself ] After the curve has "settled" spray
it with cold water, then lay the whole thing down and flush it with cold
water.
It really takes longer to describe than to do. Really no waste; 10 ft
sections of pipe are standard, can be joined for longer lengths, and just
about last forever. The "jig" is any 2x4 and can then be used for
whatever else you want, and everybody has lengths of "bungee
cord".
Pad the top "side" of the mast. Old sheets, blankets, towels,
or sails . . . anything that will prevent chafe or puncture. Pad the ends
too . . . I padded and used plastic buckets.
Now comes the reason for all the padding.
A 19ft x 25ft "Ultra Heavy Duty, PLASTIC COATED, guaranteed for 3
years" silver-gray tarp only cost $45.00 - - - BUT you CAN
PUNCTURE IT. Get a hank of polyester tie-down line, use the grommet points
and GENTLY PULL the tarp over the "ridgepole"
created by the mast. Wrap the tarp around the boat {and trailer tongue, if
desired} and tie it down snugly but not "bowstring tight".

The fact that you are above the ground, and the ends of a rectangle are
wrapped around, allows air circulation. Now, even if you dont go aboard
until spring, you wont have mildew growing over everything. With a
transom mounted boarding ladder, or a short step ladder and a little advance
thinking on your wrapping technique, its an easy matter to get in and out
of the cockpit.. The amount of headroom you have depends on your mast crutch
arrangements.