|
Technical Drawings
Usually, a set of
technical drawings consists of a Body view, a Profile view and a
Plan view. The Plan view is
sometimes called the Seagulls view.
The Plan view is divided by the longitudinal centerline into two
halves that are each others mirror image.
For that reason the drawing can be simplified to an illustration of
one side on the centerline.
It is called the half-Breadth view.
See figure 2-1.
Once you become
familiar with and accustomed to the set of plans, it is easy to
forget that they are nothing else than projections that often give a
complete different, sometimes distorted picture from the reality.
To give an extremely striking example:
A straight line in a Profile and half- Breadth view can show up as
just a single dot in the Body view, i.e., the center line.
Only by looking at the first two illustrations do we become aware
that the dot in the Body view represents a full straight line.
Another example is that a circle can show up as a
straight line in two projection planes.
Only the third projection will give us the real picture.
Plans of a Double-Ender
Figure 2-1 shows the three projection drawings of a
16-ft. Double-Ender with constant flare.
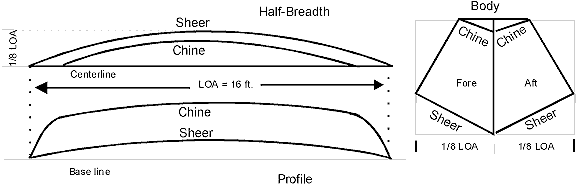
Fig. 2 - 1
Set of plans of
a Double-Ender
In de Half-Breadth and Profile view the sheer lines
show up as parts of elliptical curves.
In the Body view that sheer line is a straight line!
Also, the sheer line in the Body view is the
hypotenuse of a right triangle.
That right triangle conforms to the other right triangle above it
on the side. The hypotenuse
of this second right triangle is the side panel of the hull.
The angle between the long leg and the hypotenuse of that right triangle
represents the constant flare angle
of the side panel.
In the right triangle of which the sheer line is the
hypotenuse, the horizontal (long) leg represents the
width of the half-Breadth at Beam
in the half-Breadth view. This width is
1/8 LOA
= 24".
The vertical (short) leg of this triangle is the
Profile height at Beam in the Profile view.
IF that Profile
height is
10",
the hypotenuse/sheer line is
26" according to the theorem of Pythagoras
(a2 = b2
+ c2).
The late John Gardner states on page 43 in
The Dory Book that the sheer
line of the Double-Ender is a natural
curve. By definition
that means part of a circle (arc).
A chord is a straight line on which a circle arc
stand. The half-Breadth view shows us clearly that chord.
It is the centerline of the drawing.
The length of the chord = the length of the centerline = the
Overall Length:
LOA =16 ft. = 192"
To draw the real sheer line has now become the grade-8, secondary school,
mathematical problem how to draw a circle arc on a chord when you know the
length of the chord, and the height of the arc above the chord.
Rephrased, the real question is: Calculate the
radius of a circle arc standing on a chord.
The chord is 192", the height of the arc is 26".
I obtained my
high school certificate in 1939.
Since that time, all that I had ever used from all the mathematics
that I had crammed in high school was Ohms Law, which is expressed by the
formula
V = I x R.
I had needed the
formula to figure out the rating to replace a blown-out Xmas-tree light in
a series string. My knowledge
of mathematics had stifled, and rusted over in a far away corner of the
brain box. I searched some
old school books that my by-this-time-married children had left behind.
But having learned mathematics in Holland, I had a hard time with
the expressions of the English language equivalents in 1990, 50 years
later. I experienced one of
the very few moments that I felt lost.
An accidental
fall into a seven-feet deep hole landed me on a concrete basement floor
and subsequently in the hospital with a broken Ischium bone.
In the other bed was a cabinetmaker with a locked shoulder.
He read a
woodworkers magazine. I was
reading WoodenBoats. Hospital days are very long, especially if you are not real
sick. The next day we
switched magazines. On page 4
was the solution of my problem.
All you need is to apply the Pythagorean equation.
See figure 2-2. The
applicable numbers are already put in
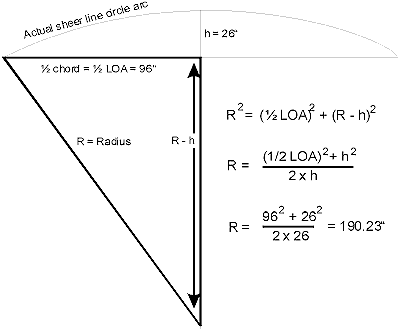
Fig. 2 - 2
Radius of a
circle arc segment on a chord
THE KEY
Do I hear the
question: Now that you can
calculate the radius of the sheer line circle arc,
SO WHAT?
In the month that I was forced to sit out the healing
of my broken bone, I discovered that once I knew the radius of the sheer
line, it is easy to figure out:
1.
The height of the arc at each station. That
determines the exact location of
the station lines in the Body
view. They can be drawn in
into figure 2-1. See figure
2-3.
2.
Once you do that, all the values of the Profile heights and
half-Breadth at the stations are at your fingertips.
You can compile the offset table of the hull lines
3. The exact real
bevel angles of the cross frames
and the transom.
4. The width at
each station, and the total length
of the expanded side panels
5. The length, the
shape, the
rake, and the crosscut
angle of the (bow) stem).
6. The measurement
and the shape of the bottom.
What is more important: It
was no longer necessary to calculate any of these figures.
A full-sized Body view drawing reveals all this information.
Take off the measurement with a dividers compass.
Transfer them to the building material directly.
A method that is far more accurate and certainly faster than
measuring with a ruler and loft the hull from the offset table.
Profile and half-Breadth drawings have become redundant.
Offset tables, often a primary cause of troubles, are no longer
needed.
A successful project starts with an accurate
technical drawing.
My technical drawings are reduced to a circle arc on
a chord, and a right triangle.
You cant go far wrong with that, or improve the
degree of accuracy! Even if
the drawings are scaled down to the easy to handle size of ¼, a high
degree of accuracy can be achieved.
On top of that,
IF
you know how to use the Staedtler-Mars scale (ruler) #987 18-34 and make
the drawing on one-inch-grid graph paper, you can use the same figures
from the full-sized illustration.
No conversion calculations, not the slightest
chance of making mistakes.
Practically, a foolproof method.
My SET OF PLANS for The Double-Ender
Figure 2-3A and B are just that.
In figure 2-3B, the locations of the station lines are plotted onto
the hypotenuse. Since the
vertical middle line divides the drawing into two mirror-image-equal
halves only one half is drawn, just as the half-Breadth drawing replaces a
full Plan view illustration.
In figure 2-3B the long,
24",
horizontal leg of the right triangle is the half-Breadth at Beam.
The vertical,
10",
short
leg is the Profile height at Beam.
The
26"
hypotenuse represents
hn = hBeam = h8.
For clarity, only the locations of the
even-numbered station lines are
plotted on the hypotenuse. Besides that, more frames are seldom necessary.
If both drawing
are made on one-inch-grid graph paper, the numbers of the offset tables
can be read-off from the drawing.
As mentioned before, it is a lot quicker and more
accurate to transfer the dimensions to the material with a dividers
compass. Good bye and good
riddance offset tables!
If any of the readers can shows me a better, faster,
and more accurate way, IMHO, I think, we all like to hear about that.
The drawings also make a Profile and a half-Breadth
view redundant, be it with one
definite and
one possible exception.
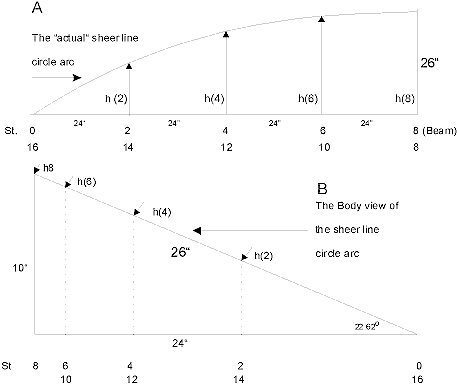
Fig. 2 - 3.
Actual sheer line circle arc (A)
Body view of the sheer line arc (B)
Note: The drawing A and B are made to scale.
However, for clarity, the scale of drawing B is 4 times the scale
of drawing A
The Exceptions: Bow stem and
Transom
The real
shape of the bow stem can be
seen only in the Profile view.
Also, if the hull has a raked transom, its real length and rake
angle only show up in the Profile view.
Before this is
explored, you have to get acquainted with a couple of other
short cuts that facilitate building a hard-chined hull.
That will be shown and discussed later.
Cross Frame Bevel Angles
To obtain the maximum bearing surface for a good
connection to the side panels, the side edges of the cross frames and the
frame linings are beveled.
See figure 2-4. A skilled
carpenter has no difficulty with that.
If it does not fit perfectly, a couple of strokes with a plane, et
voila´.
Plywood edges and narrow lining battens are difficult
to plane. Beginning amateurs
usually dont have good carpenters skills.
I should know, because I dont have them still.
But the skill is not necessary.
The bevels are easily cut with a table saw.
Never take the
bevels from the half- Breadth view.
They are always wrong.
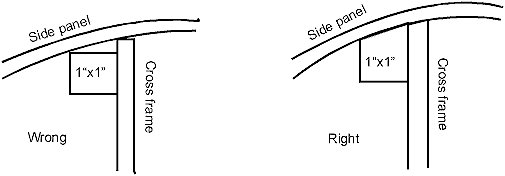
Fig. 2 - 4
Side panel
bearing on cross frame
A bevel angle of a cross frame is equal to the center point angle between
the radius of that particular station and the radius at Beam. See figure 2-5.
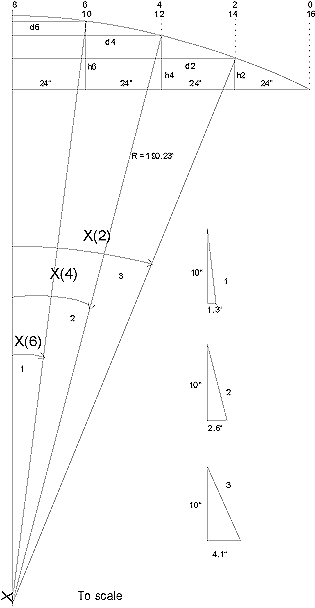
Fig 2 - 5
The cross frame
bevel angles are equal to the center point angles
The sine of the center point angle X4 is
Sin angle X4 = d4/R = 48/190.23 = 0.252326. The angle
X4 = 14.615º. In the same way,
Sin angle X2 = d2/R = 72/190.23 = 0.3785. The angle
X2 = 22.24º, and
Sin angle X6 = d6/R = 24/190.23 = 0.126. The angle
X6 = 7.25º
The pleasant thing is that you dont need to do any
calculation! Transfer the
size of each center point angle of the actual circle arc drawing to a
triangular piece of scrap plywood as shown in the drawing.
Place that right-triangular template with its short leg on the
table. Tilt the saw against
the hypotenuse. The bevel
cuts will be dead on.
Cutting the templates goes faster than making the calculation.
Mark the
templates clearly, because they are needed for #10 frame (= #6), #12 frame
(= #4), and #14 frame (= #2). That way, the bevel angles of the corresponding frames are
perfectly equal.
Sheers and
Chines, Barend. |

