| I wasn't really prepared for what was going to happen to me when,
at the age of 45, I happened to see a copy of a magazine I had never heard
of before at the newsstand. It was called Watercraft and I had to buy it.
I have throughout my live had a latent interest in boating, an interest
that has been steadily rising the last six or seven years. I am especially
interested in sailing, but never, ever, had I thought of actually building
a boat of my own. The picture that was to change my life (at least life in
my spare time for the next couple of years) was of Phil Bolger's Queen Mab,
a 7´ sailing vessel with beautiful rounded lines, gaff cat rig and offset
centreboard. It looked very neat and the text mentioned that it could
double as a varnished bookcase in the living room during off-season. I
kept coming back to the picture and gradually a thought began to grow
within me: If it could spend the winters in a living room, then couldn´t
it also be built in a living room (I live in a city apartment)? Of course
it could, and if other people could build one, couldn't I do it too? Of
course I could, and by god, I was going to!!
This may be the right place to mention that my father was an amateur
boatbuilder. Between 1939 and 1963 he built, in his spare time,
altogether 14 boats, all in sizes around 13´- 15´. Hence there
may be something genetic in it all.
My manual arts lessons in school back in the sixties did not produce
anything that could be displayed in my ancestral home except in areas
outsiders were not expected to visit. During the seventies, eighties and
nineties I did nothing to improve those skills. That could become a
problem, but I was older and wiser now than back in school, and my
patience had grown. With a lot of common sense and afterthought, what
could possibly go wrong?
The first obstacle to overcome was to get the actual permit to build
the boat in our living room. It is about 5 x 5 meters (17´ x 17´) and we
have two children, at the time 4 and 6 years old. However, their mother is
a librarian and when I gently raised the issue, emphasizing the
winter-bookshelf function, my working permit was granted with no problem.
Next step was to use the internet to trace down someone who had
actually built the boat and ask some questions. The answer was not
encouraging: Queen Mab is a difficult boat to build, and not suitable for
beginners. I was recommended some easier plywood stitch-and-glue small
dinghy.
|
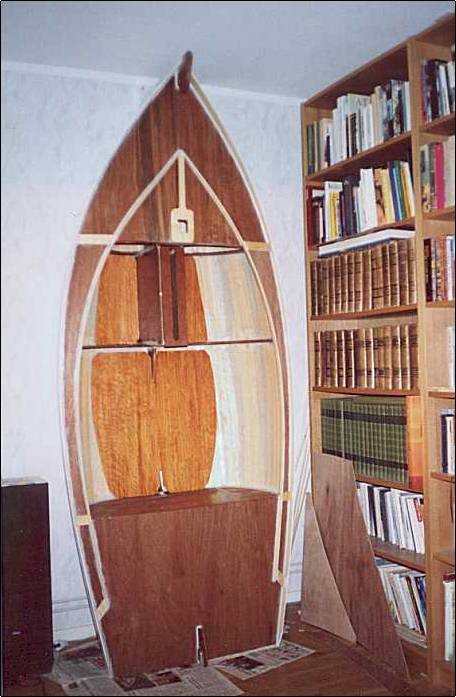
The frames glued to
the backbone |
If I have some boat-building genes inside me, I have probably even more
boat-designing genes, so this answer was the perfect excuse to enter an
even more narrow and winding track. I have worked as a mechanical designer
for 20 years so my self-confidence, when it comes to designing things, is
solid. I started at once to make drawings and think out ingenious design
features. Compared to Queen Mab I wanted a slightly bigger boat. The
living room ceiling is 8' so I settled for some 3" less than that. I
wanted the centreboard in the middle for a reason I will come back to
later which would mean a seating position with one leg on each side of the
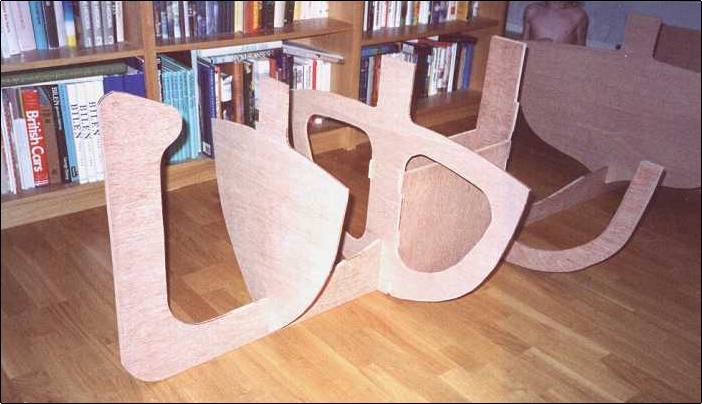
centreboard trunk. After a month or so I was ready to start the work. I
bought some cheap Meranti plywood and started cutting out backbone,
bulkheads and frames, full of enthusiasm. Today I am thankful I did not go
for more expensive materials. I should mention that residents in my block
have access to a small workshop with an electric band-saw, so all sawing
was done there.
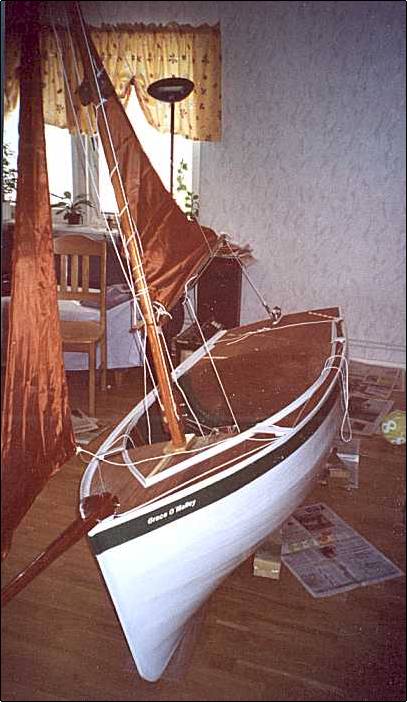
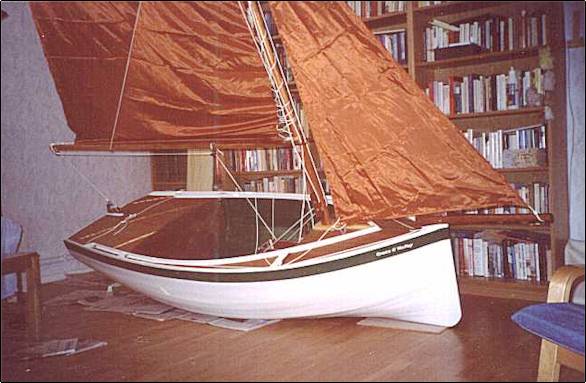
The name issue is important and needs to be attended to in an early
stage as it takes time to find a name that feels 100% right. Having named
three boats to this date I know that it is difficult and that you usually
know instantly when you have found the right name. Since the hull shape
and rig was intended to be a miniature copy of a British-style 19th
century sailing cutter (but with a sloop rig) something in style with that
would feel right. "Grace
O´Malley" (after the Irish 16th-century female pirate captain) was the
name I was looking for.
When the frame pieces were cut I should really have assembled them and
started the strip planking but I didn't know where to get the strips.
Buying cedar strips from England was one option, but a very expensive one.
Cutting them out myself from spruce planks would be another option, and I
actually made some tests but the result was of a very poor quality. While
time passed and the strip issue was becoming more and more of a problem, I
worked on the other parts: Mast, boom, gaff, bowsprit (yes, of course)
rudder and centreboard.
The centreboard deserves a little chapter of its own: Since the boat
is small and narrow and I am too old to appreciate falling into the water
all the time the stability of the boat was a high priority. The seating
position would be a bit cramped and shifting my body weight to balance the
boat would not be easy. To step over to the centreboard in case of a
capsize would hardly be possible. In fact, falling out of the cockpit and
into the water without being able to re-enter would be the likely outcome.
A ballasted and even bulbed ballasted centreboard would be the solution. I
had never heard of that on a small dinghy, but why not? To get the bulb to
pass through the slot in the centreboard trunk this would have to be
designed with a "adapter"-piece filling out the gap between the 3" wide
opening in the centreboard trunk necessary for the bulb to pass and the 1"
width of the actual centreboard. This pice is made so it can slide on the
board between the bulb and the upper end where a mechanical stop-piece
prevents the board from disappearing into the depths. I got two iron bars,
about 8 lbs each to glue on to each side of the bottom of the board. To
get a sufficient lever for this iron the board was made 4´ long, which
would mean more than 3´ draught when it was down. When it was finished,
except the iron, it struck me that it felt very heavy. Laminated from
plywood to a thickness of 1" it weighed 10 lbs. Good, was my first
thought, weight low down. But then I realized that in the water it would
be more like lifting force low down. Since the density of the plywood is
around 0.5 a weight on land of 10 lbs would mean a lifting force equaling
10 lbs when submerged. And since the 18 lbs of iron would only weigh
around 15 lbs when submerged the effective ballast would only be some 5
lbs. Something had to be done. So, I came up with a kind of solution: the
water-ballasted centreboard. I tried to delaminate the massive one but
delamination only occurs when it is not wanted, so I cut it up to pieces,
and started designing a new hollow one with only 4mm (1/6")plywood sides.
That went better, the wooden parts weigh 6 lbs so there is 9 lbs left as
effective ballast. I know that the real figures are better, because the
lever is greater for the steel parts than the wooden parts but the real
lesson from these figures is that wood has nothing to do on a centreboard
designed to provide stability on a small, tender boat. It should really
all be heavier than water.
But back to the hull: The winter passed and we were well into April and
I had not yet decided how to achieve the strips. Then, just when I was
about to go to the local wood supplier to buy some unprofiled strips to
assemble with a lot of epoxy filler I got lucky: I chanced to come across
the internet site of the Swedish canoe manufacturer
Wermlandia who mentioned that
they made their own profiled concave/convex strips in Western Swedish
Spruce. I asked, and yes, sure I could buy some. The price was even lower
than the unprofiled ones I had almost bought....
So I started it all in a great haste, eager to be afloat before summer
ended. The result was predictable: Bad. First I glued together the
backbone and the frames to fix the strips on. The reason was that I wanted
the centreboard trunk to be an integrated part of the structure instead of
cutting out holes later. I will not do like that next time, since it made
the inside finishing very difficult. Then I started strip planking from
the sheerline and worked my way down (or up, as the boat was upside down).
I did not use staples, but fixed the strips with clamps and weights and
various other ingenious devices to keep them in fixed positions, gluing
them to the frames. Steaming, when it was absolutely necessary, was done
over a boiling pot in the kitchen which limited the length of strip to be
steamed at one occasion to around 20 cm (8").
Pretty soon I discovered that as I added strip by strip they were
beginning to abandon contact with the frames. The natural radius for them
to form as they were assembled on top of each other was bigger then the
radius of the frames. And yet I had used some violence to get them there.
At this stage, I should have sat down and used my brain to try and save
the situation. Instead, eager to finish the hull and give the living room
back to the rest of the family, I said to myself that any esoterical
imperfections could be covered up with filler in the end. Thus I just
re-started the strip planking a bit further up. This meant that instead of
one line on each side where the strips met and had to be cut to fit, I
ended up with three such lines. And since they were meeting at different
angles, the gradually shorter strips which filled this gap had to be
placed alternately from the upper side and from the lower side, ending up
in a zig-zag form of chine. It was somewhere around this period that I
realized that there would have to be a Grace O´Malley II.
It is now time to establish the "LGD" index, meaning "Looking Good
Distance". At this stage of the project I estimated LGD to be around 35-40
metres. That is quite a lot for a boat of so small dimensions. I will not
reveal the amount of polyester filler I applied to bring down the LGD to
10 meters, let me just say that it would probably have taken an additional
1-2 kgs in order to entirely drop the LGD index. Sheathing and painting
the outside white did not reduce LGD, but rather increased it.
If the hull is the depressing part of this project, the deck is the
positive part. Apart from the epoxy filler stains that have discolored the
Meranti surface in some places it looks quite OK to me. Next time it will
be even better.
Some more design features: The rudder is pivoting, and the steering
is by wire via an endless loop of 4mm line going around the seating
compartment and attached to the tiller. The centreboard is raised with an
extra halyard from the mast top, purchase 1:3. There is also an extra
halyard for lowering the flying jib and bringing it in to the seating
compartment, since there would be no other way to retrieve it should it go
overboard when lowered. Watertight compartments fore and aft contains some
125 litres of buoyancy. My previous experience of homemade watertight
plywood structures is bad, so I filled these with foam, quite an
unnecessary expense really.
The backbone protrudes some 2-3 inches inside the boat so a seating
surface is made by a plywood piece, supported by and glued to the inside
bottom with PU foam , a rather sticky and unpredictable material to work
with until it has hardened.
All this filler in combination with some over dimensioned structural
components means that the finished weight of the hull amounts to around 60
lbs. In Grace O'Malley II the target will be 50 lbs. But first maybe I
will go a strip planking course, not that I really need it, but just for
fun.
The rig is a traditional sloop rig, with a total sail area of 33 sq.
ft. divided between a flying jib and a gaff main. This is slightly less
than an optimist dinghy, the natural opponent. The sails themselves are
home made by some cheap air-tight synthetic cloth. If the rest works O.K.
I will make new sails of proper sailcloth.
The maiden voyage is to be made this summer in a nearby lake as soon
as the water temperature has reached some 18-20C (65-68F). The good thing
about the lake is that it is quite narrow so solid ground is nowhere more
than two hundred meters away. The bad thing is that the lake is the summer
recreation spot for the entire city of Umeå. I plan to be there very early
in the morning when the likelihood of a large audience is small. One of my
friends will be present to take pictures which will be nice to have in
case the first trip also turns out to be the last. Please look out for
more information later this year.
See the Launch of Grace O'Malley |