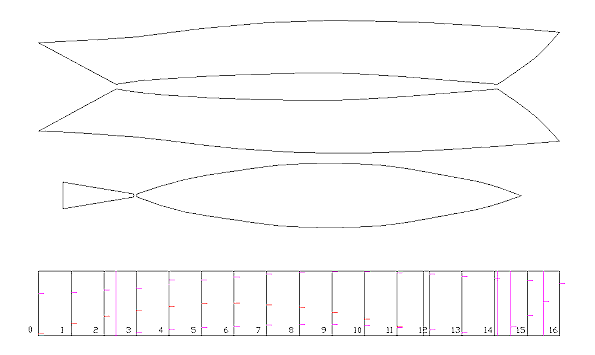
TRANSOM
The transom is a small tombstone style transom which is also made of
1/4" plywood. Many designs call for a thick transom, however the small
size of the transom means that 1/4" plywood is sufficient. The transom is
drawn out on scrap plywood from the bottom or side panels, wherever you
can find a triangle area about 10" by 26". Note that the transom must fit
the actual dimensions of the bottom and side panels, and that the transom
fits over the ends of the side panels (not inside them) and sits on the
bottom panel. Draw a centerline about 26" long. Draw the transom bottom at
a total of 1 3/8" wide, (0-0-5 + offset on either side of the centerline).
Check the hull side panel and determine the transom side length. The total
width of the transom at the top is 9 3/4" (0-4-7 offset on either side of
the centerline). So you know the length of the transom side and the offset
from the centerline. Make an arc from the bottom corner of the transom
using the transom side length on each side of the transom. Then find the
point on the arc that is exactly 0-4-7 offset from the centerline. This
marks the top corner of the transom. After you have marked the top corner
of the transom on both sides, you can draw the rounded transom top. I used
a 4 to 6' radius (I didn't write it down!). Clamp down your part on a
large table, and extend the centerline out past the bottom using a thread
and pins. Install a clamp so that the bar is on the centerline about 5'
from the transom top. Make a loop in baling wire and slip it over the
clamp bar. Make a loop in the other end of the baling wire so that a
pencil inserted in the loop passes through the transom top corners. Draw
the curve. This is all easier to do than describe in writing. Cut out the
transom. Do not drill wire holes in the transom until assembly.
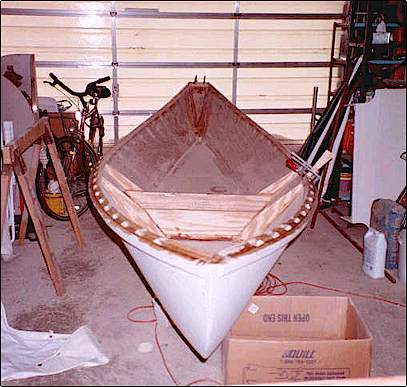
HULL DOUBLER
The hull doubler is optional. When I was putting my boat together, I
had a fit of paranoia and thought that the hull would flex too much at the
point where I stood on it to get in. So I cut a floor board from scrap
1/4" ply and epoxied it down under where the seat is and where the rowers
legs are. It was 4 feet long and was cut a little smaller than the bottom.
After the hull was assembled, I sanded the hull doubler to fit over the
hull side tape and fillets, and laminated it down with lots of
epoxy/filler and weight. I then filled around it with epoxy/filler and
added glass tape to the sides. If you want to strengthen the boat but with
some weight penalty, add a doubler. I installed mine from Station 2 plus
10" to Station 6 plus 10", which lines it up with the forward seat frame
and extends it past the footrest. I will not put the doubler in my next
boat because I think the seat frame and foot rests stiffen the bottom
enough. I want to be able to carry my boat, and every ounce counts.
Assembly
The assembly method is to wire (stitch) the panels together and then
to use a spreader to force the side panels apart, which bends the bottom
up at the ends and gives the boat rocker. Because there is no frame, it is
important that the wiring be equally tight on both sides of the boat, and
that there is a regular pattern of wiring points. High stress areas such
as the fore and aft ends of the bottom receive more wiring points. When
spreading the hull to prepare for fiberglass and epoxy tape, the hull is
supported at the two ends of the bottom and a weight is put in the middle
of the boat.
I used a thin steel baling wire to wire the boat. It is not
particularly thick. A slightly thicker wire might not cut into the plywood
as much, but the baling wire did fine. The procedure I suggest is based on
experience of having to restitch the boat two or three times to get to the
point where I could spread the hull and fillet and tape the interior. You
don't have to be this precise, but the way I describe it should work the
first time.
Drilling holes for wire should be done symmetrically, so there are
the same number of holes in the same places on both sides of the bottom.
The best way to do this is to predrill the sides while they are clamped on
top of each other. Choose a drill bit that allows your wire to pass
through the hole easily but without too much extra space. The wiring holes
should be located as close to the edge of the panel as possible without
allowing the wire to rip out the plywood. For the middle of the boat,
where stresses are low, drilling the holes a little less than 1/4" from
the edge of the plywood is acceptable. Near the corners and on the stem
curve, stay about 3/8" from the edges.
DRILLING THE SIDE PANELS
NOTE: Do not drill the transom or bottom until assembly.
Clamp the two hull side panels together and make sure they are
aligned perfectly. Starting at the stem top, drill the first hole at the
corner, 3/8" from both top and side. Drill a second hole 1/2" down from
the first as a reinforcement. Drill the next three holes further down the
stem, 1" apart. Then move down the stem and drill two holes 3" apart.
Starting at the bottom of the stem, drill a similar pattern of holes
moving up, making sure that the first is in the very corner of the stem
bottom. Complete the middle of the stem by drilling holes about 3"-4"
apart, evenly spaced.
At the transom bottom on the hull side, repeat the pattern, moving
up the transom about half way. Repeat the stem top pattern at the transom
top on the hull side. DRILL THE HULL SIDE, NOT THE TRANSOM.
Starting on the forward corner of the bottom line of the hull side,
drill three holes about 1/2" apart. Drill the next three holes about 1"
apart. Drill the next three holes about 2" apart, and then continue to the
middle of the panel at about 4"-6" apart. Repeat the pattern starting from
the aft corner of the bottom line of the hull side.
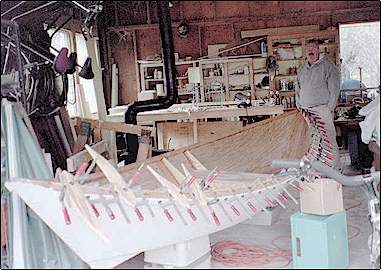
DRILLING/WIRING/STITCHING
Wiring is basically taking a length of wire, sticking it through two
holes, aligning the panel edges and twisting the wire tight.
Just keep in mind through this process: the bottom fits over the
hull side edges and the transom edge. The transom fits over the hull side
edges.
Start by wiring three or four holes in the middle of the stem curve.
Do not wire the corners at this time. These first stitches are preliminary
and should be slightly loose. You will likely remove them and replace them
with tighter wire stitches later, because the bending involved in getting
the hull to the right shape will stretch and weaken the preliminary
stitches. Next, align the transom and drill three or four holes on either
side of the transom to match the holes in the hull side exactly. The
transom bottom should be even with the hull side bottoms, and the transom
fits over the ends of the hull sides. It is very important to position the
holes so the wires will pull the parts together with the correct
alignment. Wire a few preliminary stitches on both sides of the transom
and the hull sides. Check the alignment of the stem bottom, and wire the
stem bottom corner reasonably tight but not so tight that the wire will be
ripped out when the sides are spread to fit the bottom. Repeat with the
stem top, and transom tops and bottoms. Check alignment, drill a few
holes, wire them up, and move on until the stem curve and transom are
wired up completely.
 To add
the bottom and turn the flexible mess into a boat, turn the hull upside
down on a table, and start at the rear corner where the transom, sides and
bottom come together. Drill three holes along the width of the transom
bottom. Align the hull bottom with the transom bottom, with the hull
bottom over the transom edge and drill the mating holes in the correct
position. Putting the holes in the right place is very important! Wire
them up tight. Spread the sides out a little so they roughly approximate
the shape of the bottom, and put the hull bottom on the edge of the side.
Starting at an aft corner, drill a couple of holes in the bottom to match
the first few holes on the side panel. Do not drill more than a few holes
at a time. Wire them up, and move to the other side, repeat. Continue this
process a few holes at a time until you reach the stem. Complete wiring
any holes that are not yet complete. To add
the bottom and turn the flexible mess into a boat, turn the hull upside
down on a table, and start at the rear corner where the transom, sides and
bottom come together. Drill three holes along the width of the transom
bottom. Align the hull bottom with the transom bottom, with the hull
bottom over the transom edge and drill the mating holes in the correct
position. Putting the holes in the right place is very important! Wire
them up tight. Spread the sides out a little so they roughly approximate
the shape of the bottom, and put the hull bottom on the edge of the side.
Starting at an aft corner, drill a couple of holes in the bottom to match
the first few holes on the side panel. Do not drill more than a few holes
at a time. Wire them up, and move to the other side, repeat. Continue this
process a few holes at a time until you reach the stem. Complete wiring
any holes that are not yet complete.
Is the bottom longer than the sides? I drew up the plan so that the
bottom should be a little longer than the sides. When you get close to
wiring the forward end of the bottom, mark the shape of the sides on the
bottom, and use a jigsaw or sander to trim the bottom down so the bottom
and sides fit together well. This is the area where you will be able to
tell if I did a good job writing down the offsets. Please let me know how
this fit for you at
admin@cruisenews.net .
Check alignment, are there any problems? If so, feel free to remove
any old stitches that are not holding the hull together correctly and to
drill new holes and restitch. Go through all of your stitches and inspect
the wire carefully. Hit it lightly with a pliers and if it is loose,
tighten it up until it sings. Grab it with the pliers and shake it a
little and see if it breaks. Don't cut off the ends yet. Check each one.
Everything OK? Then its time to spread the hull.
Turn the hull over (avoid getting jabbed by the thousands of sharp
points!) and support it by a couple of cinder blocks (or similar) on the
floor, with the blocks near the fore and aft ends of the bottom panel. Put
a weight in the middle of the hull (5 gallon pail full of water) and watch
the hull assume a beautiful shape. Take a piece of wood and a few clamps
and find a way to spread out the hull sides a foot or two aft of the
middle of the boat. I fastened a clamp on each side of the hull and cut a
batten to the right length to stretch the sides by jamming the batten
under the clamps. After admiring it for a while, remove the weight and
spreader until you are ready to fillet and tape the inside. You should
install the spreader when you tape both the interior and exterior chines.
Taping the hull
Cut 4" wide pieces of 6 oz fiberglass tape. You will need two pieces
about 14' long (measure the inside chines and add a few inches on each
side), a piece for the stem about three feet long, and two pieces for the
transom about 2 1/2' long.
Taping is a job that you have to do in one shot. Running out of
epoxy and running to the store for more halfway through is probably going
to be a disaster. So have your workshop organized, prepare for every step
of the process, have the stirring sticks, the plastic gloves, the goo
squeegee, the silica filler powder, the tape, the cleanup products,
plastic bag, trash can, rags and and everything that you will need
standing out on display. Go through a dry run and imagine goo dripping
everywhere, how do you deal with it?
Check each wire again, replacing any that are broken, loose or are
of questionable strength, and when you are satisfied with the wiring and
the boat seems ready to be glued together, put the hull back on the blocks
and weight the center. Put the spreader in and stretch the boat just a bit
further than you want it to be when its done (it will relax a little when
the spreader is removed). Look at the alignment of the edges, and at the
curves of the sheer (top). Hang a plumb bob and look down the centerline.
Does it look pretty fair and balanced, no bulges out to one side? If so
you are ready to rock and roll.
Take a large flat screwdriver and gently push each and every wire in
towards the joint on the inside of the boat. Take a one inch paintbrush
and paint clear epoxy on the plywood about 3" on either side of all the
joints. Mix up a pot of thick epoxy/filler (peanut butter consistency) and
use a squeegee together with a one inch putty knife to push the filler
into the joint. Another way to do this is to use a plastic bag and cut a
small hole in the corner and squeeze the epoxy/filler out. Use a rounded
stick or squeegee to cove (round) the filler, maybe a 2" radius curve in
the middle of the bottom, and 1" or less in the stem. Clean up any extra
filler laying outside of the coved (rounded) area. A good cove is about
one inch wide (more or less), except for the stem which will be narrow due
to the sharp angle. Use a lot of filler in the stem. Have you filled all
the joints? Have you cleaned up the extra goo? Good, move on to the tape.
Gently lay the dry tape along the joints centered on the joint.
There should be at least an inch or more of tape touching the plywood
outside of the filler cove. More is better. Try not to gouge into the
filler cove too much, be gentle, no need to push it in or anything. Take
the paintbrush and paint clear epoxy over the tape, sticking it down. Keep
it centered nicely. Are you getting gooey threads that are a pain to deal
with? Me too. If you can get them off with the paintbrush, slobber them on
to the wastebasket or a piece of cardboard or something. Otherwise just
leave them hanging in the air rather than disturb the rest of the tape.
You can get them off after the epoxy cures.
You can cut off the ends of the tape that hang over before you start
epoxying it, or you can let them hang over the top of the hull a little
and cut them after the epoxy cures. Overlapping the tape at the bottom
corners is a good thing, it strengthens the hull at a high stress spot.
Keep putting tape down until all the joints are covered. Are you thinking
that this will never be strong enough to float your bloat? You could add
another layer of filler and tape along the stem. This is the joint that I
think needs a little strengthening, although I have not had any problems.
I used one layer of tape on the inside joints (except where the tape
segments overlap).
When you are done, make a final inspection, then stop poking at it,
turn off the light, leave the room, shut the door, and don't let anyone
near the boat for 24 hours, including you. Don't try to change it while it
is curing, you will only make things worse.
After 24 hours or more, remove the spreader, take out the weight,
and clean up the glass that is hanging above the hull top, if any. Don't
start cleaning up the inside yet, let it cure at least another day first.
Turn the hull over, avoiding the many sharp wire points. Use a wire
clipper to clip all the wires off of the outside. If you can pull the
wires out, go ahead, but if they won't come out, leave them and just clip
them off flush. Use a diagonal wire cutter to get them close to the wood.
Sand the all of the outside chines (joint corners), stem and transom
joints so they are rounded nicely. They should all have nice round
corners, not sharp corners. Now put 4" tape and clear epoxy on all the
outside corners. You may have areas where the tape won't lay nicely, try
shorter pieces of tape in those areas. Once again, let the epoxy cure a
day, lightly sand any rough stuff and then paint another layer of clear
epoxy over the tape to fill the weave. Let cure. Flip the boat, lightly
sand any rough areas on the tape on the inside of the boat, and paint a
layer of clear epoxy over it to fill the weave. Let cure. You now have a
hull which will need only minor framing to make it ready to row.
Sheer Clamps - part 1
Sheer clamps are the boards which strengthen the top of the hull.
Right now, you are just going to put the outside sheer clamp on. I used
3/4"x1 1/2" pine or fir boards which were sold as furring strips and were
extremely cheap. 3/4" is too thick, you may want to reduce the sheer clamp
battens down to 5/8" or even 1/2", they will be easier to work with. The
other dimension is less important for structural strength, anything
between 1" to 3" would be OK, whatever you think looks nice. Next time I
would use nominal 2"x4" pine boards cut down to 1/2"x2". There are three
layers plus the hull width, so you will still get a strong sheer clamp
with a narrow batten. I like the looks of a thick sheer clamp, but it's
definitely another area to remove some weight from the boat with no
strength loss.
You will need to scarf pieces together to make 15'2" pieces. There
will be a lot of stress at the scarf area so make sure you are scarfing
ends together with no weak knots or cracks. I used an 6" scarf, trying to
get 15' out of two 8' sections and one of my scarfs cracked so you might
want to go with a 10" or 12" scarf with two scarfs per batten if you are
using 8' stock. I wasn't too concerned about the crack, I just smeared
epoxy/filler (molasses consistency) in and outside the crack, put a piece
of saran wrap around it, and clamped a piece of furring strip next to it
as a sister to make sure it cured with the right curve.
What, you don't know how to scarf? Well, you probably should get a
book on boatbuilding, but basically it is cutting an angle into the end of
a stick, and cutting the same angle into the end of another stick, and
gluing the two sticks together. When I talk about a 10" scarf, it means to
start the angle 10" from the end of the stick. I drew a line which showed
the area I wanted to cut off to make the angle, and then took a hand saw
and cut it off. Then I took the orbital sander and smoothed it out and
made sure both angles fit each other OK. Then I glued them with
epoxy/filler and clamped them down so they made for a straight 15' stick.
Gluing the outside sheer clamps is a matter of wetting the hull top
and sheer clamp with epoxy and clamping the two together. Do one side at a
time and have at least 10 clamps (more is better). Sometimes the batten
doesn't quite want to follow the curve of the plywood and you have to
clamp it hard and bend it hard. If you have to fight it, you might want to
let the sheer clamp take it's natural shape and either carve off the
additional plywood which sticks up after it cures or fill in the hole with
more epoxy/filler and plywood after you add the inner sheer clamps. I had
to do both on my boat, which means the top curve should be adjusted, but
it wasn't by much. The solution is to use battens that are not very thick.
I will use 1/2" battens on my next boat.
Cut the sheer clamps off flush with the hull at the ends, or if you
like, you can cut it so the forward end is pointed, which is a little bit
more difficult cut, but the boat would probably look better with a pointed
sheer clamp. When the first outside sheer clamp has been installed and is
cured, stand in the front of the boat and imagine the centerline as it
passes through the sheer clamp. Cut the sheer clamp along the centerline.
Before installing the second sheer clamp, cut the end to fit the first
sheer clamp and use lots of epoxy/filler between the two.
If you don't have enough clamps, there is another way. You will have
to start by installing the inside sheer spacers (see below) and put them
in to be able to use screws to hold the outside sheer clamp in place.
Are the outside sheer clamps cured? Good, let's move on.
Glass the Bottom
Flip the boat bottom side up, and cut a piece of glass cloth exactly
the size of the bottom. Don't try to let it overhang the corners, it will
create folds and will not lay right. Pour and brush clear epoxy on the
glass and bottom until it is saturated. Let cure, then brush on more epoxy
to fill the weave. You could glass the sides too, but be prepared for an
increase in weight. I don't think its worth it, because I want to be able
to carry the boat on my own. For rough use on rocky rivers I might
consider it.
Install Skeg
To cut the skeg shape, put a piece of 1/2" ply on the aft part of
the bottom. The skeg should start well aft of the lowest point (highest
when upside down) of the bottom curve. Take a straight edge and draw what
you think would be a good skeg. Then go to the transom, and extend the
angle of the transom on to the skeg. Cut out the skeg triangle. Lay it on
the hull and decide if you like it. If so, use it as a pattern to cut
another 1/2" plywood board with the same shape. Glue the two boards
together to make a 1" skeg. Round the outer edges of the skeg (but not the
side against the hull) so they are very round. Line up the skeg on the
hull so that it is in line with the centerline of the bottom. Make up five
4" tape pieces a little longer than the length of the skeg. Paint the hull
in the skeg area and the skeg with clear epoxy. Mix up some epoxy/filler
(peanut butter consistency) and smear it where the skeg will be attached
to the hull. Push the skeg down into the goo all the way till it touches
the hull, and then cove the epoxy/filler. Add tape to the joints and brush
on clear epoxy. Add more tape, the more layers across the top of the skeg,
the better, this area takes a beating. If you can't get the tape to bend
around the back end, let it hang out and sand it down after it cures, and
then put another layer on the back end. Let it all cure, sand, and brush
on clear epoxy to fill the weave. If you think you need to add more tape
to the back of the skeg or the top, do it.
Paint Bottom
Let the epoxy cure for at least a week. Brush on an oil-based enamel
paint in the color of your choice. To do it right, you need five or more
coats. At a coat a day, this takes a while to get done. Let the last coat
dry a week or more.
Sheer Clamps - part 2
 I'll
assume you have the outside sheer clamp installed. This design depends on
the sheer clamp to hold the hull in shape. To make it look really
authentic, and also to let water run out when you lay it on its side, you
can use sheer spacer blocks. These are just pieces of the same wood that
you use for the sheer clamps cut to a standard length, say 4" or 6". These
parts are then glued on the inside hull top, aligned with the top of the
outside sheer clamp, and are spaced a standard length from each other, say
3" or 4". The ends and the oarlock areas are made with 12" blocks for
strength reasons. I would suggest making the spacer blocks 3/4" wide, but
1/2" will work if that is what you have. I'll
assume you have the outside sheer clamp installed. This design depends on
the sheer clamp to hold the hull in shape. To make it look really
authentic, and also to let water run out when you lay it on its side, you
can use sheer spacer blocks. These are just pieces of the same wood that
you use for the sheer clamps cut to a standard length, say 4" or 6". These
parts are then glued on the inside hull top, aligned with the top of the
outside sheer clamp, and are spaced a standard length from each other, say
3" or 4". The ends and the oarlock areas are made with 12" blocks for
strength reasons. I would suggest making the spacer blocks 3/4" wide, but
1/2" will work if that is what you have.
The inner sheer clamp is glued to the spacer blocks. The transom is
a little difficult because it is rounded. I just glued straight battens
across it and then sanded and ground them down to a rounded shape. Not
fine cabinetry work but effective.
The ends and transom corners of the inner sheer clamp will have to
be cut to join with an angle. I just look at them and imagine the
centerline and maybe mark where I want to cut it and at what angle, and
then use a handsaw to cut it. This is not accurate and leaves open spaces,
so I put plastic tape around the bottom and side of the joint and try to
shape the tape how I want the part to look and then fill the joint with
epoxy/filler (molasses consistency). You could also epoxy a piece of
fiberglass tape under the forward joint (breasthook?) for strength, or
pour some epoxy/filler (molasses consistency) under the joint while the
boat is upside down.
Seat Frame
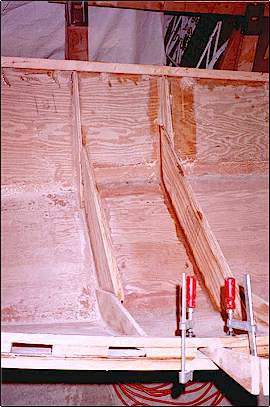 There
are two seat frames, forward and aft. The aft seat frame is located at
5'8" forward of the hull bottom/transom joint, and the forward seat frame
is located at 6'10" forward of the hull bottom/transom joint. Each frame
is made of three parts, a seat base and two arms. The seat base is made
out of 1/2" ply cut to a width of 6 3/4" (which is the height of the seat
above the floor of the boat). The bottom of the seat base is cut to the
width of the hull bottom, and the top width is the width of the hull sides
at 6 3/4" above the hull bottom. In other words, cut it to fit into the
boat. I would suggest you use the centerline method, where you measure the
distances, divide them in half, and plot the distances out on either side
of a centerline. This gives you a pretty good chance that the part will
fit the hull. There
are two seat frames, forward and aft. The aft seat frame is located at
5'8" forward of the hull bottom/transom joint, and the forward seat frame
is located at 6'10" forward of the hull bottom/transom joint. Each frame
is made of three parts, a seat base and two arms. The seat base is made
out of 1/2" ply cut to a width of 6 3/4" (which is the height of the seat
above the floor of the boat). The bottom of the seat base is cut to the
width of the hull bottom, and the top width is the width of the hull sides
at 6 3/4" above the hull bottom. In other words, cut it to fit into the
boat. I would suggest you use the centerline method, where you measure the
distances, divide them in half, and plot the distances out on either side
of a centerline. This gives you a pretty good chance that the part will
fit the hull.
The arms are 3" wide 1/2" plywood, and are cut to taper from 3" at
the top of the seat base down to the width of the inner sheer clamp, where
it touches the sheer clamp. The seat base goes inside the arms and holds
up the seat. Install the seat base and arms by painting all mating
surfaces with clear epoxy, then join the parts and hull with lots of
epoxy/filler (peanut butter consistency). Clamp the seat base and arms
together, then cove the joints. I did not use glass tape here, but you
could. You can also do this in steps to make sure it fits right, for
example epoxy the arms and base together while inside the hull, then
install the assembly inside the hull. It should work OK either way. I
added a cleat on the inside of the seat base to help hold up the seat and
keep it from falling in when I tried to open it, but I am not sure that
this is needed. I did not add limber holes. The advantage of limber holes
is that you have only one puddle in the boat instead of three, but I
personally would rather keep the mud and oar splash in the aft area so the
front stays clean and I can lay down in it.
Seat
Cut a piece of 1/2" plywood to fit inside the seat frame arms on the
seat base, from hull side to hull side. The seat is just laid on the seat
bases, no hinges or anything. It might be a good idea to tie it to the
boat somehow, in case of capsize. At 14" wide, I find the seat is wide
enough to hold a 2 liter pop bottle full of water, a personal floatation
device, small Danforth anchor and line, plastic cup and sponge for
bailing, and a cleanup rag. I also keep a couple of boat cushions up front
to lay on and watch the sky at anchor, one of my greatest joys in life.
Foot Rest
The foot rest is also 1/2 " plywood, and is just a mini frame which
goes 5" up the hull side, and 5" along the hull bottom. Use a bevel gauge
or two pieces of wood to figure out the angle of the hull. The top is
curved in a way that I imagine will give me two ways to brace my feet,
high and low. I put the foot rest into the boat vertically. I located the
foot rests at 3'2" forward of the hull bottom/transom joint. This is for a
six foot tall person, I suggest you get in the boat and check to make sure
your foot rest location fits you. Install the foot rests by painting all
mating surfaces with clear epoxy, then join the parts and hull with lots
of epoxy/filler (peanut butter consistency). Cove the joints and add a
small amount of glass tape and epoxy, at least on the forward side.
I'm sure that there are many ways to make a foot rest. The advantage
of this style is that it serves to strengthen the hull.
Paint Interior
Lightly sand any rough spots, and paint with oil based enamel. I
covered the seat board with epoxy and plan to varnish the seat board, but
the rest of the boat is all gloss white oil-based enamel. Maybe I will put
a blue stripe on it to make it pretty. The paint takes a while to dry, you
can add a new coat every day, but expect to wait a week for the final coat
to be dry enough to use.
Oarlocks
I used a pair of bronze ribbed horn oarlocks, (Defender 2001, p.
169, Item 450626) and a pair of bronze top mount sockets, (Item 450631). I
also tried the round horns, they did not work well due to the angle of the
sheer clamp. You may have made a mark on the centerline of the hull bottom
for positioning the oarlocks (see Bottom Panel cut out plan). It's
important to check to make sure that the oarlocks are 14" aft of the aft
edge of the seat. I centered the sockets in the sheer clamp, which means
drilling directly adjacent to the hull side, take care. I tie a loop of
line to the bottom of the oarlock and then use a figure eight knot to keep
the oarlock from falling out if capsized.
Oars
I have 6 1/2' oars from West Marine. Seven foot would probably work
better. I did not put leathers on them, I just wrapped 10"x12" glass cloth
and epoxy around the area where it rubs against the oarlock. I don't know
if this works so you might just want to use the traditional leathers. I
hold the oars in place by tying a line around the oar with a series of
tight rolling half hitches and then bringing the line up around the
oarlock and tying it off on an opening in the sheer clamp. By adjusting
the knot at the sheer clamp, you can put the oar at the precise extension
out that you want. This method also secures the oars to the boat.
Fishing
I intend to drill a hole low on the aft seat base to fit my favorite
fishing rod. I might have to add a layer or two of plywood on the inside
of the seat base to make sure the rod stays at the right angle. I want it
to stick straight back with the tip about 3' over the back of the boat.
The pole has to be kept low out of the way of the oars, but that's OK,
then I don't have to look up to see if I have a fish. Fishing is a great
excuse to get on the water. "Honey, I'm going fishing, see you later!"
echoes back with "Good riddance, I'm going shopping". No questions asked,
just do it. Even if you don't like to fish I suggest you get a license and
a cheap fishing rod, and the biggest, most outrageous fishing lure that
most normal size fish run in fear from. Why? The bigger the lure is, the
more macho the fisherman. By rowing up and down the harbor dragging your
ridiculous lure, the motorboat crowd will think you are the most rabid
fisherman out there and will steer clear, thinking that you are second
cousin to Popeye. The 100+ hp fisherman types will throw you an extra
salmon now and then, just because anyone who ROWS to troll has got to be a
real die-hard fisherman. And when a fish bites your oversize ridiculous
looking lure, it will probably be the biggest fish in the harbor and it
will tow you around for an hour.
Registration
Registration laws are different in every state. In Michigan, rowing
boats under 16 feet are exempt from registration and title requirements,
although you may register and title your boat if you wish. You may want to
print out the state law to show overeager water safety officers:
MCL 324.80123.1(f)
My homepage.
Email me at: Paul VandenBosch.
|

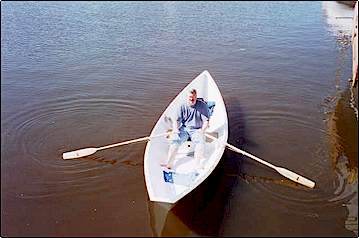
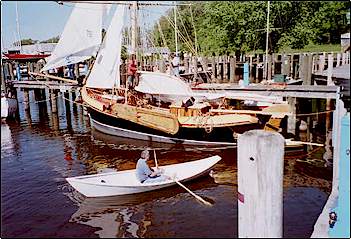
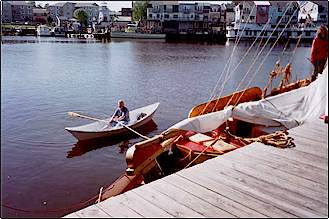 The
completed boat is light enough that a strong person can carry the boat a
short distance, so the boat can be car-topped or trailered. An estimate
for total cost is a little over $300. The boat is very fast under oars and
is an excellent introduction to recreational rowing. It is stable if you
are used to canoes and kayaks, but not as stable as a fishing boat (for
example). I have been able to stand up in it in flat water, but it is a
balancing act. The best part about this boat is dropping the anchor and
napping in the sun in the front of the boat. You can tell yourself that
after rowing, you deserve to relax. I have written these instructions for
someone who has had experience with epoxy and stitch and glue techniques,
however a beginner could build this boat with help of a book such as
The
completed boat is light enough that a strong person can carry the boat a
short distance, so the boat can be car-topped or trailered. An estimate
for total cost is a little over $300. The boat is very fast under oars and
is an excellent introduction to recreational rowing. It is stable if you
are used to canoes and kayaks, but not as stable as a fishing boat (for
example). I have been able to stand up in it in flat water, but it is a
balancing act. The best part about this boat is dropping the anchor and
napping in the sun in the front of the boat. You can tell yourself that
after rowing, you deserve to relax. I have written these instructions for
someone who has had experience with epoxy and stitch and glue techniques,
however a beginner could build this boat with help of a book such as
 Scarfing
- The idea here is to join the two 2'x8' panels to make a 2'x16' panel.
Use a long work table (mine was 8' long). Dry fit the panels: Clamp one
2'x8' panel down with the good face up, factory edge toward you, with the
2' edge at the middle of the table. Clamp the other panel next to it,
butting the 2' ends tight next to each other with the good side up and
factory edge toward you to make a 2'x16' panel. Take two pins and some
thread, and check to make sure that the 16' edge is reasonably straight.
When you glue the panels together in the next step, it will be important
that there is little space between the 2' ends to avoid a weak point, so
if the long side is not straight then you may want to flip one of the
panels to see if it works better the other way.
Scarfing
- The idea here is to join the two 2'x8' panels to make a 2'x16' panel.
Use a long work table (mine was 8' long). Dry fit the panels: Clamp one
2'x8' panel down with the good face up, factory edge toward you, with the
2' edge at the middle of the table. Clamp the other panel next to it,
butting the 2' ends tight next to each other with the good side up and
factory edge toward you to make a 2'x16' panel. Take two pins and some
thread, and check to make sure that the 16' edge is reasonably straight.
When you glue the panels together in the next step, it will be important
that there is little space between the 2' ends to avoid a weak point, so
if the long side is not straight then you may want to flip one of the
panels to see if it works better the other way.