Twisted Seagull
by Bruce
Hector
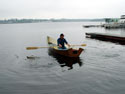
I take her for a spin
(click images to enlarge) |
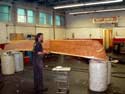
I started my John
Welsford designed Seagull
on a Friday afternoon when the plywood arrived at 4 pm. By Sunday
afternoon, I had the hull completed in a single weekend of intense
work.
But although she looked like a
boat, she was less than 1/3 done.
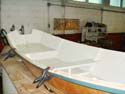
Fitting the thwart tops was obviously
going to be a "by guess and by golly" affair, as dimensions
for these parts were not on the plans. I guess everyone's would
end up slightly different.
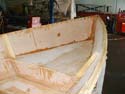
The forward seat |
What I did was take measurements
every 100 mm (6") from the centerline thwart supports I'd
epoxied in place, and transferred these measurements to the plywood
seat stock. Then I cut them out 1" too large. Holding them
in approximate position, I drew the actual curve by holding a
pencil firmly and steadily as I drew my knuckle along the side
panel. This left a pencil line on the seat top that more accurately
corresponded with the contour of the side panels. I then cut this
out and trimmed it to fit and fall half way across the centerline
support. Viola, it was within "epoxy range", 1/4"
gaps or less, except in one spot where it approached an inch for
a few inched. Good enough. I flipped it and cut a mirror image
for the other side. A bit of fiddling with the plane and I got
them both to lay flat sharing the centerline support beam.
improvised weights
|
The process was repeated for the
stern thwarts.
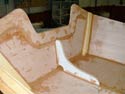
A 5 pumper mix of West was made,
and all the edges and the side panels were brushed with "clear"
epoxy to prevent any joint starvation. Then I thickened the mix
to a peanut butter consistency with wood flour and spread it into
the gaps. I'd thought I might have to roll up some paper towel
to jam in the bigger gap to prevent the slop from falling through,
but it held in the gap by itself.

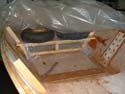
breast hook
|
The next morning we made up a finishing
mix of epoxy thicken with micro balloons to go over these rough
fillets and smooth it all out.
A breasthook was cut out
of 1 by 6 pine and the skeg was cut from the same stock. Both
were epoxied in place. I also cut and epoxied in a reverse transom
knee to transfer and spread out some of the thrust loads of the
outboard.
transome knee
|
While we were away attending
the Rend Lake Messabout Gary Sexsmith, who works with me and is
a auto painter by trade, sprayed her white. It came out very well.
I decided to finish her bright after admiring the bright work
on the D4 and Melonseed at the Messabout.
varnishing
|
Gary and I brushed on a coat of
polyurethane spar varnish, which took forever to dry on the epoxied
hull. It was still tacky after 3 day! Two more days of setting
her out in the sun whenever possible finally had her dry enough
to continue. Because of the long drying time, I decided to neglect
a second coat at this time. I'll brush on a few more after I've
rowed the wheels off for a while.
glueing oarlocks
|
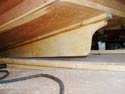
I cut oar socket blocks from red
oak and epoxied them in place. Rather than cut the tricky bevel,
I simply waited til the next day and brought them level with the
belt sander. I bored the holes by drilling a pilot hole, then
alternating between 7/8" and 3/4" wood bits, stirring
them a bit, to produce the tapered holes that roughly matched
the taper on the socket set I had.

painting waterline
|
We rolled an off white cream oil
enamel over the white interior, with the idea of painting the
seats a medium brown. Then Gary and I thought that if we made
the seat tops green to match the trim, we'd have a prettier boat.
So more painting was accomplished after work with only a few short
beer breaks.
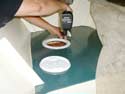
screwing deckplate
|
I got a good deal on two plastic
deck plates, and we cut and mounted them in white silicone with
stainless steel screws. Also mounted the oar sockets and a bow
cleat.
We were done! I scheduled a launch
party for Friday June 20 at 6.
Then we took her down to
Peter Music Boats on the Cataraqui River at lunch time Thursday
for a trial run to make sure she floated and to pre-warn ourselves
of any surprises. There weren't any.
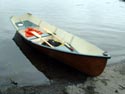
skeg
|
Peter Music is an experienced
boat builder. The kind who can eyeball a garboard, plane it in
his lap, and have it fit like a glove. He's not like me at all.
He got to the west by building a rowboat and rowing across the
Adriatic from Yugoslavia in the 1950s. But "Twisted Seagull"
earned his praise. He said it was my best yet, that she rowed
and trimmed well and that the water-line was perfect.
High praise for an epoxyman like
I.
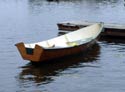
first time wet
|
"Twisted Seagull" went
feet wet for the first time at 11:45 am Thursday June 19, 2004
and floated high and dry.
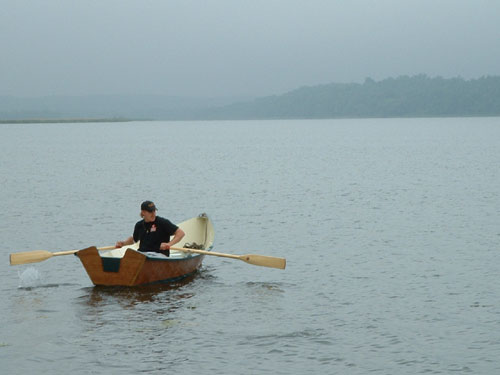
I took her for a quick first row.
She went like she was on greased rails, glided beautifully between
each stroke and was a pleasure. I loved her at once. Trevor Lowe,
my foreman, then took her out and had a great time for 20 minutes
in which I swear he covered over a mile. Twisted Seagull looked
so sweet, and her sheer line is a credit to her designer.
Then we tried her with a good,
healthy load. Elaine, Trevor and I hopped in. E at the bow, Trev
rowing and I resting in the stern sheets to trim her flat. Even
with this 600 plus pound load she rowed easily and didn't quite
settle to her waterline. I was relieved to note the complete lack
of screeching or snapping sounds.
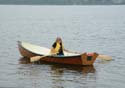
Elaine rowing
|
Elaine then took her for a short
row before we slid her back in the truck and returned to the shop
for a few last minute touches.
I roughed up the back side of a
Loonie (a brass Canadian $1 coin) and epoxied it onto the bow
thwart near the stemless stem. This is an old seamen's tradition.
Should the vessel flounder and any hands are lost, they are said
to use this coin to pay Charon's fare to ferry them across the
River Styx to the gates of hell. Not wanting to find myself without
a fare in such a situation, I epoxied another one in a more hidden
location, for emergencies only.
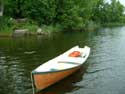
at the dock
|
A final coat of green was rolled
onto the gunwales and Twisted Seagull was put to bed to await
her launching ceremony tomorrow. She'll be christened by my sister,
just returned from Malawai, Africa. Twisted Seagull got her name,
when I noticed I'd built in a small 1'2" twist when I first
filleted her together. This was my first stitch and glue boat,
and I didn't know to carefully eyeball it from all angles before
I spread on the thickened epoxy fillets. Only the next morning,
far too late, did we notice one side of the stern was 1'2 higher
than the other.
moored
|
The designer advised me not to
try to correct it until I'd seen her in the water. As the lower
side, would have more buoyancy, and the effect might be minimized.
John was right, she looks just fine to me, under load or empty.
I'm mighty proud of her.
Bruce Hector
https://www.brucesboats.com
|