Hawbuck Update #2
(see original post) update1
Hey Chuck,
I finally got Matt sobered up long enough to finish his sanding.
Because Matt's boat is a powered canoe we added a 3/4"
by 1/2" ash keel, scarfed to the outer stem. Even though
I angled the sides to minimize sharp edges (fiberglass does
not like sharp edges) we still made up a batch of filler out
of the wood flour (collected from sanding) and used it to fill
the inner edges along the keel. It worked a lot like the microballon
and talc mixture I normally use for seams - also sanded pretty
good. After close inspection and sanding a few pencil marks
here and there we fitted a layer of 6oz glass and covered it
with epoxy.
By the way - because of bad experiences
with old boats - I did not cover the transom with fiberglass
- due to the engine stress and vibration it seems to be the
most likely place for water to get under the glass to cause
future problems. Instead we just "painted" the transom
with resin - any "issues" in this area will show right
away and be more easily corrected.
Before the Hawbuck I have only
used polyester and wasn't sure what to expect. So, I used slow-non-blushing
hardener (requires 60 degrees and up temp) which is mixed 2:1
ratio (much different than 7cc/pint I use for poly). The epoxy
resin soaked into the fiberglass just about the same speed as
it does with polyester. The main difference is with the slow
curing speed I was able to mix larger batches and not end up
with interesting but useless "paperweights" like I
usually do with polyester.
We mixed 10 pumps of hardener
to 20 pumps of resin (with pumps supplied with the resin) and
after thoroughly mixing poured it a little at a time right onto
the hull. Starting at the keel and working down to the shear
we used cheap (disposable) 2" paint brushes to spread the
resin - a slow steady speed gave the resin time to soak into
the glass. Always moving wet to dry helped avoid introducing
wrinkles or air bubbles under the glass. I (being vastly more
skilled) also used a 4" plastic automotive squeegee to
remove excess resin or move it to a dry area. We changed brushes
as the resin thickened on them and I frequently wiped the squeegee
clean to keep it working properly. As we progressed I continually
went back to "completed" areas to check for air bubbles
(especially along the keel) and ensure everything was the way
we expected.
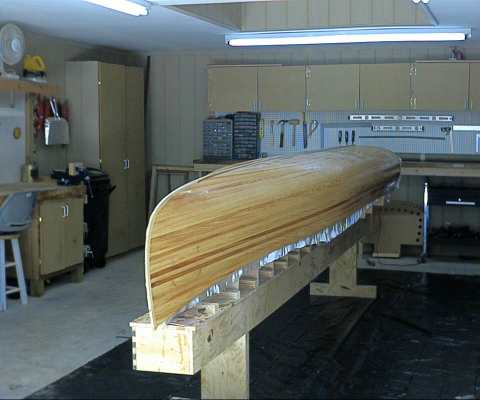
We decided ahead of time to let
the first layer cure at least four days. This will ensure the
resin is fully cured - making sanding far easier than trying
to work with green resin. Here's a photo - no wrinkles, no bubbles.
I like the cypress, it was pleasant to work with and soaked
in resin it has a nice "wood" color. Note the darker
"sinker" cypress really stands out as accents. Hmm,
I might just make one of these babies for my own stable. Only
next time I'll hand select the wood rather than using stuff
from the scrap pile - heh, heh, Matt can't read this - he's
too cheap to subscribe!
Larry
Pullon