Dog Bone Scarfs
by George
Wright
Problem;
The plans for the boat I was building called for sides of 16 feet
length so I needed to scarf together plywood. I was ready for
this but -- even with metric plywood two sheets scarfed together
will be shorter than 16 feet. It seemed goofy to have another
scarf to pick up a couple of inches in length.
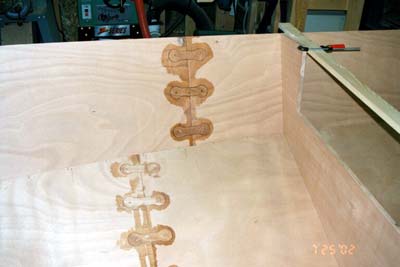
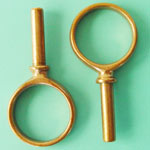
Figure 1
Solution;
I came up with this method to scarf plywood together using a router
and inlay techniques which did not shorten the plywood. I call
it a dog bone scarf which comes from the appearance. [Figure 1]
Normal plywood scarfs reduce the overall length of the plywood
for the overlapping of the scarf. The dog bone scarf butts the
two plywood pieces together and then adds interconnecting dog
bones to strengthen the joint and allow the joint to flex the
same as a normal sheet of plywood. Some of the precut kayak kits
use a similar method to connect their precut pieces, sort of like
a jig saw puzzle. See figure 1, 2 for finished joint on the boat.
I used a layer of fiberglass on the inside and outside for strength,
since the boat already had the outside fiber glassed only an area
on the inside to cover the scarf is extra.

Figure 2
Method;
I used a Lee Valley “inlay” kit and a router. This
lets the router bit cut an inlay and a matching piece to fit inside
the inlay. The inlay set uses a small bit (1/8) which wasn’t
long enough to cut through the plywood so I used the inlay bit
to make patterns that could then be followed by a ½”
flush cutting bit with bearing. I made two patterns, one for the
dog bone and another for the opening. See figure 3.
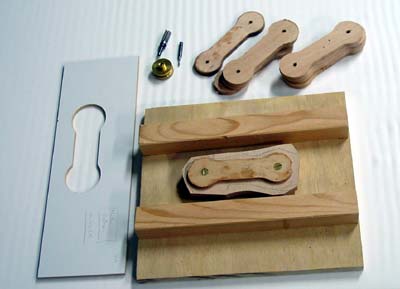
Figure 3
I clamped the two plywood pieces together end to end. I kept
one long edge straight; this helped later in marking and cutting
the plywood. I then clamped the opening pattern overlapping the
two pieces and routed out the opening, repeating for each opening.
I made a separate jig to allow making a bunch of dog bones. I
rough cut the dog bone pieces on the band saw and drilled two
clamp holes that matched the pattern. The clamp holes let me use
a flat head screw to clamp the pattern to the rough cut dog bone
piece. I ran the router around the pattern to make each dog bone.
See figure 4.
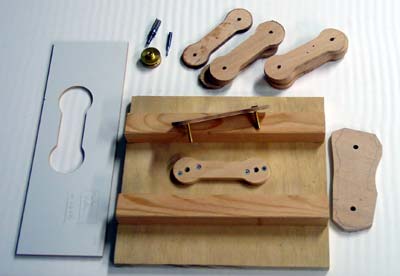
Figure 4
For glue up, I clamped the two plywood sheets to a flat board,
coated the edges of the opening and the dog bones with epoxy,
and put in the dog bones. I then added epoxy to fill any gaps
between the opening and the dog bone. I used a second flat board
over everything to clamp it flat. Of course I used lots of wax
paper to prevent the wrong things getting glued together.
The inlay kits are intended to make a very tight fitting joint,
however a looser fit is better for the epoxy. I sanded the patterns
to loosen up the fit.
Conclusion;
This method is good if you need to stretch out the plywood. However,
it will take longer than a normal scarf.
George Wright
george@midstream.com
|