Part 2
Part 1 - Part 3
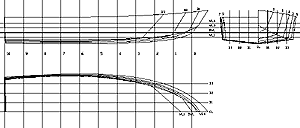
The Line Drawing
(click image above to enlarge)
The most useful tool when designing boats is the
line drawing. The line drawing clearly defines the hull geometry.
Furthermore it is used when calculating hydrostatic properties
for the hull you are designing.
(click image above to enlarge)
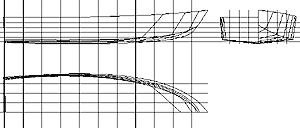
If you have followed the steps in part
1 of this article series you will already have
the start of the line drawing. But there is more drawing to
do before it is finished. Start with drawing your design water
line (DWL). The design water line is the waterline you expect
your hull will float at. Later on it may show up that the hull
does not float at exactly this waterline but don’t worry
about that at the moment. Next you divide your waterline in
10 equal lengthen pieces making 11 stations. In the profile
plane the stations 0 and 10 are made where the profile of the
hull is cut by the DWL. Now you have a grid to start with. The
next thing to do is to begin constructing the stations. The
stations cut the hull in the same way as the frames will be
placed in the boat later on. But the stations have in principle
nothing to do with the frames in the boat.
(click image above to enlarge)
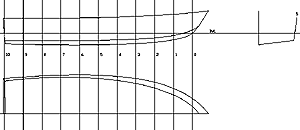
Now with the grid started it is time to draw some
more stations in the body plane. As an example you can see above
how it is done. In the profile plane the intersections between
the hull and the stations are continued into the body plane.
Then the ‘Dist 1’ and ‘Dist 2’ from
the half breadth plane are set out from the centreline in the
body plane. In the body plane you now have 3 points that define
the section. In the example there is used a chine hull so the
3 points are sufficient for defining the section. Continue with
section 1, 7 and 9. You can fill in the rest later. If you are
designing a traditional hull the 3 points will not be enough
to define the entire section so you will need some waterlines
and buttocks as well.
(click image above to enlarge)
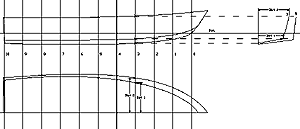
You can add as many waterlines (WL) and buttocks
(B) as you want. They have the purpose of helping you define
the hull shape more accurately. When you add the waterlines
and buttocks you make more intersection points so you will have
more points helping you to define your curves. Normally waterlines
and buttocks are made with an equivalent distance between them,
but you can place them at any distance you choose.
(click image above to enlarge)
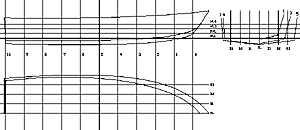
The rest of the line drawing is now made. Normally
curves should be smooth but since the example is a chine hull
you can see some bends where the waterline cuts the chine. Making
a line drawing is hard work. It is not unusual for a designer
to spend days working on one, so don’t expect to make
yours in an hour or so. You must also be aware that the lines
may have to be changed many times during the work. Even lines
you thought were right may later need to be altered. This is
normal and there is no shortcut to that.
Drawing tools
Beside a ruler, pencil and eraser some tools
for making curves are necessary when making the line drawing.
If your drawing is large you can use a thin batten held with
weights, but if your drawing is smaller or there is large curvature
some curved rulers are necessary. It is possible to get a large
variety of curved rulers but they are not all well suited for
the purpose of drawing hull curves.

The most complete set of ship curves is the Copenhagen ship
curves. The ship curves are produced by Linex (www.linex.dk).
The set of curves are outstanding but unfortunately it will
also be quite expensive to buy them all. I can recommend that
if this is the solution you want you can buy curves A1, A2,
A11/15 and A11/29. They will fit most needs.
If you want to spend less on curves you can use
3 curves from the ‘103DT Burmester Set’. The curves
can be used for making hull curves but they are not outstanding.
I have often seen the curve set in bookstores for $15-20.
CAD
In this article series cad for hull design is not described
but there are many cad applications available for hull design.
They range in price from free to many thousand dollars. So all
the sketching and drawing on paper can be avoided and instead
you can do all the work on your computer. It shall be said at
once that using cad for hull design is great, it saves a lot
of the hard work for you get results quickly. But there are
problems when designing with cad programs. First of all, are
you sure that the hull you designed with the cad program is
the hull you wanted in the first place? Many times, if you are
not careful the hull you get is the hull the cad program or
the limits in the cad program designs for you. So you sort of
loose control over your hull design process. Anyway it can never
give you any problems knowing the old fashion way of doing the
design process. It might even give you an advantage when using
a design software.