Ripping and Machining the Planking
Ripping the Planking -
This is the first real step in building your canoe
- slicing those long hefty boards into thin, supple strips that
will bend to an elegant shape and eventually sustain you through
heavy waves or swirling rapids.
Ripping the planks is not difficult, providing
you take the time to set up the equipment and work area first.
Your overriding aim in this process is to produce long planks
of uniform 1/4-inch thickness along their full length.
This can be done using either a table saw or
a band saw. The band saw is a little safer and easier to operate,
but unless its blade is wide, it has a tendency to wander. Most
home workshops have a table saw, which will give you a nice,
smooth cut if you are careful and use a sharp, hollow-ground
combination blade or a thin planer blade. The latter will give
you better strips with less waste, but use it only if the wood
is perfectly dry.
These long boards will sag and bind the blade
unless they are supported. Still, it is safer and more accurate
to make preparations to do the job alone than try to work with
(and against) a helper. To do this, set up a sawhorse the same
height as the table, about 8 feet from the infeed side of the
saw. On the opposite side, set up two more sawhorses, with a
board or piece of plywood between them. Butt the board flush
to the outfeed side of the table to support the plank as it
leaves the blade (see illustrations). With this system, you
can control the plank and keep it level as you push it through
the saw.

Spring fingers clamped to the saw table
act like and extra hand, pressing the plank firmly against the
fence while the builder feeds the plank through the blade.
The ripping process will flow more smoothly if
you clean the
saw table before you start, and rub it with paraffin. Set the
blade slightly above the thickness of the wood (although a hollow-ground
blade should be raised a little higher for extra clearance,
as the blade is thinner near the centre). Set the rip fence
at 1/4 inch, almost parallel to the blade but offset fractionally
away from the back of the blade to prevent binding and kickback.
For consistent thickness, the plank must be pressed
tightly against the fence. This is dangerous work for human
hands, especially as the board gets thinner. Rather than lose
fingers, and for greater control and safety, make a set of spring
fingers, sometimes called a "featherboard" (above
and below). Cut at an angle one end of an 8-to-10-inch length
of 3 x 1/2-inch hardwood, then slice it through at 1/16-inch
intervals. Rub the ends of the fingers with paraffin to reduce
friction, and use a large C-clamp to fasten it to the saw table,
so the fingers exert pressure on the board just before it meets
the saw blade, holding it tightly against the fence.
Arrange
a support system of sawhorses to keep the planking level
when ripping boatds into sturps. (right)
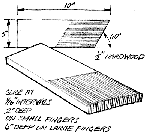
Spring fingers
(click images to enlarge) |
|
With spring fingers and lumber supports in place,
begin to push the board through the saw blade. Proceed cautiously
at an even rate, watching for gaps between the board and fence.
If the plank wanders and causes a thin spot in the strip, break
it out as soon as it is through the saw. Don't force the board:
the blade may bind or the motor stall and overheat. Let the
cutting of the blade set the speed.
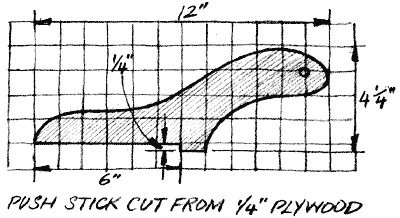
When the end of the board reaches the table,
use a push stick (below) to guide it through the blade to the
other side. This will give you the longest consistent strip
possible. When they are all cut, store the strips where they
will not be trampled.
This is an incredibly dusty operation, as for
every two planks you rip, one is blown away in sawdust, so wear
a mask at all times, and be sure the shop is well ventilated.
It is also a good idea to wear safety goggles or glasses. Remember
to keep them clean.
If you do not want to rip your own planking,
you can buy it precut or pay a local cabinetmaker to rip the
boards for you. Whichever route you take, be sure to end up
with long, absolutely uniform 1/4-inch planks.
Machining the Planking
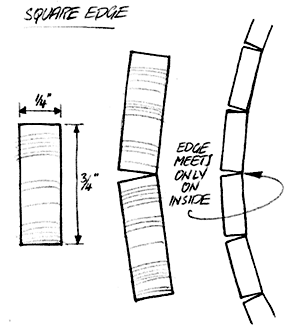
There are serious drawbacks to using this square-edge
planking as is. Because they cannot be interlocked, it is hard
to keep the planks in line when they are being laid across the
moulds. Even with a fortune in temporary staples punched between
the stations, the strips will want to spring apart.
Because the hull is a continuous curve, the butting
edges will not mate along their full width. This creates gaps,
especially on sharp curves, and reduces gluing surface so much
that planks may pop apart when staples are pulled. For an idea
of the problems that occur, hoist a butt-planked canoe over
your head at midday, and chances are that shafts of sunlight
will pierce the hull.
The amount of gluing surface can be improved
on square-edge planking if you bevel the edge of each strip
to mate with the one below. This requires a fair amount of skill,
because it is a rolling bevel and entails a great deal of trial-and-error
fitting.
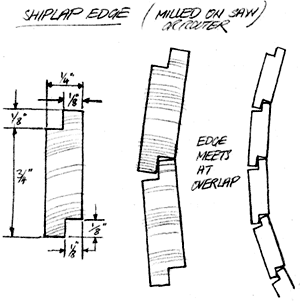
A better approach is to machine each plank with
a shiplap edge that locks the strips together in one direction.
Although the gluing surface is increased, the joints may still
need a few between-station staples to keep them from separating.
For a shiplap edge, set both the saw blade and
fence at 1/8-inch. (Screw a false wooden fence to the saw fence
to prevent damage if the blade hits it.) Press the strip against
the fence with spring fingers clamped to the table. Make another
short (3-to-4-inch) set of spring fingers and clamp it to the
fence, pressing down on the plank. Push the first strip through,
taking a 1/8-inch notch out of the bottom of the strip. When
the first strip reaches the table, use another strip to push
it completely through the blade. Continue the uninterrupted
flow of strips until one edge is milled on all of the planks.
Then flip them over and do the other edge.
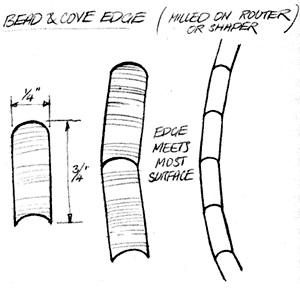
Beyond this method, however, planking with a
bead-and-cove edge will give you the smoothest, tightestjoints.
Regardless of the angle at which they come together, the bead
and cove lock the strips together in both directions and provide
maximum gluing surface. Although somewhat more fragile, bead-and-cove
edging reduces stapling, frustration and fairing time. One builder,
after working with butt planking, decided to switch to bead
and cove for his next canoe. Using a moulding cutterhead and
knives on his table saw, he machined all the planking in a half
hour, saving himself hours of fitting and fairing.
The bead and cove can also be milled with cutters
designed for use with 1/4-inch router bits. There is only one
North American source (page 143), but the cutters include plans
for a router jig so that both bead-and-cove edges can be cut
simultaneously. You can also mill the edge with Rockwell's three-wing
cutters fitted for a 1/2-inch shaoer. If you machine the two
edges separately, do the bead-edge of all planks first and then
the cove. The latter is fragile; handle as little as possible.

 |
The above
was taken from Canoecraft
by Ted Moores and Merilyn Mohr. This title is available
form Duckworks Store |


