Giving Birth to "Ethel"
by David
Brodie
I suspect that boats figure large in the memory
of most readers. During my childhood I sailed model boats on
a lake at Southport but my family never had a proper boat of
its own. Instead, we hired riverboats or took advantage of those
offering trips whenever there was the opportunity. At that time
the only people I new who did have a boat were our neighbours,
Percy and Ella who bought an aging wooden speedboat when I was
about eight years old. I can recall standing inside their garage,
soon after the boat had arrived, listening to Percy’s
enthusiastic nautical ambitions whilst observing the preparations
ahead of its maiden voyage. My wish was to be part of that adventure
but my parents were not too taken on this idea. In retrospect
this was perhaps a good thing for on their first outing Percy
and Ella were towed back to the shore after the boat’s
outboard failed. On the second Percy was on his own. He decided
to play safe and launched the boat on a canal. Launching proved
to be a sensitive issue as on that occasion the throttle stuck
wide open and Percy and the boat were launched onto the Towpath.
I never saw the boat again or heard
 the River Dee at Chester
(click images to enlarge) |
Percy make any reference to it. There are of
course many more inspiring memories particularly those of Sunday
afternoons beside the River Dee at Chester.
Over thirty years on and I find myself living
in Chester. The Dee is metaphorically on my doorstep and the
desire to be pleasured by the river has become a relentless
tease. During visits to the river I frequently encounter many
of the boats that inhabited the water when I was a child including
the clinker built Prince Charles. Ironically a rather flashy
Show Boat called the Lady Diana has joined him. The Lady Diana
has an entertainments license and can be chartered for early
evening cruises with her return journey being made long after
Prince Charles has been moored for the night. There are other
equally splendid vessels currently using the river including
a heavy 1930’s Dutch rowing boat manned by four aging
rowers and a Cox. There are also a couple of 1930’s classic
motor launches and a replica boat powered by steam. The Duke
of Westminster’s exquisite launch can often be seen sharing
the quieter stretches of the river with a flotilla of boats
owned by the Chester Rowing club.
My humble aspiration was to build a traditional
looking boat from wood that was capable of marrying nostalgic
memories with reality. It would have to hold its own alongside
the best craft using the river today but would need to be built
from plans that did not demand too much specialist boat building
knowledge or experience. With this checklist I cruised the Internet
and paddled through press references eventually identifying
John Welsford’s boats as potential candidates. His designs
fired both my enthusiasm and confidence, convincing me that
such a project was within my capabilities. After further consideration
“Joansa”,
constructed from plywood planks, fixed onto solid wood stringers,
with the opportunity to use some mahogany and brass, emerged
as the answer to my prayers.
John Welsford's "Joansa" |
Predictably, like many born again boat builders,
I had to face a fair amount of cynical questioning from friends
and family. Initially this was directed at my scandalously poor
sea legs but soon spiralled into mockery when the self-righteous
cynics christened me “Noah”. Despite this abuse,
they too had to be accommodated in my plans for I new they would
eventually be brought onboard and want to use the boat. And
so, in the dead of night, satisfied that “Joansa”
was the one, an e-mail order for plans was despatched and my
voyage was underway.
 two cynics and a builder
 |
The post is delivered early around here, which
gave me time to spread the newly arrived plans on the breakfast
table before anybody else was up. I also had time to look in
the local free press and mark the advertisement that started
“huge shed for sale”. The plans I would allow the
family to see but mention of the shed had to be carefully engineered,
that would have to wait until another day. As it happened, by
the following week the “huge Shed” which had previously
been the home of a micro light aircraft, was also sitting at
the breakfast table, metaphorically speaking, leaving nobody
in doubt of my aspiration. Before too long an army of crusaders,
enough to silence any residual cynic, had come out of the cloisters
and “New Noah” was born.
It was to be some months before I would be able
to start building. The huge shed had to be erected
and the air temperature needed to rise sufficiently in order
to ensure that the wood’s moisture content would not compromise
the use of epoxy resin.
As a new builder I was happy to use this period
of time to read about the exploits of those who had gone before
as well as studying John
Welsford’s plans and instructions. It was
during this period that the “feel right factor”
began to surface. The feel right factor is something
that all good makers acquire by osmosis. It reveals itself as
an attitude to making, which dictates that one should always
work towards making ‘it’ feel right.
In this context the implication was that a boat should fit its
owner, not the other way around. Although further confirmation
of the feel right factor’s importance was not
required, John Welsford’s instruction for “Joansa”,
which advised that “measurements given are from a
scale drawing and may be a couple of millimetres out”,
persuaded me to it as a licence to make minor changes to the
plans if I felt it necessary. And so, armed with the feel
right factor, a pencil and a vision of the boat that I
wanted to realise, I embarked on the surgical analysis of “Joanna’s”
design.
As a maker I subscribe to the belief that objects
should retain evidence of the process by which they were created,
with the proviso that such an approach should not be allowed
to destroy aesthetic sensibilities. The riverboats of my childhood
were clinker built and varnished both inside and out. However
“Joansa’s” resin fillets, necessary to seal
the plank overlaps, had to be painted if the boat was to have
any clinker built creditability. Paint would be needed to uniform
the surface and mask any perpendicular joints if the eye was
to sweep uninterrupted from bow to stern. Inside, the boats
length would be punctuated by the bulkhead assemblies as they
visually cut through the stringers, a detail further enhanced
by the changes in wood grain direction. To take advantage of
this my stringers and gunwales would be made from mahogany,
glue / fillet mix would include West System’s 405 Filleting
blend and the whole inside would be clear varnished. To link
the inside with the outside I would also fix mahogany rubbing
strips right around the boat.
My next concern was for the use of doublers on
the bulkhead uprights (arms) and the suggested use of butt straps
on the planking. The plans advised that small semi-circular
plates be fixed to the uprights at the points where they housed
the stringers. There was no doubt that added strength was needed
at these points but the solution proposed visually compromised
the upright’s elegance. At the risk of adding weight I
planned to double the bulkhead uprights completely, rounding
off their edges to lessen the visual weight.
 Bulkhead doublers and brass inserts
for rowlocks
Bulkhead doublers and brass inserts
for rowlocks |
At 4.6 metres in length, John Welsford had advised
that planking be done in short lengths, eight to each side,
and butt strapped discreetly. He also suggested that the boat’s
bottom be made the same way. Aesthetically this appeared to
be rather clumsy. The scarfing of both bottom panel and planks
would be a much better option providing the builder was competent
enough to make such joints in 4mm ply. As a process scarfing
was to prove the most technically demanding aspect of the whole
build and it is understandable that John Welsford should offer
an alternative. However, the extra effort involved with scarfing
is more than compensated for in terms of the aesthetic value
it adds to the boat. As it transpired I was to scarf not only
the bottom panel and planks but the mahogany stringers as well
due to the fact that I could only get stock material in three
metre lengths.
Epoxy resin is fantastic stuff. It glues, fills
and seals but it’s also capable of reducing the virgin
boat builder to tiers. It takes no prisoners. Having used it
in the past I was conscious of the need for it to be used with
care in order to avoid cured excess deposits having to be removed
from inaccessible areas. In this instance I was concerned for
the finish I was going to be able to achieve on the inside at
the bow given that generous amounts of glue would be needed
to ensure a good fixing. The nightmare vision of the bow opening
up like a flower bud should “Joansa” meet the side
of a jetty at anything other that a snails pace was not something
I wanted to consider every time I launched the boat. To eliminate
this possibility and increase the tolerance for the fitting
of stringers and planks at the bow, my solution would be to
attach hardwood fillets between the stringers on the stem doublers.
These would then be shaped providing additional landing for
the planks and a neat finish on the inside.
 Breasthook and
brass prow |
By now I was beginning to marry the general knowledge
I had acquired through background reading with a growing appreciation
of “Joansa’s” design. I was determined to
produce the very best result. I had read in Thomas Hill’s
excellent book, Ultralight Boatbuilding, that “Few things
show a boat builder’s skill more readily than a neat fitting
breasthook”. I would like to add quarter knees to this
statement given that both command structural and aesthetic importance.
Transforming these dynamic angular junctures into elegant sweeping
curves was to be my objective. The solution would be to first
clamp four, one inch wide strips of 4mm plywood directly into
each of the angles where the inwales converged at the prow and
where they met the transom. The plywood strips would first be
dampened before each set of four was positioned and then pulled
into the angles by sash clamps and left in position overnight.
Before they were removed, wood fillets shaped to fill the gaps
between plywood laminate and prow and plywood laminate and transom
would have to be fashioned. When all were a good fit every element
was to be removed, covered in glue and then repositioned and
pulled back into the angles. After the area had been cleaned
up I would hopefully be left with structurally sound joints
that were aesthetically pleasing.
Quarter Knee assembly |
Quarter Knee construction |
I started the build towards the end of June making
additional minor changes to the plans as “Joansa”
began to take shape. Each demanded a carefully balanced decision
in respect of aesthetic and structural qualities. The most involved
of these was in relation to the transom. John Welsford’s
plans advised that the 4.5mm plywood transom profile be mounted
on a solid 12mm timber frame for reinforcement. It was proposed
that the frame be made up of eight small lap jointed pieces
in order to avoid any large short grain sections. My concern
was that one bad joint would compromise the structural integrity
of the whole transom. My alternative transom was to be an entirely
ply / resin composite. An MDF profile was first cut and then
used, with the help of a router, to machine two 6mm ply frames.
The two frames were then fixed to the original plywood transom
creating a unit that was almost 17mm in thickness. The top edge
of the transom cut-out was likely to take a bit of knocking,
particularly if an outboard was to be attached, and so to reduce
the risk of splitting, the ply was rounded off.
Transome detail |
At this point I must confess to a lapse of concentration
for although I planned to use an outboard occasionally, I failed
to ensure that the cut-out in “Joansa’s” transom
would accommodate my geriatric Seagull. As a result I have had
to make a packer (not illustrated), which lifts the outboard
by 50mm, allowing it to operate without restriction.
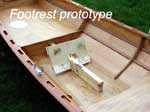
Footrest prototype |
Despite my earlier criticism of doublers I do
appreciate their usefulness. In the case of “Joansa”
I specifically liked John Welsford’s use of them on the
seat and buoyancy tank overhangs. Here they add necessary visual
weight as well as additional strength to the bulkhead assemblies.
The plans proposed that the rear buoyancy tank overhang be extended
at the sides and be supported by a shaped cross member that
doubled as a fixed foot stretcher. This set-up had two disadvantages
for me. Firstly, the fixed foot stretcher would not accommodate
the variety of leg lengths expected to use the boat and secondly,
when not being rowed, the stretcher would become an annoying
obstacle. Having discussed my concerns with a couple of serious
rowers I settled on fabricating an adjustable / removable footrest.
The now unsupported side extensions to the rear buoyancy tank
were reduced significantly and the result is a more accessible
foot well.
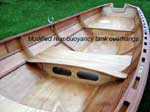
Modified rear bouyancy tank overhangs |
My final amendment was to the seat, which on my
boat is not permanently fixed. Instead it is locked in place
by wooden toggles. This enables objects to be placed under it
more easily and also makes the inevitable job or re-varnishing
less difficult with the seat removed.
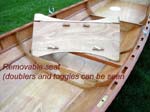 Removable seat
 |
“Joansa” was nearing completion just
as autumn arrived and with it an increase in atmospheric moisture
content that threatened to make painting and varnishing a real
challenge. Fortunately a window of opportunity presented itself
and the boat was moved into the house for a few days while my
wife was away. This gave me just enough time to paint and varnish,
which was made so much faster by the ambient temperature inside
the house, before she returned. I finished the job off as promised
by inserting brass blocks in the gunwales to accommodate the
rowlocks. Their top faces were machined at 8 degrees and they
have two treaded screw holes in their sides enabling them to
be fixed in position from the outside with countersunk screws.
The rubbing strip covers the screw heads. A brass keel strip
covers the stem and a brass plate covers the prow allowing an
eye to be securely fixed through the breast hook. Sea trials
have been undertaken and all that remains is the official naming
ceremony. My boat will be named “Ethel” in honour
of my grandmother who despite many challenges remains unsinkable
at the age of 104.

The original "Ethel" |
For me the making of “Ethel”
proved to be a humbling and intimate experience. It generated
genuine interest and invaluable practical support from friends,
family and in particular my work colleagues, which was a pleasant
surprise. Wrongly I had assumed that their aspirations would
be totally unsympathetic to mine, but in reality I had underestimated
the relevance of their life experiences. Like me boats figure
large in their memory. It goes without saying that The
Worldwide Virtual Boat Building Company proved inspirational
and has now signed up another humble recruit who, through the
birth of Ethel, has hopefully contributed a bit more
to talk about.

David Brodie. February 2004