This small tutorial will give you the basic elements for installing a Mirage pedal drive unit in a conventional sea kayak or canoe. The sea kayak installation will depend on your boat having a rather large cockpit opening such as those found on the Kruger Sea Wind style of boat.
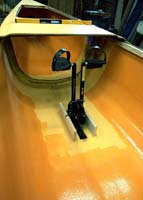
In the photo below you will see how I mocked-up the two side standards for the axle pins of the Mirage and arranged the unit to sit over the slot in the hull. I jumped ahead here in the lesson, showing the hull cut, because this is the only shot I have of the initial side supports for the Mirage drive before the complete trunk was assembled.
Typically, you can make a more conformed trunk for your boat as you will only be fitting the Mirage and have no need to allow for a dagger board.
|
Laying out the side/axle supports for the Mirage
(click images to enlarge) |
|
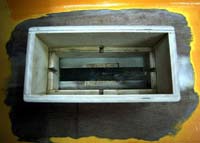
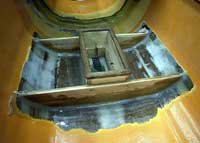
I then built the small, inner box for all four locator pins on the unit and did another "put it in place" session to get a feel for how things were looking in the hull as well as below the hull surface.
|
Router cut notches for Mirage Drive alignment locator pins |
 |
|
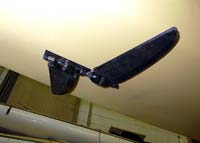
If you want the Mirage blades to fold completely flat against your hull as I did, you will have to allow for the height of the pins to give you that and nothing more.
There's a fine line, here, in getting the fold flat ability and the place where the drive hangs too far down in the water below the hull. You'll have to mess with that relationship to get things right.
|
Blades flat against hull for beaching capability |
|
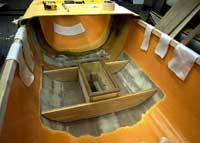
I then built the box that would be glued into the hull. I knew that the daggerboard insert unit would need substantial strength so the whole thing is built to accept those loads.
Laying out the hull cut is absolutely critical.
I pulled a stout nylon string from bow to stern stem and got it pretty tight. You may notice in this exercise that your boat has a small bit of wander to the hull, the cockpit the hatches, etc. Almost every production boat will have something a little bit wacky as to how it relates to the stem/stern centerline. No worries. What's important is that you align the Mirage slot to the hull and forget about the deck openings and such. You want the boat to go through the water with as little drag as possible and not have to run constant rudder corrections to do so.
I built a square that could sit in the hull and hold itself upright. I slid it into position so that the upright blade just barely made contact with the centerline string and found my first point for the opening.
Sidebar: It's hairy to cut a hole in your hull. Every boater grows into their understanding of a boat hull as a place that should be inviolable as to getting holes put through it for any reason, and here you are about to make one on purpose. You'll have to determine just where to locate the Mirage in the first place and this is going to vary from boat to boat so I won't supply any measurements for this part of the operation. It will have to do with your leg length, comfort while pedaling, etc. |
|
Remember that the Mirage does have a bit of adjustability for the fore/aft relationship of the pedals, so it's not a super critical issue like the centerline location. If you're sleeping aboard, and need some specific room allocated for that, then that's another issue to consider in the location.
You can also align the slot opening with a plumb bob setup in a traditional, boat builder’s fashion. You'll need to level the hull and stabilize it at that reference to have any success with the plumb bob. This system is dead accurate if you take your time.
|
The finished hull slot for the Mirage blades and the daggerboard |
 |
|
If you want an absolute plumb reference, then build a small gantry to hang out over the boat without touching the hull. Slide the gantry with hanging plumb line into the hull slowly until you get the plumb line to just barely touch the centerline string. The point of the bob will be indicating the location of either the front or the rear of the slot you need to cut. I say, either, because it depends on just where you start with the plumb process, your choice.
You could also mount a laser, leveling device in a vertical attitude and run a line from stem to stern. More high-tech, but hey, if you have the tools, why not?
Build your box with locator slots as you measure them and allow for the height adjustment. Now, carefully view your hull surface inside the boat. I'll bet it's not perfectly flat and so your box should mirror the hull's curvature so you get a good fit when you glue the trunk in place.
Again, allow for the locator pin heights when you plan this part of the install. It's only a very small difference and if you do it correctly, it won't matter at all.
You're just about ready to glue in the trunk. Before you do, I'd ask you to consider the potential for a side-loaded grounding while pedaling. If the Mirage takes a big hit from the side due to reef, bar, or mud and the waves are slamming you from abeam, the loads will translate directly through the Mirage and into the trunk. The Mirage will act as a lever arm to expand the loads and the trunk will get virtually all of that. Some of the lever action will be absorbed by the unit as it tries to jump out of its locator slots, but not all. Can the trunk's glassed mount absorb all that and survive? Can it absorb that for 15 minutes and survive? What will happen if the trunk gets slammed so hard it cracks the glass/epoxy joint and you start taking water?
I ask all this as it's the kind of stuff that can happen on a typical coastal adventure cruise or a perhaps a Watertribe Everglades Challenge and it can leave you in a very bad place.
|
All the glass tapes are laid out prior to install |
|
So, take a moment to consider installing some small, low profile floors that sit at each end of the trunk and go out over the hull
surface. Take a look at the photos and see how I did the install. You won't need anything beefy like these floors for your boat, but you get the idea. They can add tremendous strength to the hull without adding too much interference to the operation.
Again consider all the applications you have in mind as you use your new boat in future adventures.
To glue-in the trunk you need to "butter" the surfaces of the trunk with thickened epoxy that will make contact with the hull. You need to rough-up the hull a bit for maximum mechanical adhesion and carefully place the trunk on the hull surface and wiggle it around slightly to get the epoxy paste to ooze into all the micro crevices of the hull surface. Don't be concerned about the squeeze out, especially on the outside of the trunk as you will be applying a fillet of thickened epoxy all around the trunk along with a generous tape of fiberglass to complete the install.
The inside of the trunk should be cleaned of squeeze-out as soon as you get things seated. It's a lot harder to maneuver a tool later on and easy to just wipe the excess with a paper towel while it's wet.
If you are installing some support floors, they should be on the trunk before you put it into the hull for final gluing. In fact, the entire structure that you wish to install should be glued-up ahead of time and cured to the point of stiff so you can handle it properly.
In the install mode, you might want to consider having the boat resting on a carpeted floor. Actually, something firm, but soft. I use old furniture pads. I put a sheet of plastic drop cloth over the "soft but firm" stuff to keep the epoxy from sticking to the carpet. This whole operation is done to keep the hull from sagging after you have cut a slot. Most hulls are engineered to act as an integral shell structure that is always in some sort of tension. When in the water, they depend upon the pressure of the water pushing against the hull to give extra strength to the tensioned part.
If you cut a hole in the hull, it can tend to sag outward along the opening. If you glue the trunk to a slightly sagging hull skin, you will put all of the load onto the thickened epoxy for the trunk support.
Epoxy is marvelous stuff and very strong, but when it's all alone, as in thickened epoxy, it is also brittle. Support the hull slightly and then the trunk, its fillets, glass tape and epoxy will share the loading ensuring a good install.
In the photos, the hull is suspended in a set of cradles for construction. Under the hull was a constructed pair of bunks to just slightly raise the hull away from the suspension system. I took a long look at how the bunks were affecting the fairness of the hull at this point and adjusted them to suit the lines of the hull.
So now you have the trunk glued-in and all you need to do is finish-off the taped joints as you would like to have them.
For a sea kayak or canoe conversion I’d use three inch tape in a 6 oz. weight. I prefer to cut my own tape on the bias from wide cloth. The bias cut tape conforms readily to the fillets and can wrap around irregular shapes with a good deal of forgiveness. It may be necessary to cut darts in the tape to turn an inside corner smoothly. Cut the darts ahead of time and not while you are trying to wet-out the cloth with epoxy.
In one of the photos above you can see all the glass tapes laid-out for the install and awaiting the mixture of thickened epoxy for the gluing/taping session.
|
The trunk and its support floors are glued and taped |
 |
|
For a really smooth look that will fit in with the rest of the boat, I'd paint on a couple of layers of epoxy to fill the glass weave before sanding and perhaps, even buffing smooth. Don't sand the tape until you put on the fill coats. You'll damage the glass cloth and take away a good part of its strength in the process. You can sand the edges, carefully, to feather them into the hull surface and provide for a smooth transition.
If you’ve never done filleted and taped joints before there are dozens of sites on the web that describe the process as it applies to Stitch and Glue boat construction. If this is your first time, it would be good to practice the process a few times before you jump into doing this on a boat worth several grand.
So, the obvious question that is hardly ever addressed is this: What if you screw it up? First, have a beer or a cup of tea or something to calm your nerves. It’s not the end of the world.
You can carve the mess out of the hull, sand it down to the original hull material and do it over. Not a happy thought, but certainly far from tossing the boat away in frustration.
All my trunk components were built with Baltic Birch ply because it machines so cleanly and is very strong. I sealed all the open end grain and side grain with three coats of epoxy and then varnished all exposed surfaces inside the trunk for water proofing.
The structural floors were built from Western Red Cedar and were also coated with epoxy after they were glassed into place in the hull.
The two side compartments were lined with indoor/outdoor carpet and the boxes were enclosed with teak surfaces having o-ringed inspection ports for access. The side boxes provide secure, water tight storage for valuables such as wallets, radios, GPS, etc. while sailing. They will not spill their contents while on the water unless the boat seriously founders on a reef in very nasty conditions and the boat breaks up.
I'm sure I left something out of this presentation. If you have any questions, just fire away.
Chris Ostlind
Chris@Wedgesail.com
Also see: Curiouser & Curiouser by Kellan Hatch