|
Portlights
A Boater's
Window on the World
by Paul Butler illustrations by Marya Butler
https://www.butlerprojects.com/
Portlights are a boat's eyes, and from below, the boater's window on the world. Tastefully designed and installed, they complement a boat's personality. Long narrow ports give a low streamlined look, while round or oval ports, especially brass-framed ones, provide a traditional appeal. Oval ports can even lower the visual profile of long and tall cabin sides.
A single long piece of plastic may be used to cover any number of portholes cut into the cabin side. This provides a traditional look from inside the boat and a completely different low profile look from outside.
Belowdecks, portlights add a feeling of spaciousness to cramped quarters. They allow a quick look outside for potential hazards and can provide vital ventilation. Sealed ports or deadlights, though they provide no ventilation, are safer than opening ports and easier to install. Don't overlook the possibility of having a deadlight mounted flat on the top of the cabin or on deck. They'll brighten any interior, but care must be taken to make them strong enough to withstand the occasional swat of a dropped winch handle, to make them completely watertight, and if placed in high-traffic areas, to make them flush-fitting.
Smaller ports are the safest on any boat exposed to occasional weather, and they don't compromise topside strength as much as large holes. It's always wise to leave a substantial margin of the cabin side all around the perimeter of the port for strength. Once you determine the location, all that's necessary is to cut the hole, seal the end-grain wood or exposed fiberglass laminate, and bolt the port in place with plenty of caulking to ensure watertightness.
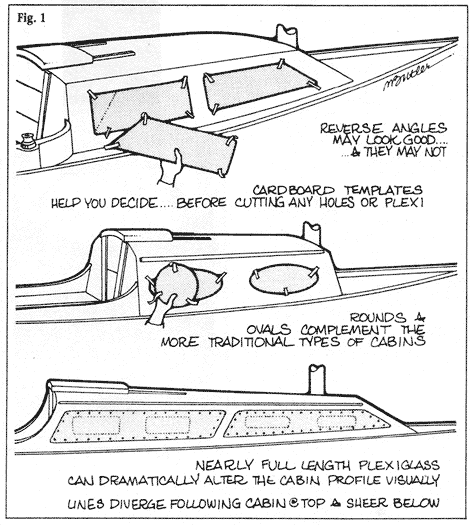
Ports may be fitted anywhere — in the cabin sides or top, on deck, or even in the bottom for underwater sightseeing. The challenge comes in choosing the best for the job and placing the lights intelligently and esthetically. Locating a series of ports along a cabin side requires some eyeballing, possibly aided by cardboard cutouts held in place with double-faced tape, and maybe a straightedge to maintain a fair line that flows with the lines of the boat (Fig. l). Very small alterations often make a lot of difference, so care should be taken before any holes are cut. The ports can follow the deck line, the cabin top, or any esthetic combination of the boat's lines as long as they look right.
Fixed Ports
Bronze, aluminum, and plastic-edged ports of various shapes and sizes are available from marine suppliers. They usually come with thumbscrew closures and screens that snap in place when needed. They're easy to install — anyone who can turn on a saw and aim a drill can install a store-bought portlight — but they can be costly. For those who want something besides ready-made ports, plexiglass and Lexan are the answer. They can be readily shaped using common woodworking tools such as a jig saw, drill, router, and block plane. The careful application of heat from a portable propane torch will remove saw and router marks and leave a clean, finished look to edges.
Plexiglass is slightly flexible and quite strong, particularly in thicknesses more than 1/4 inch. While 1/4 inch is sufficient for small ports, any port larger than 8 or 10 inches across should probably be 5/16 inch, and 3/8 inch is best for larger sizes. Plexiglass sells for about $5 per square foot in 1/4 inch thickness. Lexan is similar to plexiglass but tougher and does not scratch as easily. It sells for almost double the cost, about $9 to $i0 per square foot for 1/4-thickness. Both are available clear or smoked. Thesmoked plastic looks better from outside and also provides a degree of privacy belowdecks in daytime. For an opaque "privacy" port that still admits light, plexiglass and Lexan may also be sanded using a belt or orbital sander or sanding block and fine, 150-grit sandpaper.
Another option is shatterproof automotive safety glass, also available smoked. It has a thin plastic membrane laminated between two 1/8-inch thick sheets of glass, and a 1/4-inch thick piece sells for about $7 per square foot. Since it has superior hardness and scratch resistance, it could be an ideal material for ports and even larger windows, but shaping and drilling it is tedious, delicate work that usually requires the services of a professional glass shop. Sandblasting is required to get an opaque finish. Also, the rubber channel molding normally used to mount safety glass is not a supportive enough
seal for use on boats exposed to rough water.
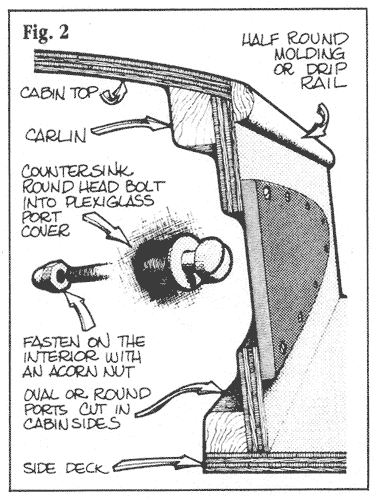
With all these materials, use particular care when tightening fastenings near the edge. The wedge shape of a flathead wood screw exerts enough pressure to break out a corner if over-tightened. Our preferred method is lo use roundhead machine screws, countersunk flush with the surface of the plastic (Fig. 2). A thin washer is also recommended. In thinner pieces, it may not be possible to countersink flush.
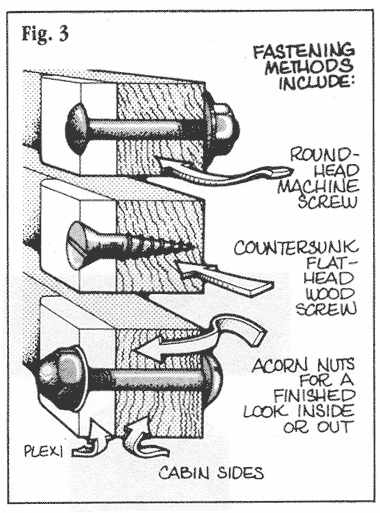
If the cabin side is thick enough you may wish to countersink the nut and washer on the inside, or you can fit them flush and use an acorn nut over the end, giving a more finished look (Fig. 3).
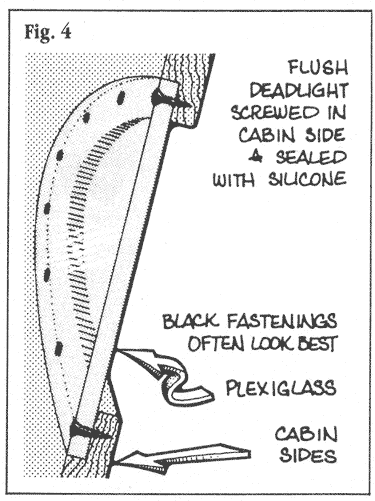
Silicone is a good sealant and bedding for the ports, regardless of size. But the port must be dry and clean. Apply a substantial bead around the perimeter of the port, and as you tighten the fastenings, you can visually inspect the seam to ensure a complete seal. You can form a small finger fillet with fresh silicone seal by wearing a rubber glove or using a tongue depressor, but work fast since it sets very quickly. After the silicone sets, it can be sliced clean with a razor blade to remove the drips and smears. If you want a flush-fitting deadlight, cut a rabbet in the cabin side, hull, or deck (Fig. 4), or if the light is the same thickness as the deck, epoxy-glue a backing plate or perimeter ring on the inside to support it.
Sliding & Hinged Ports
Sliding ports are not traditional, but properly designed and built, they do have a place on small boats. They are adjustable for ventilation, take up no extra room, and are easily built. They are not absolutely watertight if waves comes over the cabin top, but they do drain well. The slides can be made of epoxy-sealed hardwood, stainless steel, or perhaps RV-type plastic channel (Fig. 5). The best channels use a double groove to separate the two pieces. They may beheld open or closed with hooks or shock cord, and the necessary friction may be furnished by a thin felt or brush-type gasket placed between the sliding sections.
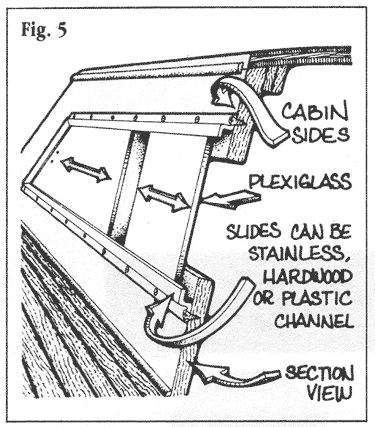
Sliders should be made respectively longer than tall to slide smoothly and not jam and stick. Although sliders may consist of three separate pieces of plexiglass or more, most are two pieces, with a substantial 3- or 4-inch overlap across the center.
For opening and closing sliders, you can mill a slight vertical indentation for a finger grip into the inboard side of the plexiglass. The indentation is easily made by adjusting a table saw blade to about half the thickness of the plastic, laying the plastic flat over the blade, then lifting it off. For another type of finger grip, attach a teak strip to the plexiglass with screws from the outside.
The shape of the sliding window is determined by the shapes you can achieve with your moldings. A streamlined round or angle looks best but requires more molding work. An alternative is to provide simple stops fore and aft and use the track or plastic channel only on top and bottom.
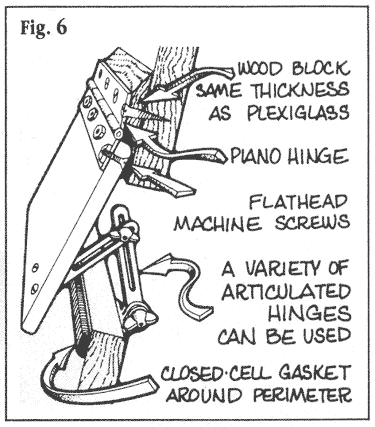
Hinged ports can provide very good ventilation, even during a rain. They can be made much tighter than sliding ports by using gaskets and dogging them down. Where structural strength is required, a piano hinge is the attachment method of choice (Fig. 6). The hinge should be secured using a drop of epoxy in each screw hole to lock it tightly and prevent rot. Since no moldings are required with hinged ports, they can be any shape or configuration without much extra work.
|

