Homemade Steel Hardware
by Rob Rohde-Szudy
Phil Bolger has been a great proponent of hardware reduction, and making one’s own from wood or common hardware store items. This is good. But sometimes you can get a lot more for your money if you know a little about metal working. Don’t freak out. I’m not going into one of those WoodenBoat things where I blithely suggest that anyone can jump right in to casting bronze in their backyard. Far from saltwater, Midwesterners do just fine with cheap scrap steel, thanks. So we get to use quicker and dirtier solutions. Of course, a great many cheap saltwater folks use steel too, simply repainting or renewing parts when necessary.
Too many of us shy away from metalwork. We think it’s way too hard and requires specialized tools and skills. This is partly true, but not as true as you might think. I recommend taking a welding class from your local technical college. I did and it was not as hard as I expected. I also welded an anchor and most of a boat trailer DURING the class. A pretty good value for $112. Of course, the semester after I took it they dropped the price to $80. Just my luck.
You can get an arc welder for $50-100 at a garage sale or auction, and you can also rent them from tool rental places. Other types of welding are expensive, but arc is cheap and easy for any metal 3/16” or thicker. It’s possible on 1/8” with a little practice. After two 4-hour classes in I was welding 1/8”. Six classes in I was starting the trailer. It goes pretty fast.
As much as I think you should learn some welding, let’s look at some metalwork that can save you a pile without actually welding.
Cold Work
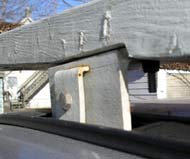
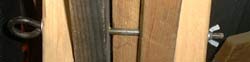
You don’t always need welding. Below is pictured the brackets for the roof rack I fitted to a 1988 Pontiac LeMans. It had factory “slots” for the rack to grab into, so I just needed to make four metal fittings top grip these and provide something for the longitudinal 2x4s to bolt to. These were made from scraps of 3/16 x 2” angle iron and other scraps of 1/8” plate. I had them laying around, but they would have cost 25 cents a pound at the local scrap yard.
The angle iron was simply cut to length and drilled for the tensioning bolt and the two bolts for the 2x4. The 1/8” bar stock was cut to shape, clamped in the vice and hammered down flat at each end to form 1/8” 90-degree “lips”. One lip grabs onto the car’s track, the other stands this grip jaw off from the angle iron to help the lower lip “dig in” more. It is held together by a common 1/4” bolt and nut with lock washer. A big vice and 3-pound hammer make short work of it, but a medium sized vice and claw hammer will get you there.
Once the parts were tested and found to work, I chucked a wire wheel in the drill and took off as much rust as I could. (Being unpainted scrap, there was plenty.) Then I ran them through some electrolytic de-rusting. Taking off rust with a battery charger was pretty cool, but it didn’t work as miraculously as I wanted it to. Next time I’ll just wire wheel it and hit it with some Permatex Extend or other phosphoric acid preparation and get on to painting it. Rustoleum “Rusty Metal Primer” would likely also be acceptable in lieu of the acid.
Before painting, it pays to scrub the parts with an old toothbrush and some Spic-n-Span. This does a good job of removing any remaining oil residue and an imperfect rinse won’t usually mess up the paint. Phosphoric acid is the “right” way, available from auto paint stores as DuPont 5717S. I have some, but haven’t bothered with this yet. Painting was a simple matter of a few light coats of spray “bare metal” primer followed by a couple coats of spray enamel. Brush paint and primer would have worked fine and is easier in my opinion. The brackets have been going strong for four years, and handily outlived the car. In fact, the photo above was the one last thing I wanted from the car before it went to the crusher.
On a subsequent car – a 1992 Geo Prizm – I had to make shaped blocks to fit the roof contour and drill holes in the tiny little rain gutters for threaded rod to tighten the rack down onto the roof. It worked fine. That car is dead too! (What can I say, I like ‘em cheap.)
This represents only one example of what might be done with fairly easy cold work. I’m sure other possibilities will leap to mind.
For those not used to cutting metal, a few things will make it much easier. First, get some sharp blades for the hacksaw. Your jigsaw or bandsaw will work fine with a metal blade IF AND ONLY IF you can slow it down! This means changing pulleys. Saws set for wood cutting speeds will just heat and break a metal blade. Fortunately, hacksaws work quite well if sharp and lubricated. In fact I find the manual hacksaw works better than my really nice Milwaukee Tool Saw-Zall. Slow blade speed with lots of pressure and lube is the key with metal cutting. The same is true for drilling metal, so slow drill speeds are good. You might find an old-fashioned brace and bit surprisingly useful. Again – lots of lubrication.
That’s right, lubrication. You need to lubricate the cut when sawing or drilling metal. They sell fancy cutting oil (of course) but almost any oil works. I use 5w-20 motor oil. Sometimes WD-40 for very small drill bits. The important thing is to stop and relubricate as soon as the cut dries out. Take note that you might still see lots of oil on the surface and none is getting to the cutting edge, so stop frequently. Oil is far cheaper than blades. Your cutting edges last a LOT longer and the cutting will actually go faster. Yes, even with all the stopping and starting. This is steel loses its hardness beyond a certain temperature (different for each type of steel). As soon as the cut dries out, the blade or bit heats up and dulls almost immediately.
Hacksaws also tend to wander in the cut because of the flexible blade. I found I could make accurate cuts by cutting at a fairly severe angle – maybe 30 degrees to the material. This allowed me to steer the very beginning of the cut while the trailing end of the blade was controlled by the earlier part of the cut. I have no idea if this is “right”, or what they teach in shop class, but it works.
Cutting Threads
This is more useful than you might imagine. True, we can buy bolts of almost any size. Almost. When the shaft of a bolt has to be the axle of something, like a leeboard for example, you don’t want threads chewing up the board or the hull. But you do want the threads to start at just the right place! You will likely not be able to buy just the right bolt, but you can certainly make it by adding threads to a longer one, then cutting it off. If you need a shaft longer than any available bolt, steel rod is cheap compared to bolts of any kind.
Be sure to lubricate well and feed the bolt or rod into the more open side of the die. I like to clamp the die in a vice and turn the bolt with a wrench, rod with vice-grips. That way I can push down on the end of the rod to get it started. You have to really lean on it until you have enough thread to guide the die as it cuts more thread. To finish the threads at just the right spot, flip the die over and cut the final threads to full depth. I think you’re supposed to use a different type of die for this, but I haven’t had any trouble doing it this way. Most of the time I don’t bother and just let the threads taper off.
With any tap or die, turn forward about 1/4 turn, the back 1/2 turn to clear the shavings, then advance another quarter turn and repeat. This is very important. Don’t do it and you’ll ruin the die. Even if it lives through the one you’re doing now, the threads won’t be quite right. You might also heat the rod enough to break it off in the die. Not fun. Even less fun is breaking off a tap in a hole. It’s damned near impossible to drill a tap out because it’s just as hard as the drill bit! So don’t hurry threading.
Speaking of taps, cutting internal threads is a little different. If they go straight through, one tap does the job. But if the hole “bottoms out”, you need a starting tap and a finishing tap to get fully cut threads all the way to the bottom. I avoid needing holes of this kind whenever possible.
Forging
I’m not talking about fancy blacksmithing here, of which I am most certainly not capable. But heating a piece of rod bright red and hammer forming an eye around a piece of pipe in a vice is workable for most of us. This may not seem too useful at first blush, but think of the axle for a mast tabernacle. It’s nice to have an eye on one side to put any old stick through as a wrench when tightening. But you may not find an eye bolt long enough at the typical hardware store, and if you do it may cost more than you’d like to pay.
Here’s a photo of the same type of eye bolt in my cheapie homemade shaving horse
(No, the shaving horse has nothing to do with boats. I built it for making banjo necks, believe it or not. Since I’m a funk bass player I felt I had to learn folk banjo. So of course I had to build a banjo rather than buying one. So I had to build a shaving horse. I think you are starting to appreciate the need for professional psychiatric help.)
Anyway, simple flattening and bending are not that hard if they don’t have to be that exact or if you can jig them. The first step is some simple equipment.
For a forge, you need little more than a backyard charcoal grill. It’s nice to use a coffee can to help contain your heat and keep the blast coming from below. I make a box-shaped stack of firebricks with a slot to let the blast in, and create that blast with a spare squirrel cage fan that I built a box around. But it needn’t be that elaborate. Any fan will do. The more directional the better. A shop vac exhaust might work. You don’t need an airtight blast duct, as most fans will be overpowered and require that you let most of the blast escape. Remember that real blacksmiths most often use a hand-cranked bellows. Not a whole lot of air, really. In fact, I don’t need the fan at all on a windy day. Too much blast actually reduces the temperature in the fire because it has to heat all that air. It also oxidizes the metal faster, so go easy on the blast. Have your metal good ands buried in coals, so it can soak up heat in a place where there is little free oxygen.
And if you’re using charcoal, don’t use all that gasoline stuff to start it. Make a chimney from a coffee can and start some thin wood scraps in it. A few broken up scraps of the 1x1 stuff we use around the edges of hatch covers would be perfect. Use this fire to start a few briquettes, then add the rest. There’s no need to have all that petroleum in your lungs, on your metal or in your food.
Back to forging. Those with cutting torches can use them for point heating. Just don’t touch the oxygen lever! This can use some gas, though, so keep in mind that oxy-propane is way cheaper than oxy-acetylene. Regular propane hand torches aren’t really enough heat for anything but very small work. I have used them to reform tips of pliers and screwdrivers for special tasks, but more than that needs more heat. (Before you run off to try reforming your tools, be sure to read up on annealing, hardening and tempering.)
You’ll need tongs, but since vice-grips were designed by a blacksmith to be a better form of tongs, they would be my first choice. Otherwise regular pliers work. Wear gloves, though. Welding gloves are ideal but work gloves are better than nothing. We’re playing with very hot metal. Even when it looks black, it can still be well over 500 degrees! Speaking of which, when you’re in a shop never pick up any metal with your bare hands unless you test for heat first. Do this by removing your glove and holding the back of your hand over the metal. The palm won’t feel the heat until it’s too late.
You don’t need to quench metal, as you see smiths do. It actually tends to make the metal brittle, so I avoid it. But it is handy to keep a bucket of water nearby for more obvious reasons. The useful part of quenching is when you want one part to bend but not another, so you quench that other part. Not too long, though, or you’ll start pulling heat out of the part you do want to bend.
Any 3 pound hammer will work, and a heavy duty vice is recommended. I have about 18” of railroad rail I use for an anvil. It barely works at all because rail is made to be springy, which wastes much of the hammer’s power. When possible I try to use it on end so it can do some good. (If I ever see a chunk of 4” or 5” plate, that puppy is mine!) For small stuff, though, we mostly work with the vice anyhow.
For the anchor I made in welding class, I had to forge a ring for the end and partly flatten the shank to meet this ring. Flattening 3/4” rod was easy. You just heat it and beat it, then repeat it. Making the ring was harder. I formed it around a pipe held in a vice, like I mentioned earlier, then cut it, flattened it, and welded it to the shank so the single weld closed the ring.
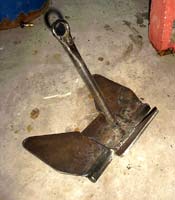 Getting the rod to form accurately to the pipe can be tricky. Here’s the trick – heat only the first inch, then form it to the pipe. Then heat the end and quench it so only the next inch is cherry red. Then hammer that inch flat to the pipe. The first inch should also lay flat on the pipe. Keep working your way back until it’s all against the pipe, coiled like a spring. Then cut off the excess and heat the whole thing to hammer it into a flat ring. On my first attempt I strayed from in incremental approach and was only able to complete the ring through heroic efforts. Do it in the right order. The reason is that you want to be able to use the long scrap end of the stock as a lever against all of the hammer blows. If you can’t, it gets very difficult.
Brazing
Since we have the homebrewed forge, we can also braze! Brazing is not as strong as welding, but is still very strong. Remember that saltwater guys have all their hardware cast from the stuff we use as brazing rod on steel. Yup, brazing is getting brass or bronze to melt and stick steel parts together. This can do things that welding can’t, like joining pieces of different materials or wildly different thicknesses. If you try to weld 1/4" plate to sheet metal, for example, it is very hard to avoid burning through the thin stuff before you heat the thick stuff! And they cool and warp at very different rates.
This is exactly the case with “Bolger oarlocks” (See Jim Michalak essay). Thin sheetmetal bands retain the oar to the thole pin, but this metal needs to be built up thicker where the pin pierces it or it will rip. My approach to such oarlocks replaces that whole steel strap with rope and sidesteps the entire issue. In fact, I have so far always managed to sidestep needing to braze anything at all.
I have gone out of my way to do so, too, because brazing can be tricky, as one must “read” the heat relatively accurately. It also requires the heat of an oxy-propane or oxy-acetylene system. Perhaps I’ll get off my butt and try some examples in the future. Of course I’ll report what I learn, be it good or bad.
Welding Prep
Sometimes welding is truly required, like for building a boat trailer. The actual welding is the easy part, though. Getting all the pieces prepared is more critical, and the more time-consuming and expensive part. Welders will often charge far less for welding a prepared job. This is why the cold work is the most important set of skills. If you can only afford a welder or a grinder, get the grinder. Any metal project requires far more grinder time than welder time. If you are considering a jigsaw, think about getting one with a slow speed for metal cutting. Also get a pair of cheap coveralls. Grinding is a very dirty job! Don’t skimp on eye and ear protection either. It’s pretty hard to enjoy sailing with muffled senses.
Gudgeons
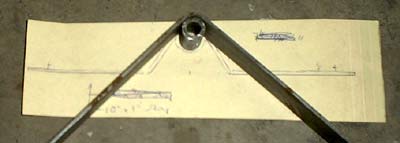
 Here’s a good example of a welding prep project, and something where we’re always looking for a good way to cheat the chandlery. The “Cary Hinge” detailed on Jim Michalak’s site works very well and avoids the use of metal altogether. But it’s bulky and requires a flat transom. My new schooner doesn’t have a flat transom, so I designed these, taking advantage of the fact that 5/16” steel rod fits nicely inside 1/4" iron pipe.
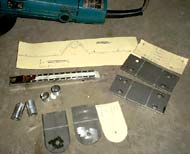
Pictured above are the first parts I cut, along with the cardstock patterns, soapstone holder and trusty grinder. The white lines that look like chalk are soapstone. This is made for marking metal. For a dollar you can find one at a decent building supply store. You sharpen this kind of “pencil” on your grinder. Those lines are the bending lines. I did this as mentioned above, by clamping the piece in a vice and tapping with a hammer. All the bends on this set of hardware, even the pins, were done cold.
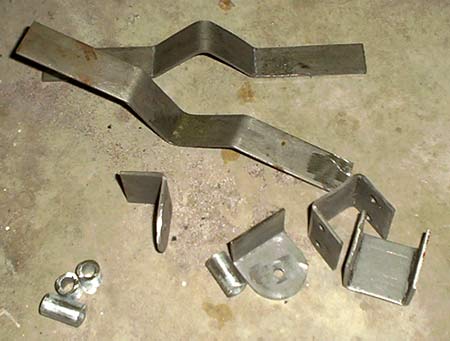
U-shaped channels can be very tricky if they are too narrow to bend around your vice. I could only go partway on my big vice, but my older, smaller one saved the day. Bigger isn’t always better.
Not shown in the first picture are the pieces that fit on the boat side. The pattern was shown, though. I couldn’t show the parts before bending, because the middle bend has to come first. Otherwise you’d never get the other two bends equidistant from it. The middle bend must be bent to fit the 1” long piece of pipe. This is how I bent it to fit.

Easy. Then you have to match it up to the pattern and mark where the other two bends go. As you see, I drew the pattern with 3/8” pipe in mind, so it doesn’t match exactly. No matter as long as the other two bend marks are equidistant from the pipe and the axis is the right distance from the hull.
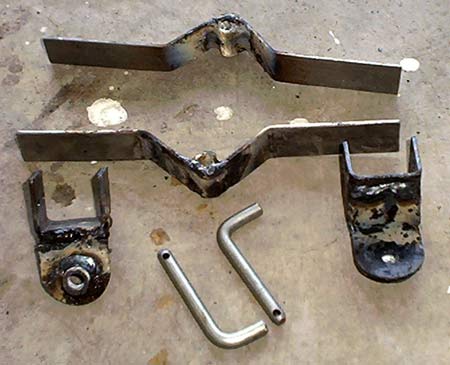
Here are all the parts ready for welding.
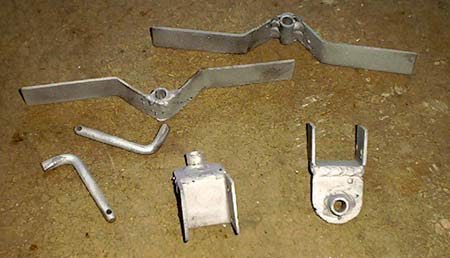
All I’ll say about the welding is that thin metal is tricky. You have to get the amperage just right. I was using 3/32” 6011 rods at 90 amps. The whole thing took only 4 rods. The only difficulty I found was that I could only weld maybe 1/2" at a time, then had to let the metal cool for a while. Otherwise the heat built and it was too easy to completely melt the thin metal. I found out the hard way by melting through part of the pipe on one of the boat side gudgeons. Since they’re over-engineered, I think it’ll be OK.
What is “thin metal”? For arc welding, 1/8” is thin. If you have a MIG setup, this is a breeze. Any professional welding shop should be able to do this quickly and quite cheaply if you have the prep all done. If you live in farm country, a great many farms have a family member who is good at welding. Pay them well. Their jobs don’t have benefits like most of our do. Here’s what the parts looked like after welding.
Ugly, huh? Now here they are after sandblasting. You can probably have the welding shop do this pretty cheaply.
I painted them right after this photo. Anybody notice what I forgot to do? No mounting holes on the boat-side gudgeons! I had to drill them after the paint dried fully, then clean the oil off, then put some primer on the newly-bared area. Apparently I don’t always think ahead about everything.
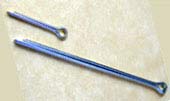
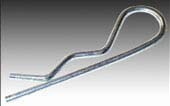
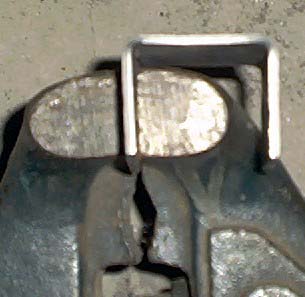
But I did think ahead about capsize. This is a weakness of typical rudder hardware. Notice the holes in the tips of the pintles. These are for cotter pins so we don’t drop our rudder assembly if we capsize, but still can remove it with minimal fuss. There are two kinds of cotter pins familiar to anyone with a boat trailer. There’s the standard cotter pin (below left), which locks the castle nut that holds your wheel bearings into the hub. Then there’s what I now know is called an “internal hitch pin” (below right). This is the one that goes through the pin that holds the hitch insert in the receiver. You can see how the cotter pin would be a pain and the hitch pin is easy. Best of all for those less neurotic than I, this modification can easily be applied to standard rudder hardware.
Be cure to use black iron pipe, not galvanized. I could only find galvanized. The welding heat vaporized the zinc, which is toxic in gas form. I used a fan to keep it away from me, but it was scary and I won’t be welding galvanized again. They were later washed with Spic-n-Span to get any oils off, primed with Rustoleum Bare Metal Primer, and painted with Rustoleum black enamel. Both paints were brush-on. If you look at the gudgeons in the Duckworks store, you can see how this could be done with no welding at all, but I went for obscene strength, since I tend to be rough with my things.
Speaking of the Duckworks store, they offer perfectly good gudgeons for about the most reasonable price I’ve seen. Chuck lets you have it all – get them cheap and support a genuine home-grown, American-made small business. Given the prices at the Duckworks store, I’d only make my own gudgeons if I needed special dimensions or if I were insanely devoted to making my own stuff. (What can I say, I like sticking metal together.)
If you buy them, I would still recommend you drill a hole for a hitch pin in at least the top pintle. It will make your life easier if you ever capsize.
Welding
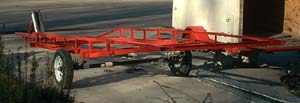
Once you take the plunge and get into doing your own welding, it’s surprising how easily large projects become accessible. As mentioned above, I only had a few welding classes before I started on the trailer. It was nice to start in class under the supervision of a real pro. I finished it at home, about 106 hours for the metal frame, starting with a pile of scrap metal and ending with a painted frame. About another hour and a half to assemble and mount the suspension kit. I spent $150 on scrap steel, about $50 on welding rods and about $25 on paint. The suspension kit was $223 from abctrailerparts.com, and I doubt you’ll find a better price anywhere. I also went through some consumables, like maybe $8 in cutoff wheels and $16 in safety glasses. But I wreck safety glasses pretty fast through carelessness. $450 + 108 hours is not a bad price for a new trailer for a 24’ boat! I’m not counting making the bunks, since you’d have to do this even if you bought a new trailer. It would take a lot less time and material for a shorter trailer, since all that trusswork would not be necessary for stiffness.
Welding was the easy part, actually. The hard part was the design. I did some pretty heavy-duty reading on the engineering involved, then made some guesses to work around the scrap I had access to. Guesses have to be reasonably close to the mark with a trailer, since too much excess weight magnifies the forces trying to break the trailer! Just to give you some idea, the tongue is 3” x 3/16” tube, and the main sides are 3” x 4.1 lbs-per-foot channel. The big gussets are 3/16” tread plate. The rear lower truss web is 1/8” x 1.5” angle from a discarded bed frame, and the rest is all 1/8” x 1” angle. All the welds were made with 6013 rod when horizontal, 6011 when not. (6011 sticks better but is harder to clean up.) You don’t need anything stronger than 60XX rod, and the higher numbers are harder to work with.
Final Word
I offer one caution: once you CAN make things in metal, the temptation is to make everything from metal. Don’t. If wood is strong enough, it can be cheaper and lighter. Use wood when possible!