The building of the Q & D KAYAK #1
by John Wright
The Colorado 100 is a 100 mile race from Bastrop, Texas (east of Austin) South to Columbus. The race starts at 7 in the morning and you must reach the finish line no later than 36 hours later. The river generally is low in the summer months but there are not rapids or portages other than many shallow bars that are no more than 50 yards or so. Last year the first finishers only took something over 11 hours to finish. The water was high and flowing fast!
This kayak is intended only for this race. I know nothing about kayaks, or canoes or rivers or lakes.
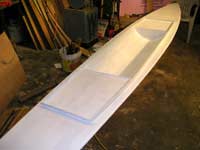
This boat is intended to be light (22 lbs.) and fast and is an inch less than 16' made out of two sheets (including the deck). If it saves me 15 paddle cycles a mile that would be 1,500 paddles in the race! The construction is what I call "glue and fold and clamp and glue". There are no frames or chines. Eight feet of the bottom (outside) has some fiberglass cloth. I used cheap ($11) 1/8" plywood. If I had known to use the burch plywood "intended" to be bent ($27 sheet) I would not have had to fiberglass a portion of the bottom. This is the second little boat that I have built using this method and I have learned lots and lots in the last five days. One is to disconnect the garage door operator when subject boat is in its trajectory. That damage cost a day of repair and dry time and a little weight.
The following is not intended to tell you how to build, just show the concept with some details. There are important details not shown for brevity.
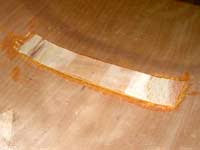
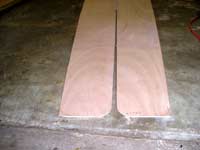
Butt two pieces of plywood together with 3" fiber glass tape both sides. I must "barf" when I think "scarf". I am not a craftsman.
(click images to enlarge)
|
 |
|
|
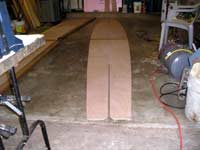
The "hull" is 28" wide about 1'-6" aft of midship and the bow is 7" on each side of the middle cut. That will make the bow 7" high. Saw the radius (14 oz. coffee can lid) and 4' down the middle of each sheet at each end. Notice that the slot is wider at the end. This produces some rocker and allows the bow and stern to be formed by folding. |
|
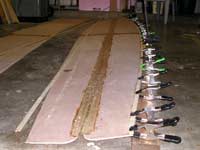
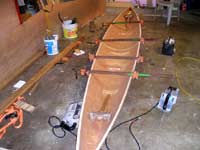
This shows Duckworks 3" fiberglass tape run from bow to stern and over the slot at each end on the bottom side of the boat. Keep glue out of the crack (off of floor). That will become a fold line. Glue several 1/2" wide plys of plywood or wood ripped into strips to form the gunwale. Never have enough clamps!
|
 |
|
|
Indispensable gadget that allows me to rip long pieces of material by myself without a table or anything to support the material. I do not have a proper shop, yet! I have only been building boats since April 1, of this year. |
|
|
Use tie down straps to bend into desired shape. |
 |
|
|
|
This little strip of plywood is glued to the inside of the bottom in a number of places down the middle of the boat. These "battens" make the bottom more flat and the sides more curved. I should have installed twice as many because they telegraphed through the hull. |
|
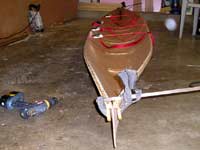
More or less the final shape. Notice the 12# sledge hammer in the bow. When stressing the plywood like this the bow wants to reverse into a concave shape. It takes a bigger hammer to change its mind. Note the two 30 yr old 15 1/2 lb. Rockwell and 14 lb. Porter Cable belt sanders with rough sandpaper. I hate to sand and they love to.
|
|
|
|
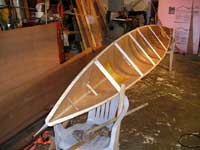
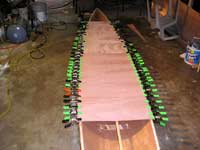
The clamps have been replaced with the 3" FG tape glued to the gunwales to hold the shape and the gunwales have been sanded flat to accept the 1/8" deck. |
|
Gluing the deck on. Notice I am using the FG tape to support a 1x1 pine stringer down the middle of the deck that will glue to the underside of the deck. Kind of a tension structure.
|
 |
|
|
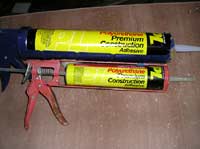
The large (3x) size is just a couple of bucks more. |
|
|
Quick coat of primer. I hate to sand! Off to soccer practice. |
 |
|
|
|
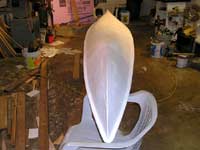
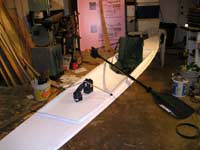
I cut a retangular hole out of the deck for the cockpit and cut a piece of plywood wider and just pushed it down to touch the bottom and glued it into place. I ripped some clear cedar to make the splash rail and a place to strap down gear for the river cruise. I think I will put an inspection plate just in front of and behind the cockpit for access into the hull and I may add a foot steered rudder after the test paddle. |
|
$45 dollar boat,$14 dollar seat and $20 paddle. I shopped around and really wanted the $360 paddle but I do not relate well to carbon and would not know how to use a "foil" paddle anyway. As a friend at soccer practice pointed out this evening, that the paddle cost prorated over two races would be less than $2 per mile. Hmmmmm!
|
|
|