| Rapid Building a PD Racer.
The Puddle Duck Racer is a class of sailboat designed by Shorty (David Routh), frequent contributor to Duckworks Magazine and maintainer both his website www.shortypen.com and the website devoted to PD Racers www.pdracer.com.
 The PD Racer was designed specifically to get the most out of a boat that can be built quickly and cheaply. The only design constraints are that it must be 48 inches wide and the bottom 10 inches must conform to the specifications. Above 10 inches, you can do anything you want. The design and placement of the sails, rudder and leeboard are all up to the builder. With 27 of these boats already built, with many more planned, it is quickly becoming a popular design. The PD Racer was designed specifically to get the most out of a boat that can be built quickly and cheaply. The only design constraints are that it must be 48 inches wide and the bottom 10 inches must conform to the specifications. Above 10 inches, you can do anything you want. The design and placement of the sails, rudder and leeboard are all up to the builder. With 27 of these boats already built, with many more planned, it is quickly becoming a popular design.
|
 I chose to build a PD Racer because I want to spend my time sailing, not building. At less than $100 for the complete boat, including rudder, leeboard, and rigging, it fits my pocket book as well. Of course, you cost of construction may vary. I chose to build a PD Racer because I want to spend my time sailing, not building. At less than $100 for the complete boat, including rudder, leeboard, and rigging, it fits my pocket book as well. Of course, you cost of construction may vary.
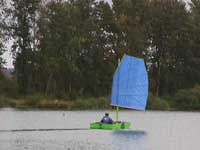
I built my first PD Racer out of 5.2mm exterior plywood and have had great success sailing it on a filthy duck pond 10 minutes away from my house. |
 But what I really wanted was someone to race against. I finally cornered John, a guy I work with, and convinced him to let me come to his house and help him and Logan, his 14 year old son, build a PD Racer. But what I really wanted was someone to race against. I finally cornered John, a guy I work with, and convinced him to let me come to his house and help him and Logan, his 14 year old son, build a PD Racer.
My first step was to come up with a PD Racer plan that would be fast and easy to build. Shorty had talked about using planks instead of plywood for the sides, transoms and bulkheads. Because the bottom and decking could be attached to the planks, we wouldn’t need to use chine logs.
I designed a PD Racer with 11-1/2 inch sides – the width of a 1x12. From there, I decided to use 1x8s for the bow and stern transoms and 1x10s for the bulkheads. The entire Bill of Materials for a bare hull with this design is:
(2) 8 foot 1x12s for the sides
(1) 8 foot 1x10 cut to 46-1/2 inch lengths for the bulkheads
(1) 8 foot 1x8 cut to 46-1/2 inch lengths for the bow and stern transoms
(2) sheets of 5.2mm external plywood for the bottom and the decking
(3) 8 foot 1x2s for external skids
(1) 8 foot 2x4 for bracing and parts
I have had experience with group building projects before, and it usually ends up with the other participants standing around watching me measure and cut things. I decided to cut the major components prior to the first day of building. The first thing was to take my plan and convert it from paper to reality – the joy of lofting. |
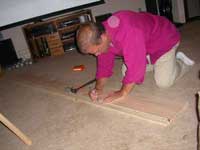 The first step is to draw the station marks every 12 inches and the end of the rocker at 90 inches and the end of the bow at 93 inches. The first step is to draw the station marks every 12 inches and the end of the rocker at 90 inches and the end of the bow at 93 inches. |
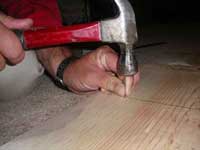 Next, I marked each station according to the plans and drove a small finishing nail at that point. For the stations on the edge of the board, I drove the nail into the corner then bent it up as well as I could. Next, I marked each station according to the plans and drove a small finishing nail at that point. For the stations on the edge of the board, I drove the nail into the corner then bent it up as well as I could. |
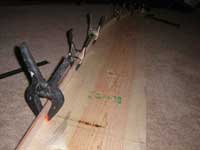 I then clamped a batten to the nails.... I then clamped a batten to the nails.... |
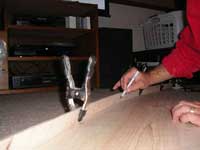 ....and traced the curve onto the plank. ....and traced the curve onto the plank. |
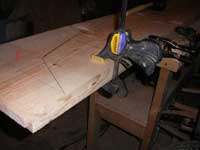 I am no craftsman, and so when I make mistakes, I make them all at once. I took both sidepieces and clamped them firmly together. I am no craftsman, and so when I make mistakes, I make them all at once. I took both sidepieces and clamped them firmly together. |
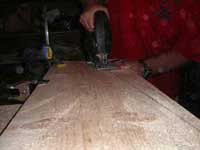 Then took my jigsaw (yes, jigsaw. I am scared of my circular saw) and cut both planks at once. That way you get a perfect match in half the time - if you don't screw up and ruin twice as much wood in one goof. Then took my jigsaw (yes, jigsaw. I am scared of my circular saw) and cut both planks at once. That way you get a perfect match in half the time - if you don't screw up and ruin twice as much wood in one goof. |
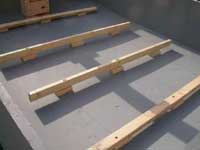
 My next step was to cut the 1x8 and 1x10 into 46-1/2 inch lengths so they could become the bow, stern, and bulkheads. Finally, I cut (16) 45degree triangles from a 2x4. These I attached to the ends of the bow, stern, and bulkheads to act as bracing. Finally, I trimmed the stern transom to a width of about 5-3/4 inches to minimize the trimming we would have to do later. My next step was to cut the 1x8 and 1x10 into 46-1/2 inch lengths so they could become the bow, stern, and bulkheads. Finally, I cut (16) 45degree triangles from a 2x4. These I attached to the ends of the bow, stern, and bulkheads to act as bracing. Finally, I trimmed the stern transom to a width of about 5-3/4 inches to minimize the trimming we would have to do later.
I delivered these parts to John’s house the next day (notice the bracings on the bow, stern and bulkhead pieces) and we went over the construction process – taking note of what we had and what we needed to accomplish the next stage: Constructing the hull.
At this point, we had to make some decisions. This is an experimental boat – no one has made a plank version of the PD Racer before. I didn’t want to permanently attach all the pieces to each other in case the design didn’t work out to our liking. Rather than use nails and glue, we decided to go with rust proof decking nails and exterior caulk in case we decide to disassemble her later on.
To actually assemble this hull, we used:
(2) tubes of black Painter’s Caulk
(1) 1lbs box of 1-1/4 inch rust proof deck screws
(1) 1lbs box of 1-5/8 inch rust proof deck screws
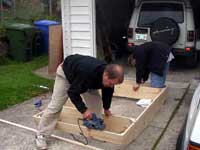
The first step was to caulk the joint and attach the stern to one of the sidepieces using the 1-5/8 inch screws. There was no set plan for the placement of the bulkheads except that they were to be straight up and down and connect to the side at their maximum height.
|
 When we finished attaching all the cross pieces to one side of the boat, we caulked the other end of the cross pieces and attached the other side. When we finished attaching all the cross pieces to one side of the boat, we caulked the other end of the cross pieces and attached the other side. |
 I then took my electric planer – one of my favorite tools – and knocked off the edges that stuck up above the curve of the rocker. This gave us a completed frame for us to attach the plywood to. I then took my electric planer – one of my favorite tools – and knocked off the edges that stuck up above the curve of the rocker. This gave us a completed frame for us to attach the plywood to. |
 We made the mistake of trimming the plywood to length before attaching it to the frame. We should have left it long and trimmed it after screwing it to the frame. As it was, we were a tad off in our placement and ended up with it long on one end and short on the other, so we have to trim anyway. We made the mistake of trimming the plywood to length before attaching it to the frame. We should have left it long and trimmed it after screwing it to the frame. As it was, we were a tad off in our placement and ended up with it long on one end and short on the other, so we have to trim anyway.
To attach the plywood, we first laid a bead of caulk along all the contact surfaces. We were a little enthusiastic with the caulk, to say the least, but it is probably better to have too much at this stage than too little. |
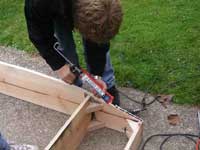
 Then we took electric drills outfitted with screw drivers (best invention of the 20th century) and drove 1-1/4 inch screws every 3 inches around the perimeter and where the plywood crossed the bulkheads. Then we took electric drills outfitted with screw drivers (best invention of the 20th century) and drove 1-1/4 inch screws every 3 inches around the perimeter and where the plywood crossed the bulkheads. |
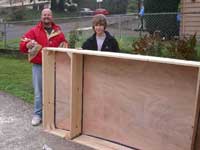 Viola! In 3 hours of work, we had an unpainted hull capable of floating. Viola! In 3 hours of work, we had an unpainted hull capable of floating. |
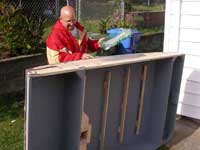
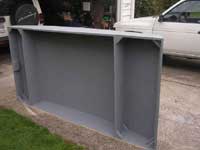 John and Logan filled in the screw divots with more caulk and then covered the boat with a coat of primer. John and Logan filled in the screw divots with more caulk and then covered the boat with a coat of primer. |
 The next day was less dramatic – we started in on the small, technical work, but the team had coalesced the day before so we went at it with a will. The next day was less dramatic – we started in on the small, technical work, but the team had coalesced the day before so we went at it with a will.
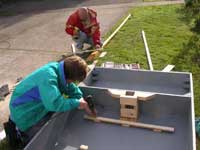
The mast for this boat is made from (2) 12 foot 2x4s laminated together and planed down to a 2-1/2 inch diameter. It is still rectangular at the bottom where it will be inserted into the mast partner. Our first task was to install the mast partner.
Ours was simple, just a box made of 2x4 pieces and braced with more 2x4 pieces. We also put another piece of plywood on the bottom to help protect the hull from the weight of the mast. The sides fit closely, but we kept the gap forward/aft so we can rake the mast a bit if we wish. We will need to add another pair of braces near the bottom of the mast partner as well. |
 The hardest part of constructing the PD Racer, in my opinion, is attaching the skids to the outside of the hull. The skids add to the stiffness of the hull and help prevent your putting your foot through it as well as protect the bottom from rocks and such and are very necessary. The hardest part of constructing the PD Racer, in my opinion, is attaching the skids to the outside of the hull. The skids add to the stiffness of the hull and help prevent your putting your foot through it as well as protect the bottom from rocks and such and are very necessary.
I had originally intended to use 5 skids placed 8 inches apart, the outer ones being 4 inches form the edge, but John had seen my PD racer and really liked the false decking. |
 The false decking adds a lot of weight to the boat, but it is really nice for keeping you feet and butt out of the water. Also, it adds (9) 8 foot 1x2s to the BOM. The false decking adds a lot of weight to the boat, but it is really nice for keeping you feet and butt out of the water. Also, it adds (9) 8 foot 1x2s to the BOM. |
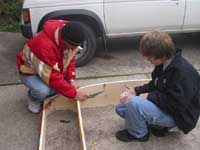
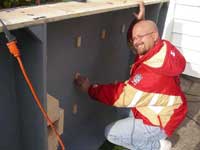 The first step is to make little ‘footpads’ to help with attaching the skids to the hull. The rocker puts a lot of strain on the skids – enough to break skids with large knots. As the hull is only 5.2m thick, you can’t just screw the skid to the hull and not have it tear the screw out. The footpads give the screws something to grab on to on the inside of the boat. They are prone to splitting, so make a few extras. The first step is to make little ‘footpads’ to help with attaching the skids to the hull. The rocker puts a lot of strain on the skids – enough to break skids with large knots. As the hull is only 5.2m thick, you can’t just screw the skid to the hull and not have it tear the screw out. The footpads give the screws something to grab on to on the inside of the boat. They are prone to splitting, so make a few extras.
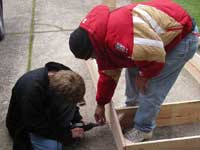
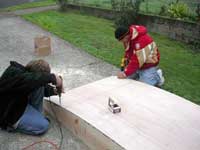
Someone on the inside holds the footpad against the plywood while the people on the outside position the skid and drive the screws. There are other ways of doing this, I am sure. |
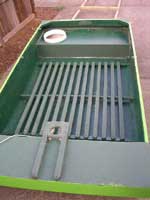
 Once the skids were attached to the hull – screwed to the bow, stern, bulkheads and footpads - we ran a 3-foot runner across each line of footpads. These runners will support the false decking. Once the skids were attached to the hull – screwed to the bow, stern, bulkheads and footpads - we ran a 3-foot runner across each line of footpads. These runners will support the false decking. |
 To minimize the curve of the hull, the outer runners are laid flat and the inner runners stand on edge. The false decking is made from 4-foot 1x2s spaced 1-1/2 inches apart. The beauty of using footpads is that they allow water to freely slosh about under the false decking. To minimize the curve of the hull, the outer runners are laid flat and the inner runners stand on edge. The false decking is made from 4-foot 1x2s spaced 1-1/2 inches apart. The beauty of using footpads is that they allow water to freely slosh about under the false decking. |
 We still need to attach the false decking, add the bottom set of braces to the mast partner, attach the fore and aft decks, build the rudder, tiller, and leeboard, decide on a sail plan, make the sail, paint her and rig her, but we are well on our way. In just 6 hours of work, we went form a pile of parts to a boat that would float. We still need to attach the false decking, add the bottom set of braces to the mast partner, attach the fore and aft decks, build the rudder, tiller, and leeboard, decide on a sail plan, make the sail, paint her and rig her, but we are well on our way. In just 6 hours of work, we went form a pile of parts to a boat that would float. |