|
A Polytarp Junk Rig |

|
|
By Mike Mulcahy - North Star, Alberta - Canada |
How to Make a High Performance Polytarp Junk Rig
 |
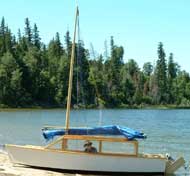
The junk sail is a safe and easy-to-use rig.
(click images for larger views) |
|
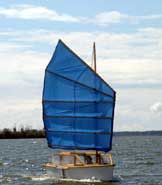
The junk sail is a safe and easy-to-use rig. Battens prevent it from flogging. To reef, simply release the halyard and let one panel (or more) down into the lazyjacks and then reset the yard parrel. If you let go of the sheet, the sail runs out to the side and hangs quietly in the wind while the boat comes to a stop. The whole sail can be dropped in an instant, if necessary. In my birdwatcher cabin style boat I can raise, lower and reef my sail from inside in bad weather.
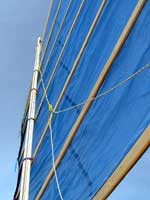
But those battens that tame the sail can also flatten it and cause poor performance, especially upwind. My sail gets around this problem in two ways. Cambered panels add shape to the body of the sail and the leech is extended into a gurney flap. Although this looks as though it would do more harm to the aerodynamics than good, the gurney flap makes a considerable improvement. Without it the sail is slower and not as close winded (I tried it).
| Cambered Panels |
|
|
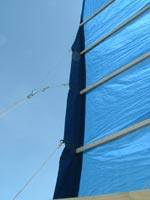 |
Gurney Flap |
|
| Gurney Flap shaped leech on a Chinese Junk |

|
|
The cambered panels and gurney flap work great together. I can tack between about 90 degrees (measured on my GPS), and all other points of sail are equally good.
Making the Sail
Camber is created in the panels by sewing darts (long triangular folds) in the sail at the batten lines (there are also two triangles of material at the foot and one at the peak of the sail which are cut off, contributing to the camber in those areas). The camber in all the panels is about 5%. The gurney flap also has a 5% depth; this gives the lower sail 10% total camber. There is a general consensus that there should be less camber in the upper panels. The 5% camber in the fanned panels (which have no gurney flap) seems about right.
 |
Sail Layout |
|
Spread out your tarp, fastening down the corners with tape. If you don’t have enough room indoors, do this outside on the lawn using tent pegs. With a tape measure, marking pen and a board for a straight edge, lay out the sail, marking in all the lines. The darts (the purple triangles in the diagram above) are not cut but are sewn later. The blue triangles (in the diagram) at the peak and foot are cut off. Cut out the rest of the sail (but don’t cut off the gurney flap).
| Sewing the Darts |
|
|
Sew the darts using heavy thread and large stitches. If your machine has trouble sewing the polytarp, try putting masking tape on the bottom seam line (next to the presser foot). Don’t cut off the finished darts, fold them down. They will be clamped between the batten halves, strengthening the seam line.
 |
Luff and Leech Reinforcements |
|
Next, reinforce the luff, leech and gurney flap. Almost any strong material with a tight weave will do. I used a single layer of 420 denier nylon packcloth sewn to one side of the polytarp. A layer of a thinner material sewn on each side of the polytarp would also be good. A row of straight stitches (heavy thread, large stitches) sewn along both edges of each reinforcing strip should be enough. Note that the gurney flap reinforcement extends several inches into the sail battens. It is important that batten screws penetrate this (and all the reinforcement strips) to tie the sail together. There are no stiffeners in the gurney flap; its shape is created by the tension of the sheetlets.
Along the head and foot of the sail and along each batten line place a layer of duct tape on each side of the sail. This gives the yard and battens a better grip on the polytarp.
The yard and each of the battens are made up of two pieces, screwed together with the sail sandwiched in-between. The batten and yard measurements are for the assembled pieces, i.e. the 1" x 1 ½" battens are actually 2 pieces each ½" x 1 ½". My battens are spruce and I had to do some scarfing to get rid of knots. Sand down any sharp edges and give the yard and battens a couple coats of varnish before assembly. Place your best battens at the top of the sail where the most stress will be.
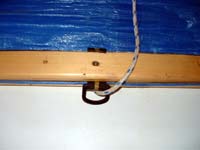
Fasten the batten halves together sandwiching the sail at the batten lines using #8 by1" flathead wood screws and spacing them 7"-8" apart. Predrill the screw-side batten so the batten halves will pull tightly together. The darts folds should lie between the batten halves. Attach D-rings for the lazyjacks to the bottom batten with short pieces of strap caught by batten screws. The yard halves fasten together with #8 by 1 ½" screws, sandwiching a 1 ½" wide strip of polytarp at the head of the sail. The “boom” on this sail is a batten the same size as the other battens.
| Lazyjack D-Ring |
|
|
Install grommets (or D-rings) in the edge of the gurney flap for sheetlet attachment points. The sail with the yard and battens is collectively called the sail bundle and now needs only the sheetlets and parrels to be finished.
Rigging
A junkrig’s mast needs to be vertical. (If it had a mast that was canted back, the weight of the battens would prevent the sail from swinging out to the side in very light wind.) The position of the sail on the mast is varies, but typically ¼ to ? of the sail is in front of the mast. The sail’s balance can be adjusted by shifting the parrel attachment points (on the battens) and halyard attachment point (on the yard) to move the sail forward or backward on the mast.
Rigging on junk sails can be quite complex. Fortunately, a smaller sail like this seems to need only a simplified rig that is fast and easy to set up. I can step the mast and rig my sail in about 10 minutes.
All the lines on my boat are from the local hardware store. The halyard is ?" braided polyester. Elsewhere I used braided polyester clothesline and three strand yellow polyprop. I like the braided line best but used three strand line where I wanted something that was easy to splice. My sheet is 5/16" braided nylon.
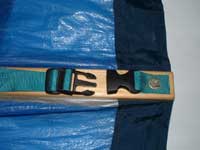
Parrels hold the sail to the mast in the correct position. The battens have fixed parrels (that is, they are not normally adjusted during sailing). These are made of 1" nylon webbing with quick release buckles. Rigging the sail is simplified if the parrels are different colors. The yard has a running parrel – it is reset each time the sail is raised or lowered. This parrel runs through a nylon fairlead on the yard and is cleated at the base of the mast. To determine the position of these parrels, spread the sail (with battens and yard attached) on the ground and lay the mast on top. Mark the positions for the parrels on the battens. The batten parrels are attached with 10-24 machine screws and nuts with suitable washers. At the same time scope out the yard attachment point and rig the yard parrel.
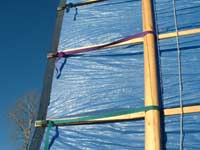 |
Batten Parrels |
|
| Batten Parrel Quick-Release Buckle |
|
|
 |
Yard Parrel with Nylon Fairlead on Yard |
|
The lazyjacks form a cradle that the lowered sail drops into. The two rear lines attach on either side of the sail with (aluminum) snap-hooks to a third line at the foot of the sail. This (third) line runs from one snap-hook down through a D-ring at the foot of the sail, up to the other snap hook, back down through the other D-ring and back to the first snap-hook. The front (mast) line runs down the outside of the sail parallel to the mast, wraps around the mast below the sail and ties back to itself. This is left tied; when rigging, the sail bundle is slid between the mast line and the mast.
| Lazyjacks Diagram |
|
|
 |
Lazyjacks |
|
The sheeting also uses aluminum snap-hooks. Since these snap-hooks come in different colors, they can be color-coded to their sheetlets to make sail rigging easier. The sheetlets are ¼" braided line.
| Sheeting: |
|
|
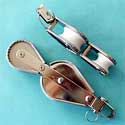
My homemade fiddle block in the photo below works OK but I have ordered a fiddle block from Duckworks. The fiddle block in my drawing (above) looks more like that one.
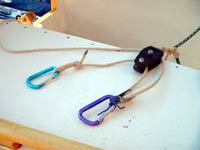 |
Sheeting Blocks and Snap Hooks |
|
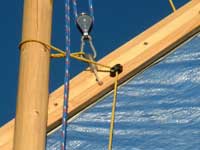
The top halyard block hangs on the masthead from a steel pad eye. The bottom block clips into a short loop of rope on the yard with a steel snap-hook. Two nylon pad eyes anchor the lazyjacks to the masthead. Note that the top halyard block hangs midway between the side and the back of the masthead.
| Mast Head |

|
|
Junk sails sometimes use downhauls (especially in higher winds) and I have webbing loops on my battens and a cleat on the mast to rig one, but so far I’ve never needed them.
To rig the sail, slide the sail bundle into the mast lazyjack and clip in the rear lazyjack lines to the bottom loop. Clip the batten parrels together (around the mast). Connect the lower halyard block snap-hook to the yard. Pass the yard parrel around the mast and snap it into the halyard block snap-hook. Fasten the two sheeting snap-hooks to their sheetlets. Raise the sail, set the yard parrel and you’re off.
Since they reef so easily, junk sails are usually a little larger than conventional rigs for a given boat. My sail, reefed down one panel, is about the size of the balanced lug rig designed for the boat.
To make a different size rig a panel can be added or subtracted at the bottom of the sail. If the sail is to be made a different width, or the batten spacing is changed, you will need to recalculate the dart sizes to get the right camber. Here’s how I figured out the dart sizes on my sail. My battens are 132" long. I wanted 5% camber in the panels so 132" x 5% = 6 ½" camber depth (this is also the gurney flap width). I held a piece of line (slackly) on a yardstick at the 0" and 24" marks (for the 24" batten spacing). I adjusted the slack until the line hung down 6 ½" from the yardstick (for the 6 ½" camber depth). The length of line needed to create the slack (29" in this case), is the amount of material needed in the panels to bag out to a 5% camber (6 ½" depth). The difference between the slack line measurement (29") and the batten spacing (24") is the dart width – 5". For the fanned panels I measured 1/3 of the batten length in from the leech and used the batten spacing measurement at that point, still using the 6 ½" camber depth.
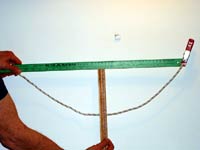 |
Determining Camber |
|
Here are plans for a 115 sq ft sail and 78 sq ft sail. The large figures outside the panels are the layout dimensions. The smaller figures inside the panels are the finished widths after the darts are sewn. The small numbers along the leech are the dart widths.
| 115 sq. ft. Version |
|
|
| 78 sq. ft. Version |
|
|
Junk rigs vary greatly in their shape, battens, parrels,
sheeting etc. This version is a combination of a few
of my own ideas and many ideas from others. It is
easily and cheaply made, has good sailing qualities,
and is quick to rig. But it’s not the only way
to make a junk sail and there is a lot of room here
for tinkering and innovation.

Further Reading
Practical Junk Rig
By HG Hasler & JK MacLeod
Extensive coverage of sail shapes, rigging, etc for designing your own rig. No information on camber, gurney flaps, etc. |
|
The Chinese Sailing Rig
By Derek Van Loan & Dan Haggerty
Good information on rig design, in a more informal style than Practical Junk Rig. Again, no information on camber, etc. |
|
Links
“The Chinese Sail” by Brian Platt Great introductory article on Junk Rigs.
Yahoo Junk Rig Groups - Group 1 - Group 2
A topnotch source for theoretical and practical information on Junk Rigs. The wind tunnel graphs in the Files section were the inspiration for my cambered panel / gurney flap sail.
Duckworks Boat Builders Supply
Source for Blocks, Cleats, Nylon Fairleads, Pad Eyes, etc.
Textile Outfitters
(Canadian) Source for Pack Cloth, Nylon Webbing, and Plastic Hardware.
|