|
PDRacer Sails Down Under |

|
| by Peter Hyndman - Mountain
Creek, Queensland - Australia |
PDRacers
As far as we can tell, there are no PDRacers in Australia,
so we (Michael Storer and I) have set out to rectify
that situation by building a pair of them. Some of
our northern hemisphere compatriots, have produced
boats that are mildly efficient. Many are spectacularly
economical and simple to construct, although not all
could be described as beautiful, and some aren't even
handsome.
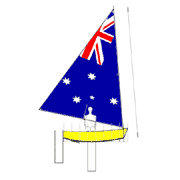 |
Michael
Storer did the design for our PDRacers.
(click
images to enlarge) |
|
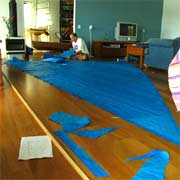
Making the sails could have been a pain in the bum,
but thankfully when we renovated, I pulled all the
walls out and now have a large living space which
makes a quite terrific sail loft, and spare-boats
that-we-aren't-working-on space!
| here I am
playing sailmaker... |
|
|
I'm not at all sure about polytarp, it's cheap, stretchy
awful stuff, and we can't be sure that it won't delaminate
under load. Masking tape pulls the blue surface off
it!!
Polytarp is the cheapest, daggiest material known
to man I reckon! It has a few interesting issues if
you are going to join it yourself, like.. it's polypropylene
and therefore immune to all known adhesives and solvents,
it can be heat joined if you have the equipment. I
tried with a soldering iron (using a bit of masking
tape to stop it melting) and had limited success.
We are using sailmakers double-sided tape, and sewing
the edges, but many in the US use duct tape to hold
them down.
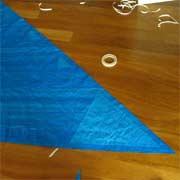 |
The notorious
polytarp cut, reinforcing patches stuck
on with double sided tape, and edge seams
ready to turn over. The mark of the outline
of the sail is clearly visible in the
pic.
|
|
Well into the night, the whole place starts to look
like a sail loft (if you can believe that sails are
made of blue polytarp that is).
I'm currently looking at Tyvek, for the next lot,
it comes in 100 m rolls 1500 wide for $300.00 and
that may be a better deal. It's white, but can be
painted or even printed on.
Decorating the sails
I used a product called B-I-N which is a white shellac
based primer sealer and available in a spray can,
it's good for lots of things, and has the best chance
of anything of sticking to polyprop, and it has the
advantage that overspray just wipes off with a metho
soaked rag! (Correction: The shellac type sealer
wasn't all that successful! Normal Pressure Pack Enamel
stays on a lot longer! - PH)
First cut the stencil of the star of your choice,
spray it with an ever-so light dusting of spray adhesive
(do this outside even if she's not home, it will save
wiping everything down with turps afterwards, to stop
your feet sticking to the floor as you walk.)
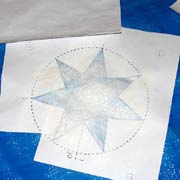 |
Paper
stencil, first coat on.
(click
images to enlarge) |
|
Now you have a tacky stencil. I mean tacky to touch...
so press it firmly into place on your polytarp. (This
also works on roadsigns, electricity boxes, post boxes
and anything else that needs a custom pattern on it,
but get the owner's permission first ok?)
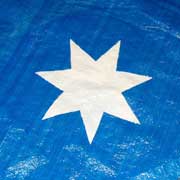
| Finished.
What a Star! |
|
|
Now spray a couple of light coats. Wait five or ten
or fifteen minutes between them and don't build up
so thick that the stuff will want to flake off when
you fold the sail over. This will happen with wear
anyway, but the thinnest coat that covers properly
is best.
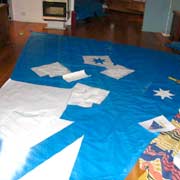 |
What the
whole catastrophe looks like in progress. |
|
Now peel off the stencil and admire your work. Clean
the overspray with metho, and you are done!
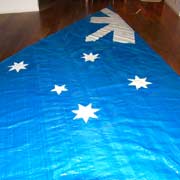
| Done and waiting
for the red bits now. |
|
|
Tomorrow: The red bits, but I'll have to do them
outside! By the way, they'll just stick to the primer
coat, so I'll use ordinary SuperCheap spray can stuff.
Back to business:-
I finished painting the sail tonight.
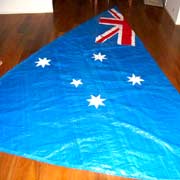 |
Well I
painted the red bits.. |
|
Well I painted the red bits.. the white bits are
flaking off where it is a bit thick, and when ever
the sail folds across them, which is everytime we
move it! That's why I wasn't too concerned with a
bit of red overspray for now, hopefully it'll bind
the surface a bit, and I'll touch it up very simply
later.
| I'll do a
few other touch ups with a brush once we've
sewn it all together |
|
|
I'll do a few other touch ups with a brush once we've
sewn it all together, but I may hang off doing the
other one till we see if we can get enough paint to
stick to make it worthwhile!
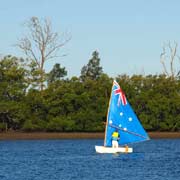
FWIW, it looks the goods!! Quite like the original
sketch really, I love it when a plan comes together!

Related websites:
|