|
Folding Kayak |

|
In my search for the perfect, portable, apartment-living boat, I had been thinking of a folding kayak for quite a while. They were developed first here in Germany around 1920 to take advantage of the large network of railway lines that often ran up and down river valleys. The idea was that one could take the folding boat out of the closet, take it down to the station, and head off to a likely spot by train. Then at the end of the trip, one simply broke the kayak down again and hopped back on the train a little bit farther down the river. I am in the same situation, and figured a folding boat would work for me too.
Launch day on the pond: didn’t sink
A few minutes on the internet looking at some of the factory options, pouchboat, klepper, feathercraft, convinced me that they were not an option because of prices, between $2,000 and (I kid you not) $4,000.
So anyway I spent more than a few more minutes on the internet gathering ideas from the few sites dedicated to this niche of build-it-yourself boat mania:
https://yostwerks.com/ and https://foldingkayaks.org/ were the two that I spent the most time with.
Most of the plans available didn’t seem to fit what I wanted to do. A lot of guys are building with aluminum tubes and high density plastic, but I wanted a frame built in a material that I was familiar with -- wood. I knew I would need some metal fittings to make the joins in places were only metal was strong enough and wouldn’t swell and make the thing impossible to take apart after it had been in the water. I was going to build the boat at my wife’s parents’ place in a small town in France and so didn’t want to spend the whole vacation on the phone sourcing exotic materials in a language I speak haltingly -- so that meant stuff I could find at the local DIY store.
In the end I just took the basic beam and length from a simple one-man canoe to be sure the finished product would hold me and a kid or two or camping gear and food for a few days, looked at how a couple of different factory-built boats were put together, and just sort of figured out how to build the thing as I went along.
I was thinking more of a relatively lightly built craft for calm waters. I figured I could get away with two rib stations, and make the longitudinal members out of cheap local pine laminated together. On the principle that the boat would never rest in the water for any length of time, I decided to use a “waterproof” white glue they sell here for laying floors and whatnot. Epoxy would have been the sure choice, but the gluing time for all the laminations, the toxicity, the general hassles and the cost turned me against it.
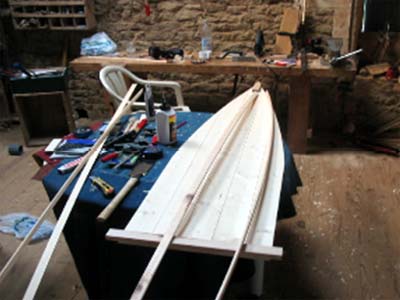
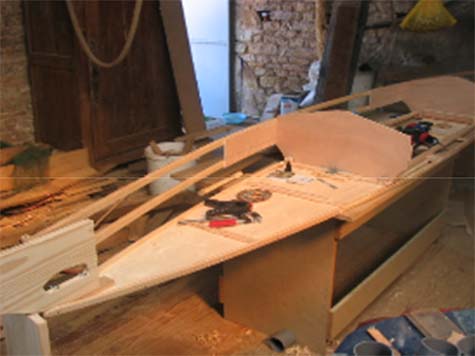
Beginning of bottom piece showing hardwood base,
floor, hardwood point, and
laminated sides.
The two bottom pieces are basically equilateral triangles with curved edges made of three laminated pine strips (each strip about 1” x 1/4”) forming the edges. I used 3/8” tounge-and-groove pine to make a floor in the triangles. The side pieces were screwed and glued to a 1x2" hardwood board at the base, and then to a shaped piece at the point of the triangle. The pine floor was then laid in place piece by piece and glued and screwed to the point and base pieces and also to the laminated edge pieces. Laminated pine beams were fitted every 20” or so crosswise and screwed and glued to the floors and to the edge pieces. At the ends I glued and screwed pieces of hardwood to form the bases for the stem and stern, which I cut out of a 1” x 8" pine plank. Bolts run up through the bottom of the boat and the stem and stern are bolted down with wingnuts in holes cut out of the center of the pieces.
The rib stations are in 3/8” plywood and are set into a slot to hold them in place fore and aft, and then fixed in the slot with a small sliding bolt like one would use to lock a door. The two bottom pieces were fixed together using two beams laminated of four pine strips bolted through the bottom on both sides of the join and at the ends resting on the cross members that form the slots for the rib stations.
(I built the boat and all this does not make a whole lot of sense to me either. It is much clearer in the photos, and if anyone would like to build something similar, I would be happy to answer any other questions.)
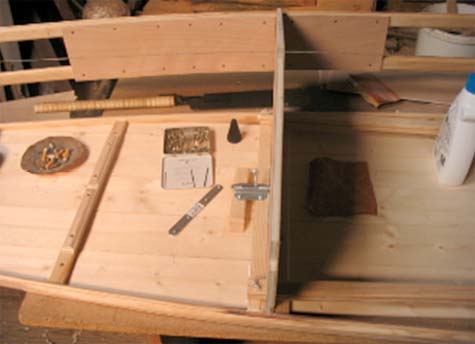
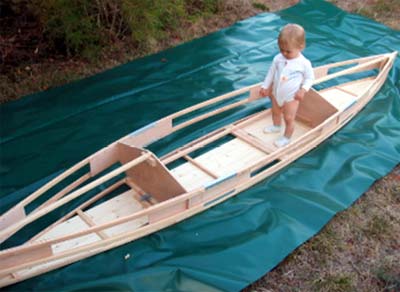
Rib stations are notched on the sides to fit into slots in the side beams and into
slot formed by cross members on floor. You can also see the ends of the beams
that hold the bottom triangles together across their base and also form handy
hand-holds when carrying the boat.
The side beams were glued up in place on the boat (three strips of the pine each) and then joined together with pieces of 1/4” ply, glued and screwed. At the ends the beams were reinforced with small pieces of 3/8” hardwood to provide a strong place to help take the strain of the bolts that hold the sides to the end pieces.
Sizing up the boat on the pvc cloth
After I had the two side beams finished and fitted I cut them each into three pieces. Aluminium u-channel pieces, about 10” long, were bolted through the beams top and bottom to rejoin them over the cuts. I later added two extra sliding bolts on each sidebeam that bolt through holes in the rib stations to fix the side beams more firmly to the rib stations.
Laminated beams were installed between the ends and the rib stations, to form the decks and then I also added two laminated beams to form the sides of the cockpit between the two rib stations.
The frame took about 75-100 hours to get sorted out. It was just a question of taking lots of cigarette breaks to get things figured out, and then things went together pretty easily. Laminating all the beams together took most of the time, and with epoxy it would have taken weeks unless one had hundreds of clamps.
Bottom piece sized and temporarily sewed in place
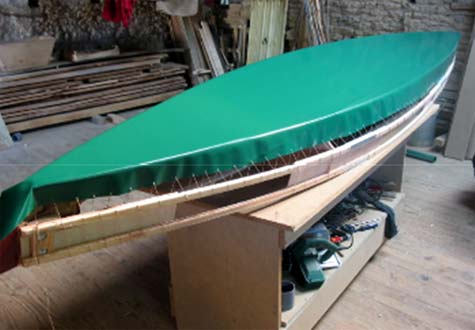
The skin was another story. I built a skin-on-frame kayak a while back, and the heavy awning canvas I stretched on a pine and oak frame and then painted worked great for several hundred miles on rivers around my home town in Ohio. But I didn’t think I could fold painted canvas repeatedly and expect it to stay strong and watertight. At Yostwerks.com I discovered Thomas Yost was using pvc cloth reinforced with polyester and so I tracked some down here in Cologne, Germany before leaving on vacation. It ran me $100 for a piece 14 ft. long by 8 ft. wide. I ended up with a lot of little scraps and a piece something like 8 ft long by 4 wide.
On Thomas Yost’s site, a couple of builders mentioned making one-piece hulls out of pvc. There were some wrinkles, but nothing too extreme. I was hoping to do the same, but the boats they were making were mostly 4-6 feet longer than my little 12 footer, with less beam, and so much less curvature in general. It took about 10 seconds of trying to get the stretchless cloth to lay flat for me to realize that I was going to have to piece the skin out and glue it together.
To glue the pvc I checked a boat store, and found contact cement to repair inflatable dinghies, but the tubes were really small and not cheap. In the end I found a general contact cement (acetone base) that said it would work on supple pvc and used that. It was about 1/8th the price and turned out to be just the thing. To test it I cut two pieces about 4” long and 1” wide and glued them together with about a half-inch overlap. After letting it sit for a bout 15 minutes I put one end in a vice and gripped the other with a pair of pliers and couldn’t pull the two pieces apart until I braced my foot on the workbench and pulled with both hands, and even then the fabric tended to fail before the glue joint.
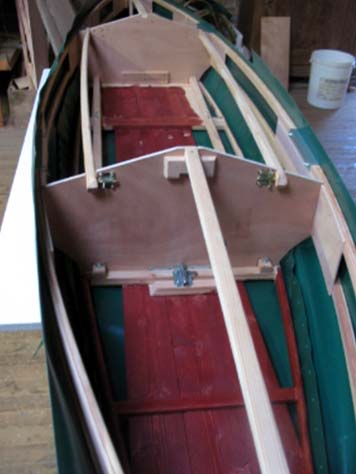
The sides are on. One point was the two cockpit-side beams: as I was horseing the half-finished boat around, I realized that there was going to be a serious lack of hand holds, and so those two beams would each have to be strong enough to take the whole weight of the boat. I ended up heading back to the store and buying a kind of light African hardwood in strips that matched my local pine and doing a pine-hardwood-pine lamination for those pieces. The sliding bolts seemed to hold fine on a couple of trips I took after finishing her.
I ended up needing to use two pieces on each side to do the forward half of the boat, and one piece each side aft. The decks fore and aft were each made of two flaps, and there was another flap each along the cockpit. I found some 3/8” brass grommets and used those to allow the hull to be laced together over the frame. I cut the panels extra large to make sure they would overlap enough, and so there were places on the inside were there was loose extra cloth (top right of above photo). I just trimmed it off as I went along.
I bought a couple of cheap foam sleeping bag pads and cut them to fit the bottom of the boat to provide a little floatation and to cushion the bottom.
In the end the skin worked out OK. There are lots of little wrinkles all over and a big one in the deck where I didn’t get a piece down exactly straight and I was worried I would ruin the skin if I peeled the piece off to re-glue it straighter. (When this contact cement says “instantaneous hold” it isn’t kidding). The skin took another 20 hours or so.
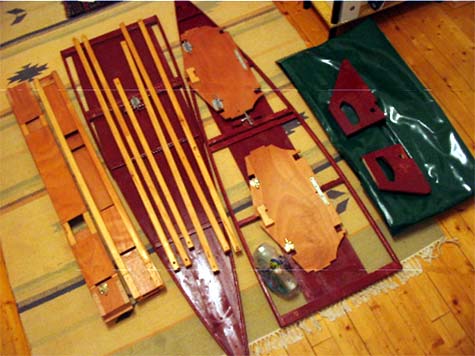
The boat disassembled: 18 parts and a bag of hardware. The first time I put it together, it took just under 30 min. and about the same to take apart. It will pack into a triangular bag about 5’6” by 25” by 8” thick. The next project will be to make bag and build some kind of cart that is dismountable to go inside the boat and can be used to carry both the bag and to help out on long portages with the boat together.
To put the boat together, you assemble the frame, then lay the foam pads in the bottom of the hull sack. Forward, the first 10” or so of the deck is closed over to keep the worst of the water out of the boat if a wave breaks over the deck. Aft the boat laces all the way to the end. You slip the front of the boat into the sack, pull it tight and make sure everything is more or less lined up. Then you press the back of the boat down into the sack and the decks and side panels lace up with 1/8” polyester line.
So I did all that and then it was time to call some of the neighbors who had been kibitzing the building process for the launching party.
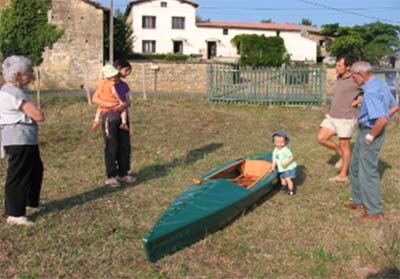
Rachel checks out the boat while papa goes to find some champagne
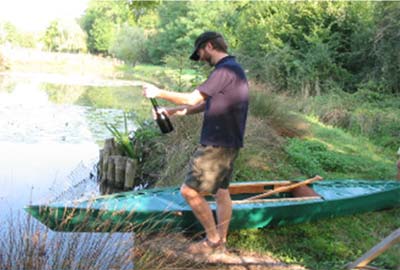
A sip for the boat...
...and a sip for us
The boat worked just fine. It handled nicely, sat loaded in the water just a hair nose up, no leaks, and draws about 4” water, so she will probably go just fine with another 40-50 pounds of camping gear or kids or whatever. A day after the launching I took her on a 4 hour trip on a river a couple of miles away, and she went fine and also attracted a bit of attention. A double paddle might be the next mini-project -- the father-in-law and I cut a dead cherry tree out of the garden last winter and had it sawed into planks that should be dry enough by now.
In the end she probably cost about $300 in materials, but that included probably about $50 in odds and ends of stuff, like extra sliding bolts, steel and aluminum stock, bolts and wingnuts, and plywood that I bought thinking I would need it but that never ended up finding their way into the boat (no plans). I am sure I will end up using it all at some time or another.
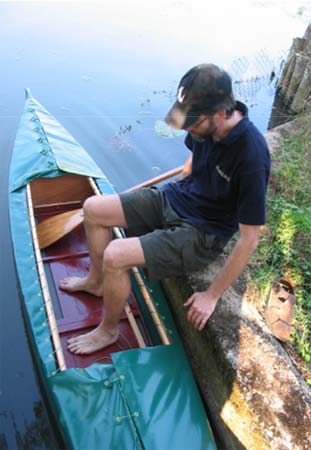
First time in: a couple of wrinkles and I still have to work out what to
do with the loose edges that hang over the cockpit fore and aft
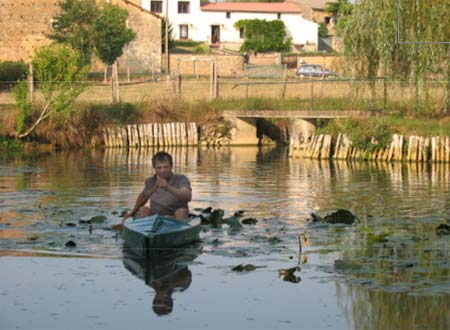
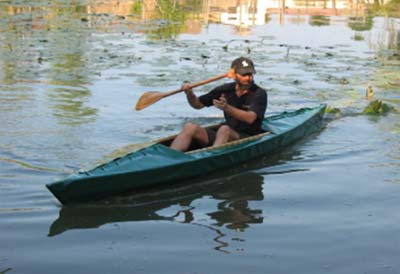
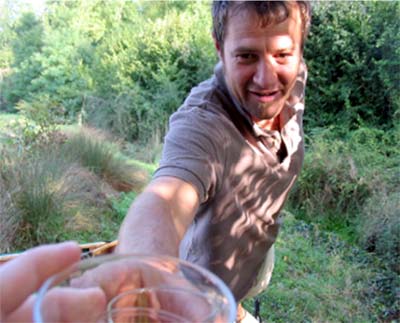
Christophe takes her for a spin. I think it was his first time in a kayak, and he didn't sink either

Original articles by Brian Anderson:
Features edited by Brian Anderson:
|