|
One-Sheet
Baby Canoe Part 4 |
|
| By Gaetan
Jette - Sherbrooke, Canada |
Part
1 - Part 2 -
Part
3 - Part 4
Finish
and Launching
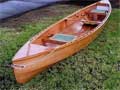
This is the last part of this series,
where we will finish the boat and launch it at last!
When it came time to paint the boat,
I ran into some problems. The epoxy primer I used
had an awful smell. I had no choice but to apply the
primer in the garage, and then move the boat back
in the workshop for sanding, once that primer was
fully cured and the smell had faded enough.
Unfortunately, it is hard to move a
boat around through doors without banging occasionally
on door frames. Because I used softwood for gunwales,
these were damaged a few times. Had I known better,
I would have used hardwood. Softwood is called that
way for a reason, after all. I may be too perfectionist,
but when it's the second time around you have to repair
dents in the gunwales, and the boat has yet to be
launched, that's less than ideal.
I had two choices, either learn to live
with it, or make tougher gunwales. The thought of
removing all that work and redo it all again was not
appealing to me, however. Time for a compromise. I
decided to try to cover the outwales with fiberglass
cloth and epoxy, and leave the inwales as is. The
keel was made from softwood, covered with fiberglass
and epoxy, and it had not suffered any visible damage
while moving the boat. Covering the outwales would
protect the most exposed softwood when moving or using
the boat.
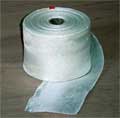
Getting the fiberglass tape to fit snugly
around a gunwale before coating with epoxy is no picnic,
though. If I build another boat someday, I'll use
hardwood for the gunwales right form the start: it
saves a lot of time and trouble.
 |
 |
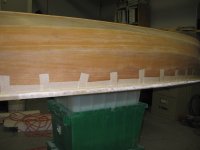
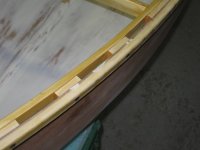
The gunwales got a few unwelcome dents while moving the boat from the garage to the workshop (and vice-versa).
|
 |
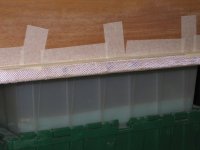 |
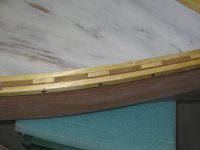
The fiberglass is taped as snugly as possible around the gunwales with masking tape, lots of it. Coating with epoxy will have to be done in more than one pass because of that. One edge of the fiberglass is set tight on the underside of the outwale.
|
 |
The other edge of the fiberglass is stretched over the inwale.
|
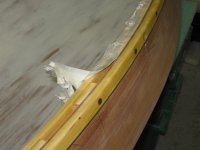 |
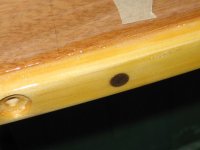
Once the epoxy has cured, a sharp utility knife is used to trim the fiberglass just at the inside edge of the hull. This would be easier to do with the epoxy still somewhat green. But since the blade is piercing right trough the fiberglas, it wasn't too difficult.
|
 |
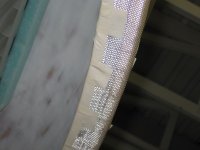
A few spots on
the top side didn't get soaked enough with epoxy
on the first coat. More coating, with some clamping,
will be required for these. |
 |
The underside
was more work: the fiberglass cloth couldn't
be stretched as hard as on the topside. As a
result, there were quite a few air bubbles to
deal with. |
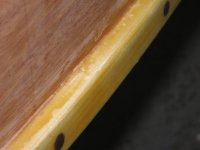 |
With a series
of holes drilled in those bubbles, clear epoxy,
thinned with a little bit of acetone, is injected
with a dropper. These holes have left marks
that are still visible on the finished boat.
But they are out of sight in normal use, unless
you are very curious. ;-) |
 Two coats of epoxy primer were applied both inside
and outside. It turned out I had the wrong thinner
for the job: that thinner was for spray painting
and evaporated too quickly for paintbrush use.
It was nearly impossible to achieve an even coat.
This meant more sanding and this stuff seemed
even harder to sand than cured epoxy.
Two coats of epoxy primer were applied both inside
and outside. It turned out I had the wrong thinner
for the job: that thinner was for spray painting
and evaporated too quickly for paintbrush use.
It was nearly impossible to achieve an even coat.
This meant more sanding and this stuff seemed
even harder to sand than cured epoxy. |
 |
 |
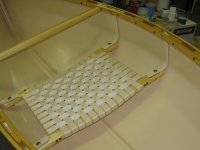
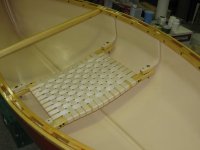
Masking
tape applied to the seat frame allows to mark
where the nylon webbing will be attached. |
 |
The nylon straps
are attached with stainless steel wood screws
and fender washers. Every hole is pre-drilled,
making it easier to attach the nylon under tension.
The screw thread is covered with beeswax to
avoid wood rot. |
Doing the seat that way is an idea I picked up
on a free plan (the Redwood Canoe) available on
the Svenson website.
This site offers lots of free old boat plans that
I found interesting to look at.
 |
The end of the
nylon straps is cut and then heated with a heat
gun to prevent unthreading. The screw holes
are made with the tip of a soldering gun. |
 |
With a curved
frame like this one, it is best to attach the
nylon straps in that direction last. |
 |
Second coat of
paint. Now you know the real reason why a boat
is referred to as a "she". It's because it sometimes
wears a skirt... ;-) |
 |
 |
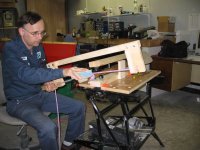
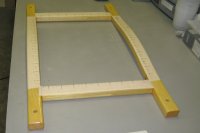
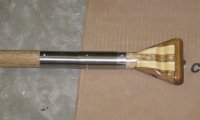
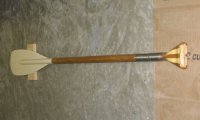
A
jig is used to cut the slots in the paddle shafts
where the blades will fit. I made a mistake,
however: the vertical plank on the left of the
jig should have been screwed on top of the other
plank. As built, the screws got in the way of
the saw blade. OOPS! Shorter screws saved the
day this time. The paddle shafts are hardwood
dowels. A bit heavy, but the easiest solution
for the purpose. |
 |
 |
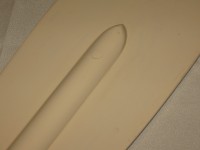
I
decided to give the tip of the paddle shafts
a rounded, pointy shape. But first, a pattern
was needed for that. That pattern is then placed
on the inside of the shaft slot to trace a curved
line for a first rough cut. The final shaping
of the shaft tip was done by eye with a sanding
block. An attempt at using a router proved a
bad idea because of the end grain. Also, I had
not built a serious jig to ensure good control
of the router. |
 |
 |
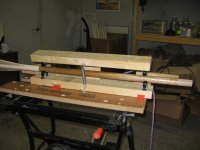
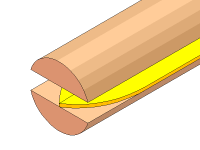
Two
holes are drilled in the paddle shaft and blade,
and fitted with short lengths of dowel rod,
to keep everything properly aligned while the
epoxy cures. Short planks placed on top and
bottom, screwed together, ensure there is no
gap between the shaft and blade. You can see
the finished result on right, ready to paint.
|
 |
One drawback
to this approach is that wood grain of the dowel
is at right angle with the grain of the shaft.
Result: six months later, the two are separating.
If I had to do it again, I would probably drill
away the dowels once the epoxy is cured, and
fill the holes with thickened epoxy. |
 |
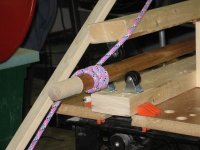
A temporary rack
allows to apply varnish to the paddle shafts
in a single pass. |
 |
Yet another use
for the leftover plywood: painting the seat
brackets. |
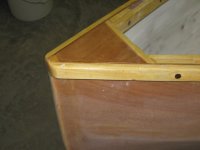
 The seat frame is attached to the seat brackets
with 5/16-inch stainless steel carriage bolts.
The seat bracket holes for the carriage bolts
had been squared with a file prior to painting.
You can see the flush connector bolts on the gunwales.
A piece of rubber is placed between the seat bracket
and seat frame to protect the surface from damage
when tightening together. It also helps to smooth
out any small angle misalignment between the seat
brackets and seat frame.
The seat frame is attached to the seat brackets
with 5/16-inch stainless steel carriage bolts.
The seat bracket holes for the carriage bolts
had been squared with a file prior to painting.
You can see the flush connector bolts on the gunwales.
A piece of rubber is placed between the seat bracket
and seat frame to protect the surface from damage
when tightening together. It also helps to smooth
out any small angle misalignment between the seat
brackets and seat frame. |
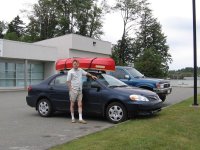 |
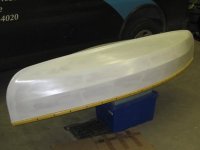
Time for a first
spin. The boat weighs in at 34 pounds. Still
heavy compared to a skin-on-frame boat, but
quite manageable. Too many epoxy coats, I guess.
|
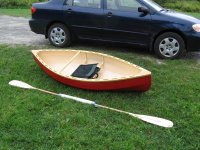 |
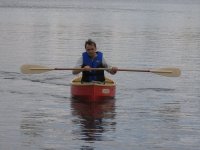
I wasn't sure
how long the double paddle should be. That's
what this first try is for. I temporarily taped
the two halves together with a length of pipe
and duck tape in order to do this first test.
You can see the folding, padded seat in place.
This provides some back support: I wanted the
most comfortable seating possible. |
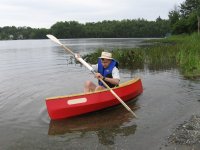 |
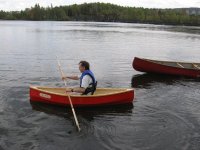
Yep, this is
a tippy boat. Granted, my boarding skills at
this point are nil, but I would not try to stand
up in this boat. |
 |
 |
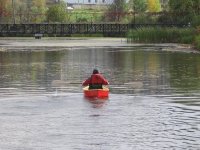
It
floats! Not a surprise really: I had done a
boat trim test in my brother's swimming pool
long before that, before there was any paint
on the boat. |
 |
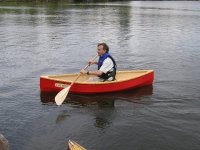
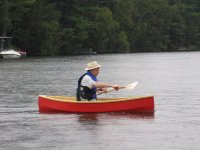
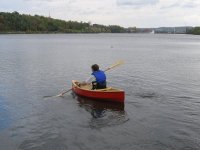
You can see that
the boat is heeling because I am not sitting
perfectly on center. This is true of any canoe,
but it is even more so with this one. |
 |
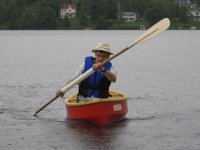
A wet but happy
camper. Although the double paddle is longer
than the boat, this test showed that I shouldn't
shorten it. |
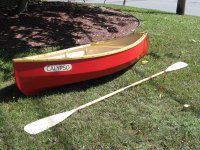
 Printing the boat name. Those are full sheet,
adhesive plastic film labels found at good office
supply stores. You have to use a laser printer
for this: the ink from inkjet printers is water-soluble.
The blank on the right will allow to paint the
background the same color as the inside of the
boat (Bristol Beige), for a better contrast. The
printing was done at an angle in order to maximize
the letters' size.
Printing the boat name. Those are full sheet,
adhesive plastic film labels found at good office
supply stores. You have to use a laser printer
for this: the ink from inkjet printers is water-soluble.
The blank on the right will allow to paint the
background the same color as the inside of the
boat (Bristol Beige), for a better contrast. The
printing was done at an angle in order to maximize
the letters' size. |
It took a while before I chose a name
for that boat. One day, while on sanding duty, I was
listening to a Suzanne Vega CD and there was this
song CALYPSO that I liked, but had never really paid
close attention to the lyrics. I googled the name.
In the Greek story The Odyssey by Homer, Calypso
is a queen who kept Odysseus captive for seven years
before Zeus orders her to let him go. She even helps
him to build a ship.
This boat project has kept me very
busy for two years. So there was a fitting parallel
there. Plus I liked the sound of the name. I read
somewhere that when building a boat, eventually a
name will come up at some point that will just fit.
It did so for me.
 |
The first coat
of paint where the boat name will be applied.
|
I was hoping to cover the boat name
with a protective clear coat. Trouble is, most clear
coat sprays tend to dissolve the ink of that boat
name. I learned that the hard way. After doing a torture
test with a screw blade on a sample, it seemed that
this laser ink was probably as tough as paint. So
I left it bare. To apply the label, you first wet
the area with water using a sponge. The water allows
to adjust the label once applied, before you commit
to its permanent position by driving the water out
with a squeegee.
 |
 |
A
plank and a few wood blocks help align the handle
and blade before securing the ferrules with
screws. |
 |
I added a few
blocks to lower the seat a bit, in order to
improve stability. |
When came the time for the official
launch, I looked at the price of champagne for christening
the boat. It made the price of epoxy sound reasonable...almost.
I settled for sparkling wine.
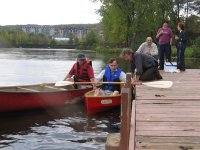 |
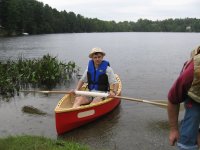
Getting aboard
is always the most delicate operation. |
 |
At low speed,
at least, the boat doesn't seem to produce much
wake. |
 |
 |
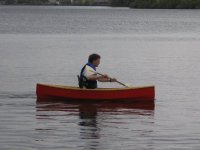
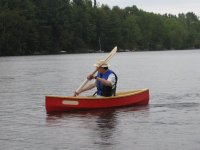
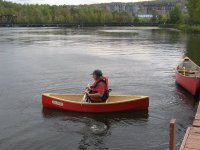
Only
one brave soul volunteered for a test drive...
|
People who have seen the boat so far
have all complimented me on her looks. So at least
that part of the design is a success. After the official
boat launch, we had only one nice Sunday before the
winter cold knocked at our door. This was mid-October
(2006). You can't really expect more for this part
of Canada.
 |
Here's where
the boat will rest for all winter... |
Epilogue
I thought this instalment would conclude
this series. Unfortunately, as I'm not quite a wise
paddler, one outing in Spring 2007 turned into a real
torture test for the boat. This caused some serious
damage that will require some repairs and a few modifications.
As I am writing this, this work has yet to be started.
TO BE CONTINUED...
REFERENCES
-
-
Suzanne Vega: Calypso,
from the album Solitude Standing, AM Records,
1987.
- This is the song that
inspired my boat name choice
-
Homer: The Odyssey, circa
800 to 600 BC
- I must admit I have only
seen TV adaptations of this story, as my knowledge
of ancient Greek is nil.

|