Steven 
                                  Lewis won our " Economy 
                                  River Cruiser" design contest a few 
                                  years ago. In the mean time he has been busy 
                                  designing all kinds of small, utility boats 
                                  for amateur construction and posting them on 
                                  his  website. 
                                  This design he designated as a Duckworks exclusive 
                                  - it is a free  download 
                                  that is available nowhere else. Thanks Steven!  | 
                             
                           
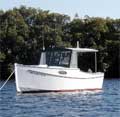
                          Duckskiff is a 14 foot skiff I designed 
                            for a buddy of mine named Tim that I work with. Tim 
                            is an avid Duck hunter and wanted a fairly lightweight 
                            boat but in nice quiet wood rather than noisy aluminum. 
                            He also wanted something a little boatier than a Johnboat 
                            styled craft. What I came up with for him is a 14 
                            ft long 5 ft wide at the shear (45 inches wide at 
                            the bottom) kind of semi-dory hull. I did this to 
                            make it an easier and dryer proposition when pulling 
                            a large dog over the side and back into the boat. 
                            The additional ultimate stability of the 23° flare 
                            to the sides allows a lot of weight to be right at 
                            the sides of the boat while at the same time getting 
                            the shear lower to the water. He wanted to be able 
                            to use his 7 hp motor to get around now with the probability 
                            of upgrading to a higher hp later on. As the hull 
                            was originally derived from a rowing style hull I 
                            was playing with a few months previously I tweaked 
                            both of them so that they were brother and sister 
                            similar and decided to present them to you here. Enjoy… 
                          Specifications for Motorized 
                            version: 
                          
                             
                              LOA  | 
                              -  | 
                              14’ 3” | 
                             
                             
                              Beam  | 
                              -  | 
                              5’ 2” (with trim) | 
                             
                             
                              Depth at midships  | 
                              -  | 
                              18” | 
                             
                             
                              Draft at design weight of 
                                  860 lbs  | 
                              -  | 
                              4.5” | 
                             
                             
                              Approximate boat weight  | 
                              -  | 
                              180-220 lbs | 
                             
                             
                              Motor  | 
                              -  | 
                              to 25hp | 


                                | 
                                Motorized Version  | 
                             
                           
                          Specifications for Rowing 
                            version: 
                          
                             
                              |   LOA  | 
                                -  | 
                              14’ 1” | 
                             
                             
                              Beam  | 
                              -  | 
                              5’ 2” | 
                             
                             
                              Depth at midships  | 
                              -  | 
                              18” | 
                             
                             
                              Draft at design weight of 
                                  600 lbs  | 
                              -  | 
                              4” | 
                             
                             
                              Approximate boat weight  | 
                              -  | 
                              130-160 lbs | 


                                | 
                                Rowing Version  | 
                             
                           
                          Introduction: 
                           Using these instructions, along with the accompanying 
                            sketches, drawings, illustrations, photos and tables, 
                            you should be able to build either version of DuckSkiff14with 
                            relative ease over the course of 2-6 weekends. The 
                            original instructions were written for just the motorized 
                            version but have been added to, amended to and revised 
                            in the appropriate areas where the information or 
                            building instructions differ for the rowing version. 
                            Please take the time to read ALL of the information 
                            as better than 90% applies to both forms of the boat 
                            and in both methods of construction. The photos are 
                            not of this particular boat but are used to illustrate 
                            what a certain method or outcome should look like. 
                            Do not be thrown off by a Vee bottom or a differently 
                            shaped hull but use it as a visualization of one possible 
                            way of doing something. The Photos are also not all 
                            mine but are courtesy of my many online friends in 
                            the various forums and groups that I inhabit 
                          
                             
                              Steven's 
                                  plans consist of 61 pages of diagrams, detailed 
                                  instructions, offsets, and even photographs. 
                                  The plans are free to  download 
                                  and you can build as many as you wish.  | 
                             
                           
                          Bill of Materials: 
                           1: Two sheets of 3/8” (Row) or 1/2”(Motor) 
                            plywood or MDO (Medium Density Overlay) for the bottom 
                            (Note: the longest life can be expected from marine 
                            grade plywood and MDO…lesser grades can be expected 
                            to have a shorter life span) 
                           2: Two sheets of 1/4” (Row) or 3/8" (Row 
                            or Motor) plywood or MDO for the sides 
                          
                             
                                | 
                                Panel layout 
                                  for Motorized version.  | 
                             
                           
                           3: One sheet of 1/4" plywood for seat boxes 
                            (if building them) 
                           4: One sheet of 3/4” plywood or MDO for transom 
                            and doubler and also knees and breasthook if not using 
                            solid wood (required only on the motorized version). 
                            You can use 3/8” ply for the transom on the 
                            rowing version provided you add some framing t o stiffen 
                            it up a bit. The knees and breasthook can be of 1x 
                            stock. 
                           5: 12’ and 16’ lengths of 1x stock. 
                            The amount will depend on the intended building method 
                            and finishing. At a minimum you will need 2”- 
                            3” wide strips for the inner and outer wales, 
                            floor stringers, bottom rub strips and cleats… 
                            plus additional 1 1/4” wide strips for Chine 
                            Logs if building that way. You may also wish to use 
                            1x stock for seat planks. If you choose to space the 
                            gunnel you will need to factor that in too. Sit down 
                            and calculate what you need by how you are planning 
                            on building the boat. You should only need the 16’ 
                            stock for the gunnels, but you can get away with shorter 
                            stuff if you don’t mind joints. All joints should 
                            be in the aft sections of the boat. The better the 
                            quality of the wood the easier to finish and the longer 
                            lasting. 
                          
                             
                               The Duckskiff 
                                  plans have 18 detailed illustrations like this 
                                  one to guide the builder through the construction 
                                  process: 
                                    
                                 | 


                            The plans 
                           6: Stem piece: 28” long piece of 2”x3” 
                            or 2”x4” fir or hardwood 
                           7: A bag of 100 4” plastic wire ties or a 
                            roll of copper wire for the Stitch and Glue version 
                           8: Epoxy…the minimum amount of epoxy needed 
                            is about 1 quart, for taping, gluing and filling on 
                            a boat built with Chine Logs. Stitch and glue will 
                            require another quart, as will glassing the bottom. 
                            If you wish to totally seal the boat (not a bad idea 
                            at all)…you will probably need all of the above 
                            and an additional quart…so about 1 gallon of 
                            epoxy. I don’t recommend polyester resin as 
                            it is not useful as a glue, isn’t really waterproof 
                            in the amounts you would use and doesn’t stick 
                            to wood nearly as well as epoxy does. To save some 
                            on epoxy you can use a glue like PL Premium polyurethane 
                            glue when gluing parts together, but it tends to foam 
                            up so it doesn’t work so well as a sealer. 
                          
                             
                                | 
                                Panel layout 
                                  for Rowing version  | 
                             
                           
                           7: Filler for the epoxy…I like wood flour 
                            mixed with Cabosil (fumed silica…wear a dust 
                            mask) 2 lbs of wood flour and ½ lb of Cabosil 
                            will do the trick for Stitch and Glue, half that for 
                            Chine Log. 
                           8: Fiberglass: Tape =10 yards for Chine Log, 25 
                            yards for Stitch and Glue Cloth= 50” width x 
                            5 yards 4-6 oz cloth if you plan on glassing it the 
                            bottom. 
                           9: Mixers, mixing containers, tongue depressors 
                            or shaped applicators (for fillets) latex or plastic 
                            gloves, dust masks, sandpaper, 3/4" Stainless 
                            screws (if leaving them in) or drywall screws (if 
                            removing) Clamps (cheap plastic ones are fine, or 
                            cut some 4”-6”schedule 40 PVC pipe into 
                            1” slices and split one edge for a really cheap 
                            clamp), primer and paint. Deck and porch paint or 
                            any good exterior heavy duty paint is fine along with 
                            a good primer, Painters plastic or plastic sheet for 
                            covering windows (better). 
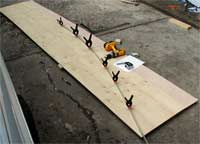
                          
                             
                                | 
                                There are 18 
                                  photographs in the downloadable PDF plans so 
                                  there can be no confusion about the instructions  | 
                             
                           
                           10: Tools: The absolute minimum I would want to 
                            get by with is a circular saw and a power drill/driver 
                            for power tools although if you are good, a jigsaw 
                            will do the job. Hand tools include a tape measure, 
                            a square, a small block plane, a small hand saw for 
                            trim work and a screwdriver. An Orbital sander is 
                            a definite nice thing to have when it comes to rounding 
                            the Chines over and feathering the tape edges in. 
                            A table saw makes cutting bevels on long pieces a 
                            snap too, so you might want to borrow or rent one 
                            for a couple of hours and get all your parts cut out 
                            ahead of time. If you don’t want to use screws 
                            to hold things together…you will need a bunch 
                            of clamps. Cheap spring clamps work most of the time 
                            but you could probably use a few C (or G) clamps for 
                            any tough stuff. You can also make cheap clamps out 
                            of 6” Schedule 40 PVC pipe…just cut 1”-2” 
                            slices of the pipe and then cut a slit in them so 
                            you can open them up.  
                          11: Batten: Personally I use a 1” x 1/8” 
                            x 8’ strip of aluminum as a batten and I recommend 
                            you do too, especially if you are building the Chine 
                            log version. You can use a wider batten on the Stitch 
                            and Glue version but you only have 1/2" space 
                            for your batten and nails on each side when laying 
                            out the bottom panel with the Chine log version. 
                          Following is the outline of the building 
                            instructions: 
                          
                            - Step One Laying out the panels: 
                              
                                - Option One: Stitch and Glue Construction for 
                                  both versions:
 
                                - Option Two: Chine Log Construction.


                            - Step Two: The Stem Piece:
 
                            - Step Three: Assembly: 
                              
                                - Joining the panels for either version or method 
                                  of construction:
 
                                - Assembling the hull (both versions) Stitch 
                                  and glue method:
 
                                - Assembling the Hull Chine Log Method:
 
                                - Bracing pieces:
 
                                - Seating:
 
                                - Finishing the interior:
 
                                - Finishing the outside-Stitch and Glue method:
 
                                - Finishing the outside-Chine Log method:
 
                                - Painting:
 
                                - Powering:


                          List of Pictures and Illustrations: 
                           
                            • Panel shapes (Motor) 
                              • Panel shapes (row) 
                              • Frame Detail 
                              • Plank Seat Detail 
                              • Boxed in motor area 
                              • Stitch, Fillet and Tape detail 
                              • Non-spaced gunnel detail 
                              • Spaced gunnel detail 
                              • Center mold 
                              • Chine log detail 
                              • Knee detail 
                              • Spreader measurement and marking detail 
                              • Breasthook example 
                              • Transom half layout detail 
                              • Transom bevel detail 
                              • Short shaft detail 
                              • Long shaft detail 
                              • Transom framing for rowing version detail 
                              • Stem detail 
                              • Squaring the hull detail 
                              • Layout picture one 
                              • Layout picture two 
                              • Batten 
                              • Fiberglass butt picture one 
                              • Squaring the hull detail 
                              • Layout picture one 
                              • Layout picture two 
                              • Batten 
                              • Fiberglass butt picture one 
                              • Fiberglass butt picture two 
                              • Fillet on inside 
                              • Smoothed fillet 
                              • Tape on inside 
                              • Stitching one 
                              • Stitching two 
                              • Knee, Butt block and box seat picture 
                              • Another knee picture 
                              • Boxed in Motor area 
                              • Non spaced gunnel 
                              • Spaced gunnel (plywood plank edge covered) 
                              • Spaced gunnel (solid planking edge left 
                              exposed) 
                              • Outside seams dry taped and stapled into 
                              place 
                              • Outside hull with fiberglass 
                              • Skeg picture 


                                  If you like the looks of anything you see 
                                    here, please feel free to download the free 
                                    plans. Oh, and thank Steven 
                                    while you are at it. 
                                  Click 
                                    HERE to download free plans for Duckskiff 
                                  | 
                             
                            |