| I’ve been interested in creating
“Foil” Like shapes for Dagger and Center
Boards for a long time, and have been reading the
recent articles on calculating and building “Foils”
with great interest. While the math is intriguing,
I am more interested in Easy To Build “Foils
Shaped” underwater boards. Befor I go too far
here, I want to make it clear what I am building are
“Foil Like” boards and Not NACA Foils.
Just more “Streamlined” shapes. Most of
the little boats we build will benefit very little
or none at all from high performance, high aspect
ratio NACA Foils anyway, but we all try to give our
boards some sort of “Streamlined” shape.
 |
We all try to
give our boards some sort of “Streamlined”
shape. |
I am using the term “Foil” very loosely
here and make no pretence that what I build is a true
“NACA” foil, or “Foil” of
any sort. Just something that Looks good, works well
and is fairly easy to build. Although I think one
could use some of the technical information in the
previous “Foil” articles and this technique
to come pretty darn Close to getting a real “Foil”
shape.
For those that are interested in learning more about
Real “Foils” and “Underwater Board
Shapes” from “Experts”, here are
some articles I found just so you know that I Know
the difference.
Here’s an old (1997) article
on NACA foils by Craig O’Donnell.
Jim Michalak” “Underwater
Board Shape”
Michalak: “Sail
Area Math”
The fact is, low aspect ratio, “Flat Plate”
boards work well on many of our, small, relatively
slow boats. And they are used on large “Working
Type” sailboats as well. Low aspect, flat boards
work over greater range of angles, speeds and conditions
and do not stall as easily as higher aspect deep boards,
even the NACA “Foils”. High aspect NACA
Boards have a definite advantage and are required
on many high speed, mono-hull and most multi-hull
racing sailboats. The original Hobie Cats are an exception
to that rule. The old Hobies have asymmetrical hulls
that have a shape kinda like an underwater wing to
help keep the boat from sliding sideways. The lack
of any underwater boards make them great “Beach
Boats”, but even Hobie has now added boards
to their newer boats to make them faster and point
higher. I still like running my “Hobie 16”
up on a beach at high speed, with no concern for Any
Boards.
My point is not to discuss the advantages and disadvantages
of underwater board aspect ratios, but to explain
a Simple method of building boards I “Discovered”
many years ago. I say, “discovered” because
I had not seen this method used until I saw it used
for the Ballasted Daggerboard on Phil Bolger’s
“Single Handed Schooner” or as it is also
called the “His and Hers Schooner”. The
“His and Hers Schooner” along with drawings
of the board are shown in his “Boats
With An Open Mind” and the Schooner
is highlighted
here in Chuck’s “Projects”.
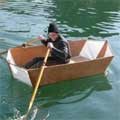
I built a Bolger “Elegant Punt” some
25 years ago and decided I wanted to try something
other than a flat, plywood leeboard, so did some experimenting
with thin plywood skins bent around a “Long
Ways” Stringer.
 |
The board is
pretty simple and is built with skins and stringer(s)
much like the way airplane wings used to be
built. |
The board is pretty simple and is built with skins
and stringer(s) much like the way airplane wings used
to be built, but without the many ribs inside a wing
that give the wing its precise shape. I found a thin
plywood “Skins” will naturally take a
“Foil-Like” shape if bent around a single
stringer that is placed slightly forward of the middle
of the board.
The construction sounds and is a little more complicated
than most standard, single piece plywood, laminated
plywood or glued up, laminated solid wood boards.
But it is not That complicated and produces a very
strong, lightweight board that doesn’t require
any “Shaping” to get to that shape most
of us feel needs to be in a board. The total cost
of material is probably not much more than a conventionally
built board and may be less for larger boards.
The board is mostly hollow, so any ballast needed
to sink the board can be added when the board is being
built, rather than having to cut a hole for lead in
a finished board, add lead, and then recover the cutout.
As in the board for Bolger’s Schooner, substantial
additional ballast can easily be easily added to provide
stability, too. Building a hollow board like this
is Fun too, and isn’t Fun much of the reason
we build these little boats anyway?
Most conventional boards involve creating a blank
of wood and then shaping that blank until it Looks
like what we think a board should look like. This
hollow board technique is Certainly quicker and easier
than stacking and gluing multiple layers of plywood
or solid, then trying to plane and sand them all to
an exact NACA Foil shape. Lots of planing and sanding
is Not My idea of Fun. I guess I’m a lazy boat
builder, but I enjoy other parts of building more.
This hollow board technique works best for rectangular
boards, but can be used to build tapered boards as
well. You just have to figure out where to put the
stringer or stringers to give the final shape you
want.
For the boards I have built, I use the same general
overall dimensions I would use if the boards were
to be built a conventional way, but I figure the board
Will be a little thicker in cross section. That’s
part of the reason this type of board is so strong.
I also build the boards before I build any box for
them as these boards are a “Cut and fit, Work
in progress”, ‘till they are done, so
I’m not always sure of the Exact finished size.
The boards I have built so far have been relatively
small, “Elegant Punt” size, about 4’
long, a foot or so, wide and 1-1/2” thick.
 |
The boards I
have built so far have been relatively small. |
I first cut a “Nose Piece” or leading
edge piece from solid wood. The “Nose Piece”
is just a long rectangular piece of wood slightly
thinner than the overall thickness of the board and
slightly shorter than the overall length of the board.
I cut a rabbet in the back edges of that piece about
3/4” front to back and slightly deeper than
the thickness of the plywood I will use for the skins.
That rabbet will take the front edge of the plywood
skin and is cut slighter deeper so the joint can be
sanded flush. So far I’ve used 1/4” plywood
for skins for all my hollow boards so the rabbets
have been about 3/4” front to back and slightly
deeper than 1/4”.
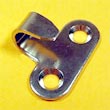
Depending on the type of board, (leeboard, dagger
board or centerboard), I cut a solid piece of wood
that will fit between the skins at the top of the
board to act as a solid spacer block and to reinforce
a pivot pin hole if needed. The solid piece also makes
a solid place to attach a top “Handle”.
As is the case of my Michalak style leeboard, I attached
a long handle to swinging the board up and down.
Since the top part of the board usually will not
be below the waterline I do not shape it to any “Streamlined”
shape but leave the top part of the board squared
off, rectangular and flat on the sides. The flat upper
section provides a better bearing surface for a leeboard
or swing up center board and lets a dagger board fit
flush inside a rectangular opening in a dagger board
box.
The thin plywood can be “Tortured” to
transition from the flat upper section to the “Streamlined”,
underwater part.
If the top of the board needs a radius cut to clear
the inside of a centerboard trunk the top of the board
can be cut to shape after it is assembled, taking
care not to hit any metal attachments that may be
hiding inside.
The only real “Trick” is deciding how
thick the long stringer needs to be and exactly where
to place it to get a suitable “Foil” (used
very Loosely again) shape. I usually make the stringer
a little thicker than the nose piece and for the 12-16”
boards, about 1-1/2” wide and about an inch
shorter than the distance from the bottom of the spacer/reinforcing
piece to the bottom end of the board.
When I get the stringer where I think it should be
I mark the position on the inside of one side skin
and then Measure that distance to mark the corresponding
position on the inside of the other skin so the stringer
will be equal distance from the front of the board.
I haven’t found it necessary to round over
the sides of the stringer on these smaller boards,
but on a larger board it should be rounded to match
the inside curve of the plywood skin to prevent any
“Hard Spots” in the skins.
 |
I guess if one
did all the math one could cut the nose piece
and stinger(s) to a size that would produce
a real “Foil” shape. |
As I said, I guess if one did all the math one could
cut the nose piece and stinger(s) to a size that would
produce a real “Foil” shape. That might
take more than one stringer and maybe a couple of
ribs, but I’m just looking for something that
Looks good.
Locating the position of the stringer by trial and
error has worked well enough for me. I pick a place
a little less than half way from the leading edge
then clamp the skins around that and see how it looks
until I’m happy.
For the first, “Elegant Punt” leeboard
I didn’t make a “Trailing edge piece”
but just glued the skins together at the trailing
edge. On the next board I built, I cut a small, thin,
triangular piece of wood with rabbets similar to the
leading edge piece to fit between the back edges of
the plywood and that seemed to make a neater, sharper
“Trailing edge”.
When I get the Leading edge piece, the skins, the
trailing edge piece and the internal blocking at the
top cut and placed where I think they should go, I
use some temporary screws and a few clamps to hold
the whole thing together so I can get a good look.
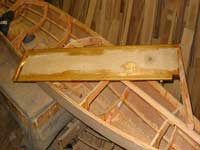
That’s the time I trace around the bottom so
I can make a solid wood “Bottom End Piece”.
That piece is cut to the same “Streamlined”
shape of the board and a rabbet is cut around the
top so it will fit inside the skins.
The reason the nosepiece, trailing edge piece and
the stringer(s) need to be slightly shorter than the
skins is so they won’t be in the way of the
“Bottom End Piece” when it is fitted in
place. Cutting and fitting the bottom end piece is
probably the most difficult part of the whole job.
Before final assembly I coat all internal parts and
insides of the skins with epoxy and let the epoxy
dry. The board May be water tight, but just in case,
I want the insides protected. I converted one board
built for use on another boat and had to drill some
additional holes. I found water dripping out one of
the earlier holes I had forgotten to plug, so was
glad I had coated everything inside with epoxy, just
in case something like that happens.
 |
Before final
assembly be Sure to round over any places that
will be difficult to get to after it’s
all put together. |
Now’s the time you need to calculate how much
internal ballast you might need or want and make accommodations
for securing that inside the bottom end of the board.
A couple of screws into the bottom pieces to give
the lead something to hold on too and some thickened
epoxy should hold some lead in place OK.
Before final assembly be Sure to round over any places
that will be difficult to get to after it’s
all put together.
If everything was dry fitted and held together with
temporary screws, final assembly should go pretty
smoothly. Just slather all the joining parts with
slightly thickened epoxy, put everything where it’s
supposed to go (Be careful to make sure stringer is
properly aligned) and put the temporary screws back
in where they were.
After the epoxy sets you can take out all the temporary
screws, ready to be used on the next project. I just
learned about using hex head sheet metal screws for
temps. The heads don’t strip out like sheet
rock screws and they can be used over and over.
I use a large round over router bit to round over
the leading edge piece and the edges of the “Bottom
End Piece”. Just a part of a very large radius
bit makes a good, “Leading Edge” shape.
Also round over any parts you think might need it,
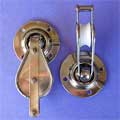
like lifting handle. Drill a pivot hole if needed.
I like to drill an oversized hole for the pivot pin
and put in some sort of “Bearing”. Fill
any joints between plywood and solid pieces if necessary
and sand to suit. Be sure to paint, or if you want
the board finished Bright, be sure to cover epoxy
with varnish or some other covering to protect the
epoxy from UV.
I don’t know if it’s necessary on smaller
boards, but I glassed the entire outsides of the boards
I’ve built to protect them and add to strength.
If you chose not to glass the whole thing, it might
be good to at least glass the leading edge and bottom
end piece as they may take a beating.
The process sounds more complicated than it really
is. It Is Fun to build a hollow board and when you
get done you’ll have a neat, very strong board
with that “Streamlined Shape” we are always
looking for. As I’ve found, you will also have
a “Conversation piece” and you may pass
on this method to others.
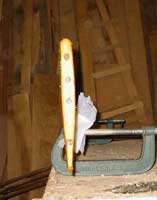
 |
I can bridge
the board between two points at the ends, stand
on the board and it doesn’t even bend. |
My 4 Foot long “Elegant Punt” board is
Way over built. I can bridge the board between two
points at the ends, stand on the board and it doesn’t
even bend. If I hit something solid with this board,
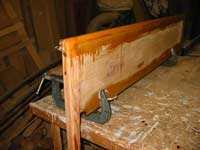
the side of the boat is going to tear off befor this
board breaks. I built the one shown here that is about
the same size as the “Elegant Punt” board
and is more in proportion to the 11’ skiff I
use it on.
This same technique can be used to build larger boards
and large rudder blades too. I think this method would
have real advantages for Large underwater boards.
The skins for an 8’x 32” leeboard for
one of Bolger’s larger boats could be made from
a single sheet of 4 X 8 plywood cut on an angle. A
couple of pieces of solid wood for the leading edge,
top blocking, bottom piece and stringer(s) and you
could have a pretty big, strong, cheap board. Compare
the cost of those parts to the cost of materials for
any solid board, be it plywood or lamented solid stock.
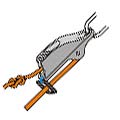
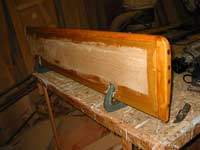
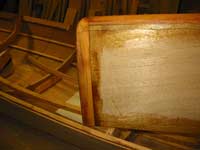
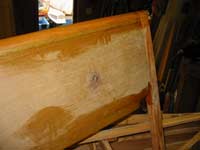
I had planned to take some photos showing the start
to finish construction of my latest hollow leeboard
to use with a “Michalak Style” mounting,
but I was having so much Fun and everything went so
quickly, I forgot to get any pics until the board
was nearly finished. But here are a couple of pics
of the nearly finished board. Maybe you can see enough
detail to be helpful.
Please let me know if anybody Has built a hollow
board like this or if you Do build a hollow board.
All comments are welcome, but Please No. “That’s
not a ‘Real “Foil’ “. I Know
that. <G>
It sure Looks Cool and Works Great.
I think these hollow boards have a lot of advantages
and I will use them on Any sailboats I build from
here out.
The technique is pretty easy and I hope self explanatory,
but if you do have any questions or Ideas, please
contact me at pateson@colton.com (Only One “t”
in That pateson )
Have Fun
Pat Patteson
Molalla, Oregon
|