| I grew up racing small one-design dinghies (Rhodes
Bantams, Lightnings, Penguins, Thistles and the
like) and given the strict one-design requirements
for these boats, there was not much one could do to
make one boat faster than another. However there was
usually some wiggle room in the shape and construction
of rudders. In one-design rudder designs there was
usually a maximum thickness requirement that was checked
by a template at regional and national regattas but
other than this thickness requirement and the two
dimensional shape of the blade, there was often quite
a bit of latitude in the actual cross sectional shape
of the rudder blade itself. Hence rudder shape and
construction was fertile ground for eking out a little
more speed.
 |
If the maximum
thickness for a dinghy rudder is, say, 7/8”,
one could find an appropriate board, plane it
down to 7/8”, cut out the prescribed shape,
hang pintles and tiller fittings on it, slap
it on to the stern of the boat and go sailing. |
Let’s start with some basic observations.
If the maximum thickness for a dinghy rudder is, say,
7/8”, one could find an appropriate board, plane
it down to 7/8”, cut out the prescribed shape,
hang pintles and tiller fittings on it, slap it on
to the stern of the boat and go sailing. Even with
the squared edges, it would work, but with all the
turbulence and drag, it would be deadly slow. A better
solution would be to shape the underwater portion
of the rudder blade into a proper hydrofoil by rounding
the leading edge and tapering it off to the trailing
edge allowing the water to move over the foil with
the minimum of drag, back eddies and turbulence. To
make the design considerations even more complex,
the rudder must perform well at all angles of attack
as the rudder is moved along its axis when the skipper
steers the boat over the race course. It didn’t
take long to conclude that there were an infinite
number of shapes one could carve into the blank, but
only one of them was the best shape. A trip to the
local library yielded a few books on hydrodynamics,
and the image that stuck with me was an overhead photo
of a trout with a fairly blunt head (leading edge),
maximum thickness about 1/3rd of the way aft of the
leading edge and a smooth taper leading to a fairly
sharp tail (trailing edge.) There was a lot of other
scientific jargon mentioned about laminar flow separation,
coefficients of drag etc. but it was the image of
the trout cross section that stuck with me. God don’t
make no slow fish, so “trout shape” was
clearly the way to go.
My first attempt at making a racing rudder was a
Penguin rudder for a friend who raced at
a local lake. He had an old boat, and his rudder was
damaged. Knowing my interest, he purchased a beautiful
piece of Philippine mahogany, and got me a set of
the official plans from Philip Rhodes Naval Architects,
the designer. I was a high school student at the time,
and usually took a wood shop class in lieu of an end-of-the-school
day study hall, and I was always looking for projects.
The plans were very specific about the shape, and
after planning the board down to maximum thickness
allowed, I made a full size template, transferred
it to the plank and cut out a blank on the bandsaw.
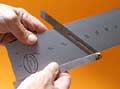
I then scribed a center line on the edge of the blank
using a depth/marking gauge, and per the plans, made
a grid on the blank. Using this grid, I scribed a
maximum thickness line down the face of the blank
on both sides and then penciled in several stations
that would later be used to check the cross sectional
shape. I then constructed a set of sheet metal shape
templates from the plans that corresponded to the
several stations on the blank.
The next step was the hard one; carving the desired
shape into the blank. There is story about the man
who approached a master sculpture and asked him how
he carved a statue of a horse from a block or marble.
The artist responded: “It’s easy –
just cut away anything that doesn’t look like
a horse.” Hence, my task was to simply cut away
anything that didn’t look like the desired rudder
shape.
My shop teacher, Mr. Nelson, told me that using
a hand plane was the best method to rough out the
shape. The planes in the shop were old and dull, and
my first task was to grind a proper cutting angle
on one of the plane irons and then hand sharpen it
with a flat sharpening stone and cutting oil. I recall
the process took the better part of three hours, but
the result was a sharp plane that could shave a thin
ribbon of mahogany without gouging or making burrs.
I must admit that I became enthralled with the romance
of using a sharp tool on a fine piece of wood.
Over the next few weeks, I slowly planed the blank
down on what amounted to four sides, the two leading
edges on each side (from the center of the leading
edge aft to the maximum thickness point) and the two
trailing edges on each side (from the maximum thickness
point to the trailing edge center line.) I set the
plane to shave off only a fraction of an inch at a
time, maybe 1/32nd “ at a pass, and I checked
the shapes frequently with the sheet metal templates
that I had made from the plans. When I finally got
done rough shaping and the templates matched, I switched
to sandpaper, starting with 100 grit and working up
to 220 grit. As good a tool as a sharp plane is, it
still makes flat cuts with each pass, and the sandpaper
rounds out the surface into a continuous curve. Mr.
Nelson often said: “Don’t forget that
sandpaper is a tool” and even though we had
a power sander in the shop, he made us do most of
our sanding by hand. I sanded for days, and when I
was done, the results were gratifying and the unfinished
rudder blade looked great. The only problem was that
in my zeal to achieve a perfectly smooth surface,
I had sanded too much and the maximum thickness ended
up about 1/8th inch under the desired specification.
It was still a nice rudder and a big improvement over
the original, but in retrospect, I should have rough
shaped the rudder a bit “proud” (i.e.
oversized) and then sanded it down to specification.
Yep, sandpaper is indeed a tool – lesson learned.
My next project was a Rhodes Bantam kick-up
rudder for my own boat, and this time I did away with
the templates and tried to eyeball the shape as best
I could. Like the scene in the first Star Wars movie
where Luke Skywalker goes on manual attacking the
Death Star, I decided to ‘go with the Force’
and see if I could come up with a fast blade by eye.
Working without templates made getting a fast, symmetrical
shape a bit more of a challenge and required looking
down the length of the blade often and then touching
up here and there to get the desired end result. It
was a good project but with the necessity of having
to use 3/16” aluminum plate for the rudder cheeks,
it came out heavy and useful only for off-the-beach
cruising, not racing. Still the shape was a big improvement
over the stock rudder that came with the boat from
the Gibbs Boat Company.
About this time I read an article in a sailing magazine
by Mark Lindsay. Mark had and continues to have the
reputation of being the best rudder carver east of
the Mississippi. The article showed how to build a
small boat rudder from laminated 1” by 1”
Sitka spruce strips, and the result would be a very
light, stiff, racing grade rudder. I had to travel
an hour to buy clear Sitka spruce stock, but I did
find some and ripped it to the 1” by 1”
specs, and then, following Lindsay’s instructions,
I rotated each strip 90 degrees to change the grain
angle for added stiffness and anti-warping and I also
built a glue jig to hold the strips in alignment for
edge gluing. Last, I threw in one strip of mahogany
just for color contrast and a little more stiffness
in the middle of the blade. Modern epoxy resin for
amateur use was still a few years off, so I used Elmers
brand waterproof resorcinol glue that was mixed from
a brown liquid and powder catalyst. I didn’t
have proper clamps, and ended up stacking cement blocks
on the top of the gluing jig, but with a nice even
run-out of the goopy glue, I figured I got a strong,
even glue joint. When the glue cured, I scraped off
the excess glue and rough belt-sanded the resulting
blank and then convinced a local mill works to run
it through a surface planer to get an even 7/8”
thick laminated plank. From then on, it was simply
a matter of band sawing out a rudder shaped blank,
and planning and sanding it to shape. With all the
different grain exposures, having a very sharp plane
was imperative, and I recall pausing often in the
shaping process to re-sharpen the plane iron. Mark
Lindsay said a little judicious belt sanding was allowed,
but I was too cautious and opted for hand sanding
the final shape. This time I also intentionally made
the blade a little under the maximum thickness as
I planned on fiberglassing the underwater section
of the blade for added strength and smoothness. When
the shaping and sanding was complete, I hung the rudder
sideways with the blunt leading edge at the top and
covered the entire underwater section with one piece
of lightweight fiberglass cloth draped over the blade
and then wetted out the cloth with catalyzed polyester
resin. When it cured, I trimmed off the excess fiberglass
cloth, sanded the glassed blade and recoated with
a flow coat of resin. After sanding again, I re-coated
with a second resin flow coat the then got serious
with finer and finer grits of sandpaper ending up
with 600 grit wet-or-dry paper used wet. I finished
the project with ¼” mahogany plywood
cheeks (per the plans) and new stainless steel pintles.
The laminated spruce and mahogany showed clearly through
the fiberglass covering, and it carved through the
water with a minimum of fuss and turbulence. [Author’s
note: A few years later while refinishing this blade,
I wondered if I could lighten it by removing the 1/4”
plywood rudder cheeks. File this idea under “bad
ideas” as it cracked end to end the first time
I sailed the boat in heavy air. I keep the cracked
blade around to remind me that good naval architects
know what they are doing most of the time and we amateurs
usually don’t. –asg]
Several years later while a graduate student in
North Carolina, I met a young couple who were building
a Rhodes Bantam from a kit from the now defunct
Bay Craft Boat Company in Bay City, Michigan. The
rudder that came with the kit was a single blank of
Philippine mahogany but not shaped. We struck up a
friendship, and I ended up volunteering to do the
basic shaping of the rudder and did so in a single
night at their married student apartment at Duke University.
I didn’t even own a plane at the time and ended
up buying a cast iron Stanley plane from a local hardware
store, a tool that I have used and enjoyed countless
times since. The rudder came out pretty good for a
one night effort.
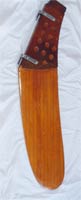 |
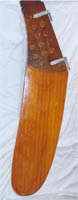
I ended up building
not one but two Sitka spruce rudders using WEST
resin for the lamination gluing and coating.
These were my best efforts to date, and although
I did not dispense with the plywood cheeks,
I did drill the cheeks full of lightening holes
and both rudders are still going strong years
later. |
In the mid-1970’s I bought a new, second hand
Rhodes Bantam that I planned to race, and
the heavy plywood mahogany rudder that came with the
boat had to go. By this time, WEST epoxy resin was
readily available, and I ended up building not one
but two Sitka spruce rudders using WEST resin for
the lamination gluing and coating. These were my best
efforts to date, and although I did not dispense with
the plywood cheeks, I did drill the cheeks full of
lightening holes (see photo) and both rudders are
still going strong years later. The completed rudders
went on my Rhodes Bantam, Spirit
and a friend’s Amazin’ Grace,
and both boats with these rudders on board won three
Rhodes Bantam International Championships
in subsequent years. I like to think that these homemade
rudders had something to do with their success but
even if they didn’t, they were great fun to
build.
These days most of my spare time goes into small
boat repair and restoration projects rather than new
construction, but I still have a fascination with
crafting fast blades. Just last summer I repaired
a badly damaged Sunfish synthetic dagger
board making a mold from an undamaged board and filling
the mold with thickened epoxy (but that’s another
story.) The technology has changed a bit over the
years, but there is still no substitute for a sharp
plane, a fine piece of wood and a good eye…and
sandpaper; don’t forget the sandpaper.

More articles about foils and rudders:
|