| Egads, foiled again.
That irreverent thought kept flashing through my
brain as I ground, sanded, puttied, and faired my
way through a revision of Oaracle’s leeboard
and rudder. In my mind, of course, were two recent
articles in Duckworks that had addressed getting airfoil
shapes on leeboards, centerboards and rudders. Based
on those examples, my goal was to achieve a foil shape
to improve performance – and maybe durability
– without too much pain and aggravation, but
taking a different route than those suggested by the
other two worthy articles.
Some background. Oaracle is a Jim
Michalak-designed
Frolic2. Like all the small boats
I have built, its foils are a bit rounded at the leading
edge, a bit tapered at the trailing edge, and slab
sided in between. Sure airfoil shapes are supposed
to be more efficient, but exactly how much and whether
it would justify a lot of potentially nit-picky (i.e.,
stuff I’m not that good at) work was uncertain.
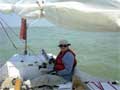
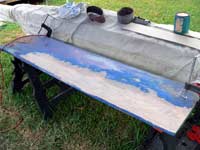
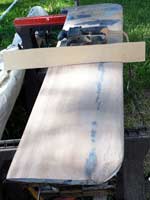
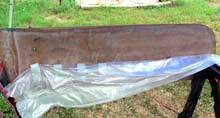
|  Here’s
Oaracle back before I made the modifications
to the rudder and leeboard. Here’s
Oaracle back before I made the modifications
to the rudder and leeboard.
|
Four factors combined to lever me out of slab-sided
complacency.
The first was Tom Hamernik’s excellent foil
programs available free through Duckworks.
Tom has released two versions and either works. All
you have to do is specify what NACA section foil shape
you want and the width and thickness of your board
and, voila, you get a graphed cross section. Neat.
Second was Warren Messer’s recent article
on how he made NACA 10 section foils for one of his
boats using 1/8-inch plywood and thickened epoxy.
For the first time, doing a proper foil shape seemed
doable. But I saw two problems. One is 1/8 waterproof
ply is nonexistent where I live and shipping in a
piece or two doubles the price. The other is I already
had a leeboard and rudder and it seemed wasteful to
start from scratch on new ones instead of shaving
down the existing ones. (When Pat Patteson’s
excellent
article appeared about making hollow
foil-shaped boards, I was already well along on my
modifications. Besides, there still was the problem
of wanting to use the existing boards. . . .)
The third impetus was some conversations with noted
small boat designer and sailor Matt Layden at this
year’s Everglades Challenge and Cedar Key events.
I had observed that the leeboard and rudder on Matt’s
Sand Flea, an innovative 8-foot punt, had foil shapes.
In response to my queries, Matt said doing a foil
would not produce a huge improvement, but in his opinion
was worth the effort. He also agreed that it was practical
to shave down the existing leeboard and rudder, rather
than start from scratch with new ones. Since there
are several varieties of NACA foils, I asked for his
recommendation. Matt said a NACA 9 section for the
leeboard and a NACA 6 section for the rudder would
be his choice. His final advice was not to obsess
about getting micromillimeter precision, but just
to get close. (Such accuracy is beyond my abilities
anyway.)
The fourth reason has nothing to do with a foil
shape but rather protecting the leading edges of the
fins. Tom Lathrop, who helped Graham Byrnes build
his winning design for the 2007 Everglades Challenge,
wrote (on the forum
section of www.messing-about.com/index.php)
about epoxying a resin-saturated Dacron rope on the
leading edge of the centerboard. He said he had been
doing it for 20 years to the leading edges of centerboard,
rudders, and the like and never had to replace one.
(You can find his account here)
It sounded worth trying. (John Guzzwell, in his book
on cold-molded boat building, recommended sheathing
the hulls with Dynel cloth, which is polyester, not
fiberglass. He reported the Dynel, while adding little
strength, could take an amazing amount of abrasion.)
The project was begun with some trepidation but
it was much easier from start to finish than I anticipated.
To be fair, I neither tried nor achieved micromillimeter
precision. But by my standards, it did come out much
better than expected.
The first part was to call up Tom Hamernik’s
programs. This was sheer simplicity. Simply pick the
NACA section you want, then plug in the thickness
and width of the leeboard or rudder. You instantly
get a graph of the half cross section of the foil,
that exaggerates the thickness to better show the
curve. The graph used to make a full size template,
using either thick cardboard, balsa wood, or thin
model-making basswood ply.
| 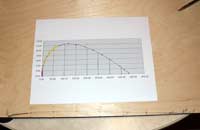 Tom
Hamernik’s foil program prints out a graphed
cross section of the chosen foil shape, with
the thickness exaggerated. Here’s the
graph and the ply template that was made from
it. One was done for the leeboard and another
for the rudder. Tom
Hamernik’s foil program prints out a graphed
cross section of the chosen foil shape, with
the thickness exaggerated. Here’s the
graph and the ply template that was made from
it. One was done for the leeboard and another
for the rudder.
|
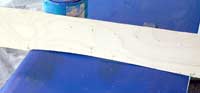
| 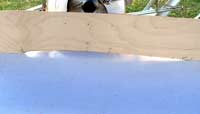 Here’s
the template on a flat surface... Here’s
the template on a flat surface...
|
|  ...
and on the original, slab sided leeboard. If
you look closely at this shot, you can see it’s
quite a ways off the foil shape. ...
and on the original, slab sided leeboard. If
you look closely at this shot, you can see it’s
quite a ways off the foil shape.
|
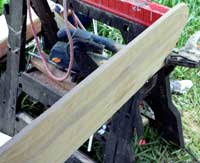
Next is the nerve-wracking part. Using the tool
of your choice – hand plane, power plane, grinder,
drawknife, etc. – carve down the foil to match
the template. Even though the leeboard and rudder
were covered with a layer of fiberglass, I planned
to used my old power planer, having learned it can
go through a layer of glass with little problem. But
the planer chose this moment to wear out, or at least
indicate it needs a new pair of brushes, which weren’t
on hand. So it was down to the local discount tool
emporium. I picked up a small angle grinder with a
sanding disc attachment for much less than the cost
of a replacement planer. The 24-grit sandpaper proved
more than a match for the glass and laminated ply
of the foils.
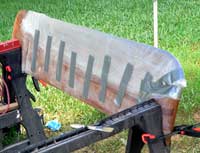
|  After
only a few minutes with the angle grinder, quite
a lot of wood has been removed. After
only a few minutes with the angle grinder, quite
a lot of wood has been removed.
|
| 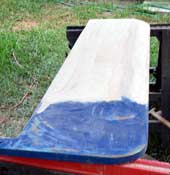 The
board is nearly ready for glassing on both sides. The
board is nearly ready for glassing on both sides.
|
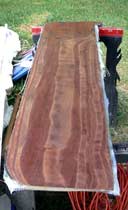
The hardest part of shaping the foils was to remember
to stop every couple minutes to check with the template
to make sure I didn’t go too far, too fast –
that grinder really removed the wood!
|  Use
the template to check the developing shape frequently.
Also take come care to ensure you’re not
skewing the shape by leaving it too thick or
thin at the front or back edge. That shouldn’t
be too hard if you’re working with a new,
unpainted boat as you can see the centerline
of the glued up ply layers (at least if you
have an even number of layers). This board had
been painted, so some care was needed to make
sure the two sides came out symmetrical. In
this shot, the shape is getting pretty close. Use
the template to check the developing shape frequently.
Also take come care to ensure you’re not
skewing the shape by leaving it too thick or
thin at the front or back edge. That shouldn’t
be too hard if you’re working with a new,
unpainted boat as you can see the centerline
of the glued up ply layers (at least if you
have an even number of layers). This board had
been painted, so some care was needed to make
sure the two sides came out symmetrical. In
this shot, the shape is getting pretty close.
|
(If you do take off too much, you can fair over
the error with thickened epoxy.) It took about 90
minutes using the grinder and finishing with a belt
sander with 60-grit paper to shape the leeboard and
about half that time on the rudder. And that was making
a point to frequently check the shape with the templates.
Because a significant amount of wood was removed
from the leeboard, I decided to reglass it with two
layers instead of one. No scientific measurements
were taken, but it was interesting to see how, as
each layer was laminated to each side, there was appreciable
improvement in the board’s stiffness (and, hopefully,
strength).
Also I decided to vary the finishing details of
the leeboard and rudder out of curiosity. On the leeboard,
I did all the glassing, and then cut back the leading
edge and attached the Dacron rope. On the rudder,
I attached the rope first and then glassed the foil,
trimming the fiberglass even with the rope/board joint.
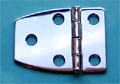
|  On
the rudder, I used a hand plane and belt sander
to put a flat face on the leading edge, ready
to take the epoxy saturated rope. On
the rudder, I used a hand plane and belt sander
to put a flat face on the leading edge, ready
to take the epoxy saturated rope.
|
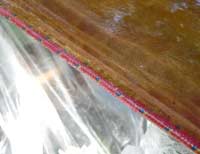
|  The
leeboard was glassed before the leading edge
rope was attached. The lines from the layers
in the ply show up better here, and help guide
the shaping. These lines should have been a
little straighter, and I did some filling with
thickened epoxy after the board was glassed. The
leeboard was glassed before the leading edge
rope was attached. The lines from the layers
in the ply show up better here, and help guide
the shaping. These lines should have been a
little straighter, and I did some filling with
thickened epoxy after the board was glassed.
|
As long as you’re available to trim the glass
with a sharp knife in its “green” stage
(not sticky, but not at its final hardness) I don’t
think it matters which way it’s done. If you’re
not going to be around to trim the glass when its
green, I’d do the glassing and then the rope.
On the leeboard, I used a circular saw to cut a flat
face on the leading edge of the board, and a power
sander to even up the cut and extend the flat face
around the curved edge on the bottom of the board.
On the rudder, I used a hand plane and finished with
the belt sander, and liked that method better.
In his writeup, Tom Lathrop said he used 3/8-inch
rope. He didn’t mention the thickness of the
board, but it looked about an inch and a half. Oaracle’s
leeboard is one-inch thick and I spent an unnecessary
amount of time obsessing which size rope I should
use, finally settling on 1/4-inch. Unfortunately,
I cut a bit more off the leeboard’s front edge
than anticipated, and the 1/4-inch seemed a bit too
small, so I grabbed a scrap of 3/8-inch and that seemed
like a good fit. It then dawned on me that the size
wasn’t that critical. Anything from 1/4-inch
to1/2-inch probably would have worked well, just so
it matches the size of the flat face cut into the
leading edge.
Tom recommended using soft, braided Dacron (he said
nylon would also work but he prefers the polyester),
and I’m assuming he meant the single braided
kind that has about 12-strands. I missed that detail
until after I had attached the ropes. The leeboard
got 3/8 inch double braided rope, the cheap stuff
now commonly available at hardware stores or the big
box home improvement outlets. Make sure you check,
some of these ropes are polypropylene which might
not saturate as well. The rudder got a scrap of 1/4-inch
yacht-grade double braided rope that was lying around.
The double braids are harder ropes, and probably didn’t
mold as well to the leeboards (see below) as the softer
rope would.
I used a somewhat simpler method of attaching the
rope; you can go to Tom’s write-up to see how
he did it. First before any epoxying is done, the
ropes were cut to length. Then a flat headed nail
(not a finish nail) was pushed through the center
at the top of the rope.
|  Use
a nail with a flat head to hold the rope in
place for a dry fit. Use
a nail with a flat head to hold the rope in
place for a dry fit.
|
Hammer the nail into the board at the top of the
flat area on the leading edge just enough to hold
it in place, being careful to get it centered. Stretch
the rope down the face and put in another nail at
the bottom, again centering the nail and the rope
on the flat edge. The tension will hold the rope in
place; it’s not necessary to put a groove in
the flat face. It’s also not necessary to stretch
it bar tight, just do it enough to hold the rope straight
and in place.
Now remove the rope from the board, leaving the
nails in the rope. The holes in the board will mark
where they need to be replaced. Cut some plastic sheeting
that is longer than the rope, and wide enough to drape
over the leading edge of the board and several inches
down each side. Use duct tape to fasten one edge to
the board, and then fold it back, exposing the flat
leading edge.
|  Here
the rope has been dry fitted with a nail at
each end holding it in position, and the plastic
has been taped on one side, ready to drape over
the soon-to-be-epoxy-saturated rope. Here
the rope has been dry fitted with a nail at
each end holding it in position, and the plastic
has been taped on one side, ready to drape over
the soon-to-be-epoxy-saturated rope.
|
Now mix up some epoxy and dunk the rope in it. I
used about 8 ounces for the 4-foot long 3/8 inch piece
for the leeboard, and probably could have got by with
4 to 6 ounces. Poke the rope with a stick for a couple
minutes to make sure air bubbles are disbursed and
the rope is thoroughly saturated. Take the rope out
(wearing gloves!) and place it, like you did before,
on the leading edge. Make sure you don’t hammer
the nails all the way down – you’ll want
to remove those when the glue dries (well, I suppose
you could use a Monel and bronze ring nails, but I
prefer to take them out). Now drape the plastic over
the saturated rope, pull it down firmly, and tape
it in place. It helps to have precut the pieces of
tape; trying to tear strips of duct tape with glue-covered
gloves is a frustration best left to others. You’ll
need pretty long pieces to fit over the bottom of
the board where the rope goes around the curved leading
edge.
|  The
rope has been removed, saturated with epoxy,
and replaced. The plastic is draped over the
rope, pulled tightly down, and taped firmly
in place. Note the long pieces of tape at the
bottom end to anchor that section. What to do
with the ends of the rope is up to the builder.
Tom Lathorp notched the bottom to fit the rope
and at the top anchored it in a hole. I wanted
until the epoxy had partially cured and then
flattened the ends, later going back and sanding
the hardened rope and using some thickened epoxy
to fair the ends. The
rope has been removed, saturated with epoxy,
and replaced. The plastic is draped over the
rope, pulled tightly down, and taped firmly
in place. Note the long pieces of tape at the
bottom end to anchor that section. What to do
with the ends of the rope is up to the builder.
Tom Lathorp notched the bottom to fit the rope
and at the top anchored it in a hole. I wanted
until the epoxy had partially cured and then
flattened the ends, later going back and sanding
the hardened rope and using some thickened epoxy
to fair the ends.
|
While the glue is still wet, run your hand over
the plastic covered rope. You can easily feel if it
has slipped off center anywhere and you can simply
move it back. There will (or should be) enough pressure
from the plastic to hold it in place. Now walk away
and let the epoxy cure.
An unrelated tip: If you regard epoxy as liquid
gold, try to have some other use lined up for the
left over epoxy used to saturate the rope. I didn’t
plan ahead when I did the leeboard. When I got to
the rudder a few days later, I made sure the excess
was used to fill the weave of the fiberglass cloth
on the leeboard.
Also, to state the obvious, you can use Dacron rope
to protect the leading edges of your boards and rudders
even if you don’t go to the trouble of shaping
them like foils.
|  The
joint between the rope and board has to be filled
with thickened epoxy The
joint between the rope and board has to be filled
with thickened epoxy
|
|  Here’s
the protective rope as it curves around the
bottom edge of the leeboard . . . Here’s
the protective rope as it curves around the
bottom edge of the leeboard . . .
|
| 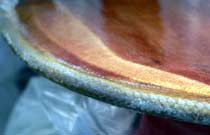 ...
and the bottom edge of the rudder. Notice the
nice curve on the leading edge provided by the
ropes. I whacked the hardened rope with some
miscellaneous heavy objects and didn’t
managed to dent or mark it. Hopefully it will
stand up to rocks and oyster shells for many
years. ...
and the bottom edge of the rudder. Notice the
nice curve on the leading edge provided by the
ropes. I whacked the hardened rope with some
miscellaneous heavy objects and didn’t
managed to dent or mark it. Hopefully it will
stand up to rocks and oyster shells for many
years.
|
Anyway, once the epoxy is dry, you’re about
done. You’ll have a groove between the rope
and board (bigger if you use hard rope like I did,
smaller if you use softer rope like Tom recommends)
to fill with thickened epoxy – no big deal.
After that fill the weave of the glass cloth and fair
the boards to whatever standards you want or have
the patience for. I was pleasantly surprised when
I put the templates back on the leeboard and rudder
to find out the rope on the leading edges matched
exactly the curves on the templates. Sometimes you
gotta be lucky.
| 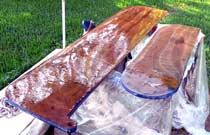 Glassing
the rudder, and filling the fiberglass weave
on the leeboard. All that’s left is sanding,
fairing, and painting. Glassing
the rudder, and filling the fiberglass weave
on the leeboard. All that’s left is sanding,
fairing, and painting.
|
Because of a minor shoulder ailment, it will be
a couple months before Oaracle is back in the water
and we get to try the revamped foils. But when I stood
back to look at the finished product, I couldn’t
help thinking, “Egads, I’ve been foiled.
And I’ll probably do it again. (When I build
another boat . . .)”

Other articles by Gary Blankenship &
Helen Snell:
|