| I got the urge to build a double paddle canoe
several years back when I paddled a Charlotte built
by Tom Hill while in Maine at the WoodenBoat School
– a great place, but that’s another story.
I liked the feel of being so close to the water while
at the same time not having to struggle to balance
on the rim of the cockpit while snuggling my legs
forward toward the foot rests as I entered the boat,
as one my have to do to enter a kayak.
The Wee Lassie was at the top of my list for a while,
but I wanted to be more versatile and try a sailing
canoe. I’d heard a lot about Iain Oughtred’s
designs, and my experience in a cedar strip kayak-building
class told me that this was a way to get a good looking
yet functional boat with minimal mess if one only
follows Ted Moores’ advice about scraping off
excess epoxy before it hardens. After considering
various designs, I opted for the Wee Rob, partially
because SailRite makes a sail kit for it, and also
because the plans indicated that it could optionally
be built in cedar strip. A friend had built a somewhat-beamier
MacGregor, which is a sailing/paddling canoe as opposed
to the Wee Rob’s paddling/sailing status, but
I wanted a ‘paddler’ more than a ‘sailer’.
After debating about the length, I opted for the 13
½’ version to be sure my 180 lb. weight
would allow a margin of safety when it came time to
sail.
I picked up some well seasoned western red cedar
and a bit of mahogany, supplementing my wood supply
with ash, some leftover Sitka spruce, mahogany marine
plywood, and a bit of scrap redwood rescued from a
dumpster. Since I enjoy the building process as much
as having the boat, I opted to start from scratch,
REALLY from scratch. First, I spent most of a year
building a shop in the backyard to allow me to keep
my cars in the garage (I always wanted to build a
house, but I figured that a shop was realistically
all I’d actually end up building).
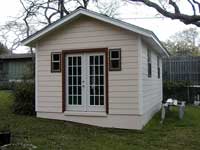 |
First, I spent
most of a year building a shop in the backyard
to allow me to keep my cars in the garage |
Next I started work on the canoe by ripping 14 foot
long, ¾” wide cedar boards into ¼”
strips, creating a lot of dust, and then built a small
router table to cove and bead these. The router once
got out of adjustment and I didn’t reset it
quite right again, which led to problems later on
as the cove/bead connection was not fully centered
on some of the strips, leading to more sanding than
I would have liked.
 |
Next I started
work on the canoe by ripping 14 foot long, ¾”
wide cedar boards into ¼” strips,
creating a lot of dust |
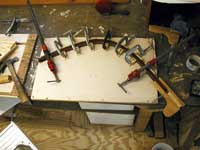
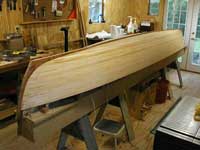
Boatbuilding, if you aim for perfection, can get
harried. Getting the plywood forms set up squarely
on the strongback, built of ¾” MDF, was
difficult.
 |
Getting the
plywood forms set up squarely on the strongback,
built of ¾” MDF, was difficult.
|
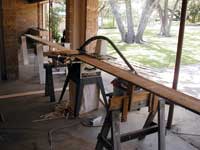
I cut thin strips of mahogany for the forward stem
and soaked them in boiling water for several hours,
adding more water every half hour or so as the water
cooled, then bent them over a jig to try to get them
in the proper shape. Once they’d dried I glued
them up on a jig using epoxy.
 |
I cut thin strips
of mahogany for the forward stem and soaked
them in boiling water for several hours, then
bent them over a jig to try to get them in the
proper shape |
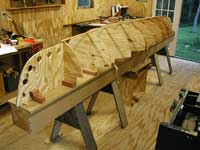
I later found when removing the tape, clamps, and
bungee cords from the strips (I built stapleless)
that they were not in fact always as close to the
molds as I’d have liked. Once a strip was glued
and positioned away from the mold, gluing and clamping
subsequent strips to it didn’t solve this problem.
When I was done, some of the strips were perhaps ¼”
or more off the molds, but if I hadn’t told
anyone about this I’d be the only one to know.
 |
I later found
when removing the tape, clamps, and bungee cords
from the strips that they were not in fact always
as close to the molds as I’d have liked |
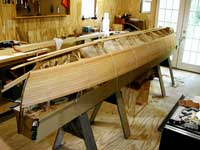
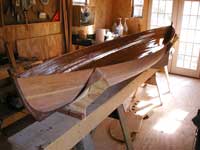
I sanded the strips initially to remove saw marks,
then several times later again, using a longboard
constructed of plastic sheeting and wood handles,
an orbital sander, and a rubber sanding block. Overkill,
but, hey, I like the process!
 |
I sanded the
strips initially to remove saw marks |
My outer stem at the bow was not quite accurate,
due perhaps to springback, so I cut off the upper
10” or so of it and glued/screwed on a solid
replacement piece that, to my surprise, actually fit.
Luckily (skillfully?) I had better luck with the stern
stem, which was from a solid piece of wood, and was
quite pleased and proud of how well the bottom of
this fit into the end of the skeg.
Despite turning down the air conditioner in the shop
as far as it would go all day (I’ll admit it,
I’m spoiled, but it does get hot and humid in
Austin in the summer) I found that the Raka clear
coat epoxy and 5 oz. cloth cured too fast (no fault
of theirs) and thus at 10:30 one night I abandoned
the project and, much later when the weather cooled,
cut off the excess cloth and completed the remaining
60% of the glassing job. A few small bubbles show,
but nobody but me and other folks who look really
close can tell.
 |
I found that
the Raka clear coat epoxy and 5 oz. cloth cured
too fast and thus at 10:30 one night I abandoned
the project |
I had John Hupfield at Lost in the Woods Boatworks
in rural Canada make some simple pintles/gudgeons
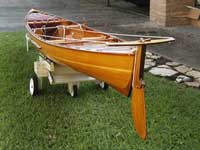
for the rudder. I made the spars, backrest, floorboards,
thwarts, and even a caned seat (Mac McCarthy tells
how in his Wee Lassie book). I made the paddles from
left over spruce and a bit of mahogany. I finished
it all of with a douglas fir/tricycle wheel canoe
cart and a SailRite web site inspired cover to keep
the bugs, birds, and dust out while my Wee Rob is
stored up high above the car in the garage.
 |
I made the paddles
from left over spruce and a bit of mahogany |
 |
I finished it
all of with a douglas fir/tricycle wheel canoe
cart and a SailRite web site inspired cover
to keep the bugs, birds, and dust out |
I discovered too late that in stretching the canoe,
as plans show, I didn’t take into account the
sail’s center of effort, which now was in the
wrong position in relationship to the leeboard’s
position, though I’d calculated pretty well
where to put the maststep. The leeboard was to far
aft. I remedied this by adding a double leeboard arrangement
on a removable thwart placed forward of where it first
was. Todd Bradshaw describes this in his book, Canoe
Rig: The Essence and the Art. It was then I realized
that the kick-up rudder would not stay down as I had
it arranged. Sailing in a small canoe with essentially
no rudder is not my idea of fun. I later weighted
the rudder with lead/epoxy mixture. That done, I was
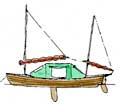
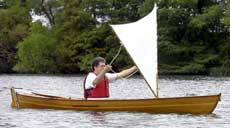
off to the lake. I later added a V sail from some
left over sail material to experiment with when going
downwind.
 |
I later added
a V sail from some left over sail material to
experiment with when going downwind. |
Building this canoe has sure given me a lot of chances
to problem solve and get plenty of experience building
from the ground up. |