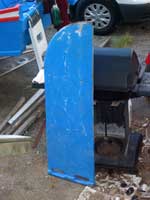
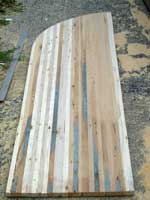
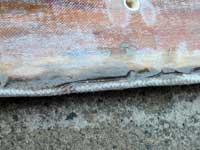
The Light Schooner’s daggerboard is huge. It’s 63 x 20” and two layers of ½” plywood. It lasted three years of the rough treatment due to such a heavy, unwieldy slab. The leading tip was splintered and packed with mud. Worse, my lamination was beginning to fail, which I had experimentally done with PL400. (It’s not so good for laminating.)
 click images for larger views click images for larger views
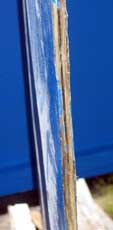
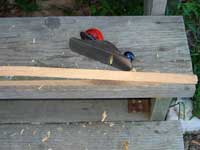
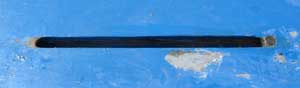
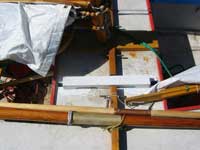
It doesn’t look too bad overall, but here’s the trailing edge.
In the last couple years, Duckworks readers have been treated to a wealth of excellent articles on making underwater foils. We’ve seen how to use computers to calculate foil sections, how to stack up thin plywood in various ways, as well as how to bend thin plywood into a stressed-skin box version of a board.
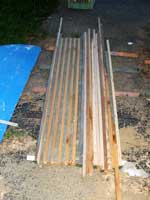
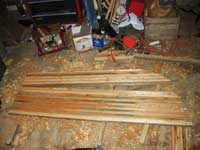
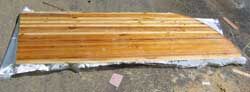
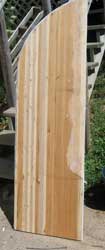
I took a different approach and laminated from strips of lumber. This was not an attempt to be pretty, since I was painting it anyway. I just couldn’t see spending $30 on a sheet of ½” plywood just to make it into a daggerboard. Even less could I imagine spending more on multiple sheets of really thin plywood to make a more perfect foil. It occurred to me that I had plenty of scraps of lumber in the right length range, and plenty more that I could scarph. I also had a tablesaw and a really nice Matsushita fine kerf blade.
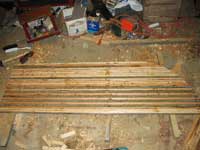
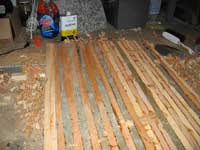
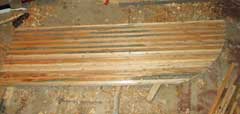
Since the board needs to be 63x20” and 1” thick, I ripped a bunch of 5/8-3/4” strips from 2x and 5/4 scrap. Then I re-ripped these to 1-1/16” and planed all faying surfaces smooth. I left the smaller surfaces rough because I would have to plane them after gluing anyway. It ended up being 24 strips.
The idea with those dimensions is to keep the laminations smaller than the thickness of the board. I’m not sure whether that really helps, but intuitively it seems that it would allow any given strip less opportunity to create a major warp in the board. I also made sure to alternate grain directions where it was obvious.
Scarphing
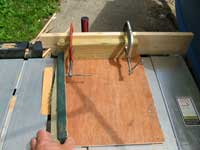
Some of the nicer sticks weren’t long enough, so I built a scarphing jig. Credit goes to David Cassidy on the Michalak Yahoo group for bringing this truly easy method to my attention. (He found elsewhere but didn’t remember where.) Simply cut a 12” (approximately) square of about from scrap plywood and then screw framing sticks to two sides. One side is clamped to the miter gauge and the other is the fence the stock goes against. Run the miter gauge into the slot backwards and adjust for the angle you want. Then set the jig so it just kisses the blade and start cutting.
David clamped his wood to the fence, which is probably smart. I held mine by hand, and I probably only got away with that because it is such small wood and such a thin blade. Don’t sneeze!
After cutting, I stack the pieces up to quickly plane out the saw marks with a block plane.
This system is so fast and easy I positively cannot believe I lived this long without one of these.
Clamping
Gluing up this mess of sticks is a trick. You need to keep everything straight, and force them into line, and clamp the joints. I’m way too cheap to use epoxy on this, so I also had to be fast, because spreading that glue takes most of the 10 minutes allowed by TiteBond III. Forget about using the nozzle on the bottle, because covering this much area is tricky even with a chip brush and a bowl of glue.
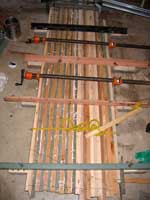
There are two kinds of clamp here—rails to keep everything in line, and edge clamps. For the rails I used scrap 2x with the edges planed parallel and flat. To those I screwed some offcuts from the strips, since they are the same thickness. To these I screwed angle iron from bedframes I found in the trash, but more scraps of 2x would be fine if you plane a flat edge. Rub some automotive paste wax on all these parts so the glue doesn’t stick.
If these 2x clamps are all the same thickness and laid on a flat floor, the board will be clamped in a flat plane. With really unruly wood you might need to screw the clamps to a strongback, but I think you would be better off finding straighter wood. As you can see, I was short a 2x and clamped together two angle irons to fill in.
The wooden clamps also provide some of the edge clamping. The wedges I cut off when making the scarph joints are hammered in between the spacer blocks and the strips.
Notice the perpendicular and diagonal line. This is a very quick way of getting the stick aligned the same way every time.
But we need more edge clamping than just those four. I filled in with a bar clamp at the end where it would fit, as well as two pipe clamps. I finished up with a Spanish windlass. The rope should be thicker and stiffer than you would think, as you are relying on it twisting. Thin cord will just try to twist itself into rope. But even with good rope, pipe clamps are easier and faster.
Gluing
Now don’t go jumping in with glue as soon as you have this all set up. Creating this sort of eternal bond is a solemn occasion that requires a rehearsal dinner and quite possibly guests (to hand you stuff). You need to practice the clamping a couple times to be able to do it fast enough with 10-minute glue. Once you’ve done that, do something else and start the next day with a practice run and gluing. If anything goes wrong, you’ll wish you started fresh after all that work ripping and planing.
Before you open up the glue, you should feel like you’re organized enough to launch a space shuttle. Here are a few things for your checklist:
- Have clamps pre-gapped so they will slip into place with minimal cranking.
- Wear plastic gloves so you can quickly shed the glue when it becomes inconvenient. It will.
- Have more gloves ready at hand.
- Use a kitchen timer or two to keep track of your open time.
- At four minutes you should be halfway through brushing on the glue.
- At seven minutes you should be clamping.
Here’s the procedure. I made three test runs to get the procedure into the required time working alone. One test run probably would have sufficed with a helper. Even still I had to do it in two sections. (More on that below.)
Lay all the strips on the bottom clamp and spread the first two strips. This is easiest if you pull out the last few strips so you can lay four or five down flat and paint the glue on with a wide chip brush. Covering a wide surface all at once speeds things considerably. My photo didn’t show it well, so here’s a diagram of step one.
Then quickly flip those strips on edge and rub the joints in – just a little back and forth motion to make sure the coverage is as good as possible. Flop the next set of strips down flat and paint on more glue as before. Repeat until they are all glued or your timer says you have three minutes left. Even if you’re not done, start clamping.
Shed the gloves and screw down the clamp tops. The clamps holding the pair of angle irons are just snug, not crushing tight. The strips have to move to be edge-clamped. Then tap in the wedges to squeeze the strips together. Then add the other edge clamps.
I only got 16 strips glued on my first pass, but I hadn’t yet figured out the wide brush technique. Painting glue individually on each strip took way too long. Adding the remaining eight strips went really fast with the wide brush technique. Except that I forgot the glue joining them to the first 16!
This wasn’t apparent until I planed off the squeeze out that was tacking them together. This provided me the joyful experience of reassembling all those clamps. I recommend you avoid it.
But I’m getting ahead of myself.
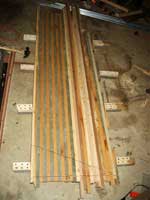
Rough work
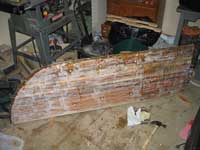
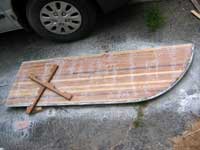
The next step was cutting the outline, since there’s no sense in planing surface that I won’t need.
We still have a lot of cleanup, but a sharp plane makes pretty short work of this. It’s kind of fun too. Here’s the beginning.
Of course you could use a planer or belt sander, but I think you’d miss out on much of why this method is more pleasant than shaping plywood. This is actual wood, so it won’t dull your plane as fast as plywood, and it makes lots of handy tinder.
Note that I didn’t go for perfection, just reasonably flat. This is getting glassed so we can always fill low spots rather than planing away a lot of wood to get everything else down to that level. (This will come up later.)
Shaping
If you really wanted to have those fancy foil sections, you could certainly make some templates and plane to them. I just made a few marks and did it by eye. I’m pretty sure it’s a better foil than the plywood ever was, because lumber is easier to plane than plywood. So I had more patience for making this one a little better. But of course I ran out of time and had to speed things along with #40 sanding belts. I went through about eight of them because it’s a big board and needed to lose a lot of wood.
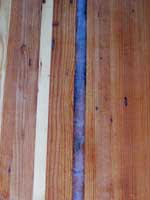
You can’t see it here, but I left the leading edge flat. That’s so I could add a piece of rope as an impact absorber as Gary Blankenship discusses in THIS article (scroll down about halfway). But first we need some glass. Any board survives better with armor, but here we also need it to bind the sticks together into a structural whole. Here I reluctantly admit that epoxy is significantly better than Polyester resin. Polyester doesn’t like to stick when going around corners, and we need to. So I spent some liquid gold on this.
Some strips were thirstier than others. Watch for strips turning white – this means they are sucking the epoxy out of the glass. I only used one layer of 6-ounce glass, so it was pretty easy to mash more resin into the weave even when the epoxy was approaching the gel stage.
Here’s that rope:
I used packing tape in hopes of forcing a smooth finish onto the epoxy. No such luck.
So I added some more epoxy putty to fill the gaps.

It didn’t end up perfect, but better.
Then I epoxied in some lengths of ½” CPVC pipe for a fancier version of the reefing holes on the old board. Any tubing that won’t rust is fine – it is only to keep water out of the end grain. Gluing these tubes are a good way to use the excess epoxy from the rope. Here you can see some of the pipes sanded flat already, and you can also see the cleats for the top edge.
After seeing Gary’s lovely boards, you might say I should have left those strips visible. But I used greenish Bondo Glass filler, which is less conducive to a clear finish. Besides, maintaining paint is a lot less work than varnish. Particularly when the board gets tossed in the bottom of the boat after each outing, and paint from the hull will be constantly rubbing off on it.
A dumb mistake
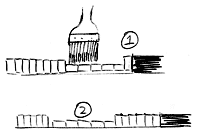
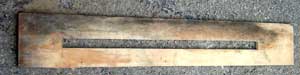
You know the saying about measuring twice and cutting once? I didn’t measure twice on the thickness of the board, and it ended up too thick to fit in the slot! I should have made a simple plywood gauge like this one.
But I didn’t. So I got to belt sand off all the glass and paint and make it thinner. Fortunately I have friends in high places. Remember Greg, my finish carpenter friend from the power tool rehabilitation article? Well, he has access to huge planers and thickness sanders. I could have done this with a hand plane, but I sure am glad I didn’t have to! I guess I should have ripped the strips closer to the final dimension. I had been thinking in terms of sawing oversized and planing to a perfect wood finish, then glassing. I should have realized that I could have easily filled any low spots with Bondo, and risked cutting closer to the final dimension.
More than that, I should have realized the original board was less than an inch! Plywood is always less than the nominal dimension, so this makes sense. In any case, here it is newly resurfaced.
I won’t belabor the process of reshaping and re-glassing, since it’s just like what you saw above. Fortunately this process didn’t interfere with the rope on the leading edge. But I did realize that I hadn’t accounted for the thickness of the rope either, so it was also too big fore and aft. I decided it was easier to open up the slot in the boat’s bottom a bit.
And of course one thing leads to another. I think I’ve mentioned before how these projects get out of control.
It was time to get around to this mess anyhow. I replaced delaminating Bondo with epoxy. (Blame my hurried surface preparation, not the type of resin.) I also filled some voids I discovered because of a slight bulge in the outer veneer. The void was not detectable on the side of the boat that sits to leeward when it’s parked, but I knew it had to be there too because it was the other half of the same piece of plywood.
That was a long tangent in the project, but finally I got back to where I meant to go.
A real test
Finally she sails with new bottom paint and new daggerboard! It survived hard reaching and beating in 10-15 mph of wind with all the sail pressure it could take without capsize. No creaking or odd sounds, either. If it were blowing harder I would have reefed, so I guess this board should do the job.
The only complaint the board made was vibrating near hull speed. Beveling the trailing edge seems to have dealt with it.
A positive advantage is lighter weight. The plywood board weighed 28 lbs but this one is only 19 lbs. You would think either one would be pretty light to someone who flipped the hull solo without injury. But lifting this big board out of the slot on the water is awkward! The weight savings reduces the struggle to a one-handed job.
However this means it actually floats up in the slot, where the old one doesn’t. Obviously I could add weight with lead, but I’d hate to give up the easy handling. However Chuck Leinweber has a magnet trick that I mentioned a while back in another daggerboard article.
Magnets
I screwed and epoxied a piece of steel to the deck on each side of the slot, and epoxied some high strength neodymium magnets into the rim of the board. Your local hardware store probably carries these as “super magnets”. Don’t stack up too many or you’ll never pry them apart.
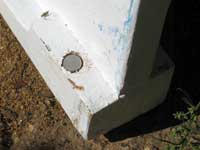
I bored the magnet holes just deep enough for the thickness of the magnet with a ½” spade bit. Four of these magnets would probably do the job for a smaller board, but I ended up with eight total. I suspect it might have been better to stack them in four holes, as the pair of magnets might grab the steel from a little further away. In any case, the magnets we roughed up with sandpaper and wiped down with acetone before being epoxied in. This whole system becomes invisible once you paint over it. Be sure to coat the steel on the deck in epoxy or it will not be long before it turns your deck paint rusty.
The beauty of this system is that when the board touches bottom while broad reaching or motoring, it will break loose from the magnets and float up. This is a handy visual cue that you might be getting into shallow water. It is particularly handy because it is deeper than and forward of the motor, so this warning will often come before the motor hits bottom.
Here the magnets are holding the board down.
And popped up.
So far this is the least offensive the daggerboard system has been. Perhaps not high praise, but I’m significantly less tempted to rebuild the thing as a Michalak leeboard. For now.
Rob Rohde-Szudy
Madison, Wisconsin, USA
robrohdeszudy@yahoo.com |