|
Part 1 - Part 2 - Part 3
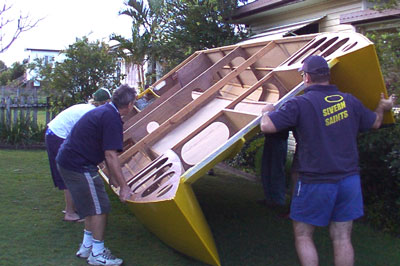
In Part 1 I noted the advantages of helping someone else build a boat. Then Oliver and I got busy building Michael Storer's Goat Island Skiff. We got to the point of glueing the bottom on. Now the story continues...
Session 8:
Finish shaping foredeck, cut and shape stern deck. Cut centerboard slot in bottom, glue and install centerboard case. Apply one coat epoxy to fore and aft floatation tanks/storage areas, and part of second coat to aft compartment. Cut upper frames for bulkheads 2 and 4 and install the frames for bulkhead 2. Sort out spruce for mast and rip spruce for first gunwale layer. Glue and clamp first port side gunwale layer. Time: 6 hours.
click images to enlarge
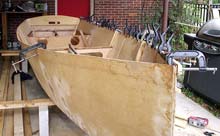
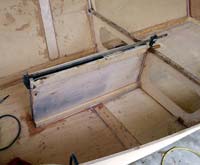 Storer recommends installing the centerboard case and then cutting the slot in the bottom is one of the last jobs done on the boat. We decided to mark and cut the slot (using the dryfitted case to ensure accuracy) before the final case installation and had no problems. Here, a three foot bar clamp holds the case firmly against the #3 bulkhead, while temporary screws through the bottom attach it to the bottom. We used plenty of thickened epoxy on the bottom joint and carefully removed the excess from the slot (using it to seal the slot’s ply edges) and on the inside of the boat used the squeezed-out epoxy to make a fillet around the bottom joint. It does not leak. Storer recommends installing the centerboard case and then cutting the slot in the bottom is one of the last jobs done on the boat. We decided to mark and cut the slot (using the dryfitted case to ensure accuracy) before the final case installation and had no problems. Here, a three foot bar clamp holds the case firmly against the #3 bulkhead, while temporary screws through the bottom attach it to the bottom. We used plenty of thickened epoxy on the bottom joint and carefully removed the excess from the slot (using it to seal the slot’s ply edges) and on the inside of the boat used the squeezed-out epoxy to make a fillet around the bottom joint. It does not leak.
|
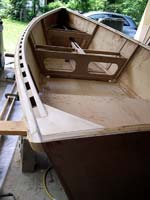
| The first layer of the gunwales is clamped and glued in place. Also visible are the clamps on the upper frame arms that are installed after the sides and bottom are assembled. There are two outside layers to the gunwales and then on the inside of the boat spacers and another inwale, making the upper edge of the hull stiff and strong. |
 |
In between, finish sealing stern compartment and apply two coats paint, seal & paint the underside of the stern seat, put inwale blocks on the starboard side, install both inwales, make both stern knees and the forward breasthook (?). Time 4-6 hours.
Session 9:
At a friend’s workshop, plane four boards from 3/4 inch to ½ inch for the mast. Cut on the table saw a pine plank for the outer gunwales, and plane to just under ½ inch. At the boat, glue on both outer gunwales (had just enough clamps). Butt together lengthwise two scrap pieces of ply and apply fiberglass tape and epoxy to join together to get a piece wide enough for the middle seat. Total time: 3 hours.
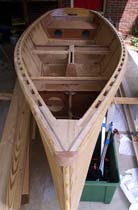 |
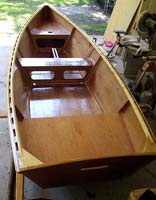
The finished gunwales are very elegant. Note also the framing for the midships seat has been installed as well as the breasthook. |
In between, finish painting under stern seat & glue down seat. Do some of the filleting along the seat seams. Install stern knees. Cut & fit ply for the midships seat. Plane excess from tops of outside gunwale layer. Install cap at step & finish piece over the gunwales at the stem. Time: 14 hours
Session 10:
Measure & cut the narrower mast staves and plane edges. Glue up cedar for internal mast blocking. Apply 2 coats of epoxy to the bottom of the midship seating. Cut, fit and glue in place framing for the midship seat. Glue on the stem breasthook and filler piece at the stem. Use excess epoxy for more filleting around edges of the stern seat. Draw rudder cheek for later cutting (too much wet epoxy around to make the sawdust fly by cutting now). Time: 4 hours.
| The stern quarter knees are installed and it and the inwales are sanded smooth. The edges of the wales were also routed to round the edges. The stern seat/deck has been installed. |
 |
Session 11:
Cut & fit blocking for the mast. Cut out rudder cheeks. Plane & sand breasthook & stern quarter knees. Rout top inside and outside edges of the gunwales. Glue up first two mast staves with blocking. Time: 3 hours (rain delay)
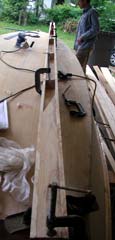 |
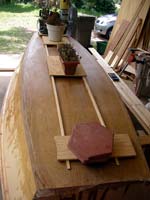
Storer uses a unique (in my experience) "ladder" system of building his hollow masts, where blocks are glued at intervals along its length. The staves have been planed to ½½ inch to keep the mast as light as possible; the internal blocking adds strength. Note the solid block at the base of the mast. |
In between, fillet along #3 bulkhead and along amidships sides, seal area under midships seat. Two hours
Session 12:
Rough cut last two mast sides, and glue up mast, sealing the inside as per instructions. Add extra epoxy where gaps appear in sides. Use every screw type clamp we have & can find. Fiberglass bottom of boat, add tape to chines. Cut & fit the bottom runners, put most of second fill coat of epoxy on the cloth. Cut strips for laminating the rudder. Time: 6.5 hours. (Some delay from rain.)
| The start of a very big day on the boat. The last two sides of the mast are glued on, proving again that no boatbuilder has ever had too many clamps. We would have liked a few more! The sides will be trimmed to size, the edges rounded and the bottom of the mast will be fiberglassed for abrasion resistence at the step and partners. Storer also recommends coating the entire mast with epoxy, which Olivier did. |
 |
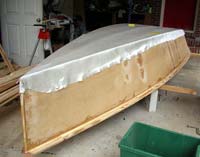 |
Storer recommends to save weight by only applying fiberglass tape at the chines; there are too many oyster bars where we are for that, so we elected to cover the entire bottom with cloth, with an additional layer of tape at the chines. Here the cloth is draped over the hull, ready for the epoxy. |
| The fiberglass is wetted out. We used the yellow plastic squeegees available in auto body shops to spread the epoxy. It spreads the epoxy quickly on horizontal surfaces and avoids puddles of excess resin. |
 |
 |
We glued down the bottom skids after the first coat of epoxy, so they would be in place when the final two coats of epoxy are applied to fill the weave of the fiberglass cloth. The locations were marked on the bottom before fiberglassing and show through the wetted out cloth. The weights hold everything in place, as Storer recommends not using screws to fasten the skids to the bottom. |
Session 13:
Glue up strips for rudder. Time, about 45 minutes. (Note, may have mismixed the epoxy as it was not particularly hard after curing, although it appears to be more than adequate in strength. From here on out, Olivier did virtually all the work.)
In between, plane down mast, rout the corners, and sand. Miscellaneous sanding on boat. More epoxy coating and sanding, coating bottom with graphite epoxy mix. Boat flipped to finish work on the interior. Time: Probably at least 30 hours of sanding, epoxying, painting, and working on other finishing details such as installing the deck plates in the forward and aft floatation chambers.
| The bottom is coated with graphite and epoxy to enhance abrasion resistance. |
 |
 |
The mast step and partners are installed before the foredeck, which will cover this area, is glued in place. |
| Construction of the basic hull is complete, and Olivier is sealing the inside and hull with the recommended three coats of epoxy. |
 |
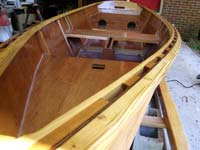 |
The lustrous look hooked him and for the interior he chose to varnish over the epoxy to show off the wood. The exterior of the hull is painted white. |
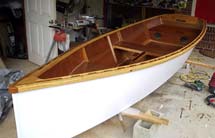
| The finished basic boat, ready for its rowing trials. |
 |
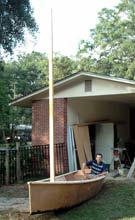 |
The proud owner sits in his Goat Island Skiff with the mast in place. Note, the hull had not been sealed, painted and varnished when this picture was taken. |
| The finished hull is a medley of varnished woods; show here on launching day at Lake Hall in Tallahassee, FL. |
 |
 |
Olivier and Tiffany take the first spin with an electric motor. The C-clamps are for testing the location for the oarlocks, a technique recommended by Jim Michalak. |
| The Goat Island Skiff next to our Piccup Pram, which served as chase & photo boat on launching day. |
 |
Postscript:
One final thought. Since Olivier was paying the bills, I'm not sure what the final construction cost was for the skiff. But it was very moderate. Enough so that shortly after the launch, he surprised Tiffany with an engagement ring!
Gary Blankenship
Next time: Final Details and Sailing
***** |