My brother, Lewis, and I came to the conclusion on our last White River outing that about the only thing “new” for us to do in that part of the country would be a Buffalo River float trip. If we could not sit in canoes and kayaks for a few days, and there is no way I would attempt to row a Jon boat 30 miles, then I would just have to come up with a new boat! A canoe with training wheels! Ah ha! Now we are talking!
 |
It really was not hard to make a sketch of a boat that would do all that stuff we wanted. Although I freely admit I really could not actually draw in 3D the shape I was seeing in my mind’s eye. So I mad a full sized mock up of the bow section and knew I was on to something. The mock up showed me how the panels would fit but it looked too boxy to me – so I narrowed the transom quite a bit – not on the mock up - on the boat I actually built |
This is how I built Muga and Tonka. If you will just relax, not get bent all out of shape by exact measurements, ridiculously close tolerances, and rows of imaginary numbers, you should be able to produce your own similar boat without hurting your head! There were a number of firsts for me with this project. I built the boats upright “freestyle” like they would have done long ago – had they had plywood and epoxy. First time I only used epoxy on the seams. And first time I did not use expensive boat paint.
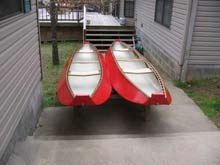
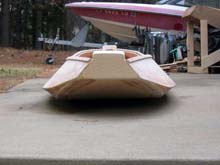
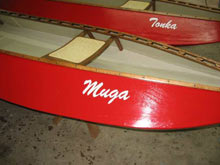
Like I said, this is how I built Muga and Tonka – Muga is a Shawnee word for bear and Tonka is a Sioux word for buffalo. Muga is #1 – the learning boat – my boat.
Setting Up
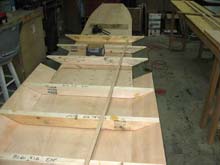
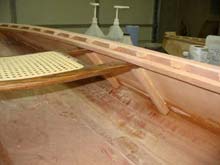
I began by setting up a strongback I built from Ted Moore’s book “Canoecraft”. Then I ripped a 4’x8’ sheet of ¼” plywood down the middle and trimmed the panels down to 2’x7’. Next, starting 2’ from the end I drew the bow curves on each side – ending with a bow curving in to a 12” wide transom. |
 |
After aligning the bottom sections on the strongback I used one of the 12”x24” wood scraps as a butt block to join the bottom sections. The butt block will look much nicer with the edges tapered. I installed six or eight drywall screws through the butt block right into the strongback (where it was wide enough) to hold the bottom in place while the epoxy glue cured.
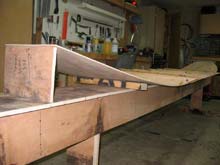 |
Next I aligned a 2”x4”x24” board between the bottom and strongback and 2’ from the transom and screwed it to the strongback using 2” drywall screws being careful not to tighten the screws so tight the plywood warped. These boards held the bottom in place for the next step – I raised the bow up and installed two screws to hold an 11 ½” wide by 8” tall block of scrap under each end to give the bottom its upward curve. |
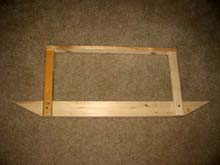
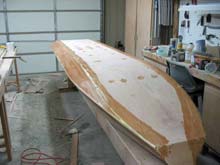
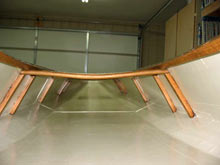
| Once that was done I made the forms to hold the thin bottom and sides in place while building the boat. I used five forms. To make them I cut a 35” 2”x4” board then ripped it to 2”x 2 ½”. After marking a center line I measured 12” in each direction to give me the angle to cut the board. Once this was done I added two 12” risers and a 23 ½” cross beam. Note – you will have to make the center form 2 ¼” as it will set on the butt block. |
 |
Next I secured the five forms with drywall screws, spacing them evenly from the center to just behind the 2”x4”supports under the bottom. Warning: haste and improper alignment will come back to haunt you if you are careless with set up!
Building
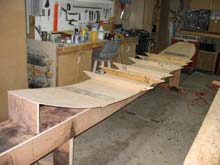
Next I ripped four 6”x8’ panels out of ¼” plywood for the chines. I left the boards 8’ to ensure I could stagger the location of the butt block joints. Holding one of the 6” panels where I wanted the butt joint to be, I drilled holes just big enough to accommodate small plastic wire ties – easier with two people – but I managed. I also installed a couple of drywall screws to hold the panel to the forms.
 |
Once the panel had enough wire ties to hold it to the boat I bent it around the bow and drew a cut line then removed it and made the cut with a jigsaw. Then I reinstalled the panel, ensured a good fit and installed enough wire ties to hold it in place (10 or 12). |
I repeated this for all for panels and then cut 6”x 6” butt blocks for the joints using drywall screws to hold them while the epoxy cured. Note: unlike metal wire, pieces of plastic wire ties can be left in the boat and easily sanded smooth.
I then used a 4’ batten (then flexible straightedge) to draw a line for the top edge of the chine to make it fair into the bow. |
 |
 |
To do this I clamped the batten level with the top of the chine panel and bent it around the curve so the chine ended up about ½” wide at the bow. Complicated to explain but a picture is worth a thousand words! |
Once the chines were trimmed I began the side panels. I cut four 16”x8’ panels out of ¼” plywood. I aligned the side panels to ensure the butt joints would not align with the bottom and chine butt joints. Using drywall screws in the form crossover beam to hold the panel in place I drew the line where I would have to trim the side panel to connect it to the chine. |
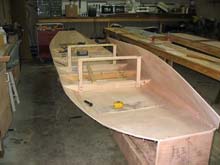 |
Don’t worry about the shear, just make sure the side panels are generally level and set up higher that the crossbeams on the forms. Note: also ensure the panel sticks out far enough at the bow to let you put a rake (angle) in the transom on both ends. After trimming the side panel and checking the fit I used plastic wire ties to hold it in place and drywall screws to hold the butt joints while the epoxy glue cured.
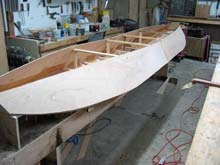 |
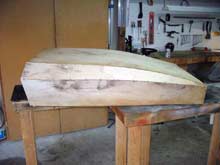
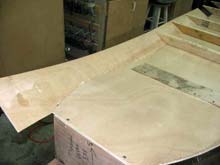
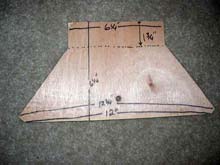
While the side panels were curing I made the transoms out of ¾” scrap plywood. I assumed I may one-day want to go crappie fishing and not be bothered by paddling – so I made the transoms to support a transom mount trolling motor. Electric trolling motors require a 1 ½” thick surface to clamp on so I made small blocks to thicken the transoms where the mounts would rest. |
I did not bother with trying to cut angles so the edges of the transom would meet flush with the boat bottom and sides – this is not that kind of a boat. Here is a photo of the transom.
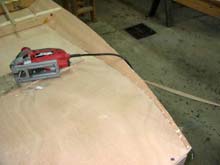
Once the transoms were held in place with a few 1 ½” nails I trimmed the excess wood on the side panels and then started working the seams. |
 |
 |
Since the outside edge of the boat is likely to come into hard contact with hard surfaces I installed three layers of seam tape. The ideal way to do seams on this boat would be using 6”, 4”, and 3” fiberglass tape applied in layers at the same time before the epoxy cured. For the butt joint and transom seams I used a singer layer of 6” fiberglass cloth (8 oz). |
I mixed a batch of 3 parts talc powder to one part micro balloons and stirred in enough epoxy to make a thick batter to fill the void around the inside edge of the transom and then covered it with 6” tape while it was still wet. By the way – you can use Bondo Ultimate if you don’t want to fool around with mixing batches of seam filler to fill voids and screw holes. It dries fast though, so mix small batches and work fast. |
 |
After the outside seams where cured I used a long batten and using the top edge of the forms as a general guide drew the shear line (top edge of the side) and trimmed it with a Japanese pull saw. Then I cut and scarfed together 7/8” x ½” oak strips to use as gunwales and installed them with epoxy glue and a bunch of spring clamps. While they were drying I made similar strips for the inwales. Since I like the look of scuppers (spacers between the gunnels) I also made 80 ¾” x 3” scuppers for each boat for later use.
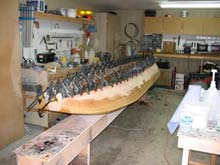 |
Next I removed the forms and put a layer of 3” and 6” tape on the inside – overkill but I am not an engineer you know. While that was curing I pulled out all the screws releasing the boat from the strong back and filled all the screw holes. Once the inside seams had hardened I rolled the boat and applied three layers of fiberglass seam tape to the outside bottom seam. |
Then I sanded all those seams as long as I could stand it – doing an OK job of fairing the seams – Oh – did I mention – I was building TWO boats at the same time. That is a lot of seams to sand, grasshopper! |
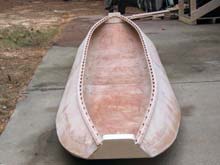 |
Once everything was sanded all I could stand I rolled the boats back over and installed the scupper blocks with epoxy glue and then the inwales. Because I have had glue failure in the past on gunnels I also drilled countersink pilot holes and installed a 1 3/16” #10 through each scupper. I stained the oak with “aged oak” color stain I had on the shelf and rolled the boats back over and installed 3 - 3/8” x ½” oak strakes to protect and stiffen the bottoms of the boats.
I used F-26 construction adhesive and held the strips in place with drywall screws until the glue dried. I also permanently installed a stainless screw in the ends of the strips to keep them in place if they were bumped. Then I stained the strips with the same stain I used on the gunnels.
 |
I bought canoe seats and canoe yokes on ebay and fitted them to the boats. I know how canoe seats are mounted – but I wanted my seats higher and I wanted them to add structural strength. I made small 1 ¼” x 1 ¼” blocks and cut them to angle to fit to the sides of the boat. I permanently installed two brass screws in the blocks from the outside and then stained them Aged Oak to match the other brightwork. |
The seats and yoke are held in place by 2” #12 stainless screws and surface washers installed through the gap between the inwale and gunwale. This allows them to be removed for boat painting and refitting. The front edge of the front seat is 49” from the transom and the back edge of the back seat is 35” from the transom which allows a single person to “sit backwards” on the front seat to better balance the boat when paddling solo. |
 |
|
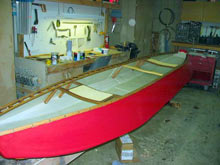
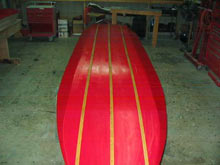
Next I primered the hulls with Rustoleum Painters Choice gray primer and then painted them with Rustoleum Painters Choice (my first time not using boat paint!). I applied several coats of Apple Red to the outside and Almond to the inside. Note – you must wear protection indoors with this stuff – it will really mess you up! |
| After the paint dried I varnished all the brightwork with several coats of Spar Varnish and installed a tow ring in both transoms of the boats. |
 |
|
The final step was to order Muga and Tonka decals! |
|