After building a sailing canoe, that proved to be too small for my intentions, I decided to build a sailing/fishing canoe. I looked at a number of websites that I found ineresting. I was most impressed with capefalconkayak.com's "joel White" sail boat, and gaboats.com's Geodesic airolite boats.
Then, I decided that I wanted a canoe with a lot of beam, maybe 37", lot of freeboard, about 18", and be at 14' long so I can car top it. It had to be simple with halyards for the sail but the least amount of rigging. Also, the rudder had to be simple and efficient. With these criteria in mind, I went ahead to look for a design. I purchased the Snowshoe 14' long canoe plans from gaboats.com, but on examining the plans, I realized that this canoe was not going to be roomy enough for me and the kids, and maybe a guest kid and adult.
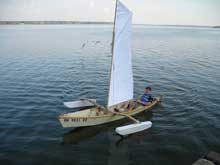 |
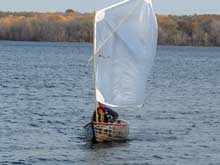
My sailing canoe.
click thumbnails for larger views |
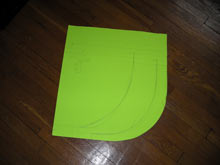
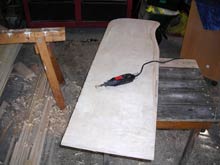
I had already built a canoe and knew that it really is a "bunch of stuff" spread apart with a bottom to it - and it will float. I decided to see if I could make my own stations, with simplicity in mind. I bought a few construction papers, the only ones that were not wrinkled, were neon-green, so I bought these. I measured out 20" from the left side, and freehand drew a nice fairly flat curve. I repeated similar lines twice more. These were going to be my half-breadth station plans. I measured up about three finger width, about 2" for the smallest station for a good size rocker. I wanted a lot of rocker in the canoe, so I could spin the boat around easily in tight fishing spots.
| I measured out 20" from the left side, and freehand drew a nice fairly flat curve. I repeated similar lines twice more. |
 |
Then I cut in along these lines up about 20", so I had about, 18" sides. I only cut in, I did not cut the pieces, so I had a single paper for all three stations. I just flipped the unused part up and drew the lines on the plywood along the cuts. I used the left side of the paper as the center for the station, then once I was done with one side I flipped the template over along a line I first drew on the ply, and drew the other half of my station. This process, took very little time. I did not care too much for precision, since I knew that the things would shift a bit here and there, and that's OK with me.
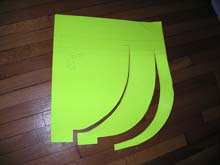 |
I cut in along these lines up about 20", so I had about, 18" sides. I only cut in, I did not cut the pieces, so I had a single paper for all three stations. |
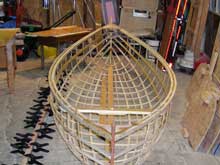
After all, I used only the outermost and innermost template for stations, and cut out two of each. So I had a total of four stations. I did not see the value of having two more stations. As soon as I attached the my stations to the strongback, I ripped 3/8x1/2 pieces, and 3/8x3/4 pieces for stringers. For gunwales, I used 3/4x1 1/2" wood. All wood is poplar, since that is the best I could get at Home Depot for a resonable price.
| I used only the outermost and innermost template for stations, and cut out two of each. |
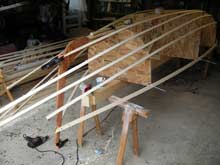 |
The stringers I placed near the bottom about my palm width, then on the sides about the distance of my thumb and little finger spread, maybe a bit shorter.
 |
The stringers I placed near the bottom about my palm width, then on the sides about the distance of my thumb and little finger spread, maybe a bit shorter. |
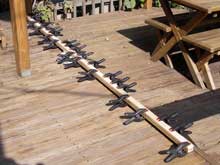
I built my own steamer from a pice of aluminum downspout, by screwing in two small pieces of wood. This will keep my ribs away from the walls of the steamer avoiding the problems of the walls cooling the ribs.
| I noticed that I had to steam the ribs, for 20 minutes, and had about 5 to 8 seconds of time to bend them to shape. |
 |
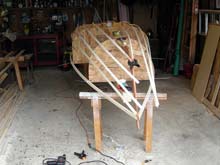
I noticed that I had to steam the ribs, for 20 minutes, and had about 5 to 8 seconds of time to bend them to shape. I worked by myself, so I put one end of the rib in the inside the gunwale, and folded the rib around the outside of the boat, sticking the other end in to the inside of the gunwale again. I could not come up with any other way to single handedly bend the wood into shape. The larger ribs, eventually opened up the boat once I cut her off from the station. The gunwales opened about 5" more. This was a welcome result for my already 40" of beam. It would just make more room and improve the stability of the boat. I placed the ribs about two of my fists apart - about 7 1/2".
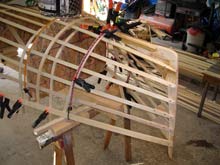 |
I put one end of the rib in the inside the gunwale, and folded the rib around the outside of the boat, sticking the other end in to the inside of the gunwale again. |
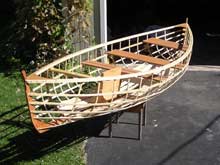
I was very impressed with the floors of the geodesic airolite boats, I liked the natural arcs of the floor cuts; I found them very elegant. I used 3" wide wood I found at Home Depot again, I believe they are an 1/8" thick. I attached the floor to the ribs with very thin zip ties, they were fast too and very strong.
| I attached the floor to the ribs with very thin zip ties, they were fast too and very strong. |
 |
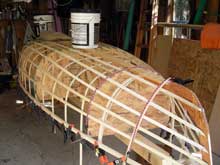
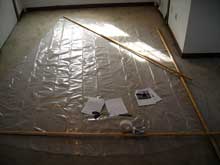
For the walls of the boat I decided to use transparent 20 gauge nylon that I bought from JoAnne's Fabric near my house. The nylon was not wide enough for my canoe turned into a sailboat, so I decided to join the mylon on the keel. First, I laid a bead of 3M 5200 glue, then carefully laid the nylon on and stapled it to the keel. I put a lot of glue around the centerboard, just in case. Then, I scuffed the nylon, and used PVC glue, that again I bought from Home Depot from the plumbing section, to join the overlapping nylon with the other side. Once, I had the two nylon glued, I used black Gorilla tape to cover the seams. At the hull curvature I did not put darts in the nylon, I simply made many little folds, and stapled the nylon to the gunwale. Then I put a strip of red duck tape on the top of the fabric to cover the staples, and screwed the rubrail on. The partially covered red duck tape is simply ornamental, and has no function at all.
 |
For my mast I used West System's resin to glue two 3/4 x 1-1/2" wide x 12' long pieces of poplar together. Then I hand planed that to a somewhat round shape. |
The centerboard I decided to make 12" deep below the keel, and 15" wide, which really wasn't measured, just eyeballed, again. For my mast I used West System's resin to glue two 3/4 x 1-1/2" wide x 12' long pieces of poplar together. Then I hand planed that to a somewhat round shape. It turned out to be a fine little mast. My sail is made out of 4mil construction nylon that is used to cover spaces up so dust does not spread around when work is under way. This again I bought it from Home Depot. The nylon comes in 10x25'pieces. This is more than enough to make a sail or two.
| The centerboard I decided to make 12" deep below the keel, and 15" wide, which really wasn't measured, just eyeballed, again. |
 |
As I mentioned, in a number of places, I tried to avoid measuring things if possible. I got this idea from Robert Morris' book, "Building Skin-on-Frame Boats", where he describes how each kayak is custome made to its owner's size. I decided that this boat is going to be custom made just for us and be simple to build and simple to operate, to maximize the fun time.
 |
My sail is made out of 4mil construction nylon that is used to cover spaces up so dust does not spread around when work is under way. |
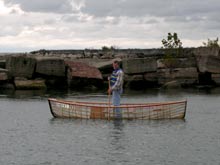
Overall the project turned out to be very interesting, and fun. The boat ended up with a 45" beam, gunwale to gunwale, and very stable, with three kids and two adults, and under sail. There is enough room for fishing and gear. The large rocker workes well as she turnes very nicely. It takes a bit of rudder force to hold her straight when under sail, but I still like the larger rocker, as I can tack on the dime, and as soon as I let the rudder go she turns into the wind instantly.
| The boat ended up with a 45" beam, gunwale to gunwale, and very stable |
 |
The transparent skin of the boat is her biggest hit. We can see the bottom of some of the clearer waters, and it is mesmerizing to see the foam under the bow, as she plows into the water under sail. Under load the nylon bulges a bit under the water pressure, and is acting like a magnifying glass for the marine life below. It is a very interesing sight, as she glides for the smallest breeze. No matter where I go with this pleople run off the road, staring at my boat on my car too long. It simply turned out to be more fun than I expected, and I am very happy that I could build something purely on intuition rather than hard numbers.
 |
It simply turned out to be more fun than I expected, and I am very happy that I could build something purely on intuition rather than hard numbers. |
The only drawback of this project is weight. The overal Weight turned out to be a lot more than I expected, primarily due to the heavy gauge nylon. I think I could have gotten away with a 12 gauge nylon as well, for a lot less weight. The nylon more than doubled the weight of the boat, which I estimate now to be about 50 - 70lbs. In addition, since the nylon is too thick, no amount of heat shrank the folds on the sides, leaving it a bit unpleasant to look at. Luckily I folded the excess nylon right at the ribs so they are not as apparent.
| She glides for the smallest breeze. No matter where I go with this boat, pleople run off the road, staring at it on my car too long. |
 |
I love this boat dearly as it turned out to be a great hit with the kids, excellent for fishing, sailing and for just fun. The nylon is very heavy and takes a bit of abuse, but worse case scenario, a bit of duck tape fixes it on site. If I ever have to recover the hull, I will go for a thinner transparent nylon, but will defintely keep it as it is: fun!
|