I have a calendar with a picture of the Herreshoff Haven 12 1/2 in it. I look at the picture more than I should.
Wondering why, it has occurred to me the curving lines of the Haven has the quality of a young boy to it. It is
cute as boys can be, with just enough flare of the hull to be a bit dangerous, as boys should be. It looks small,
as if you could hold it in your hand. And while it looks uncomplicated, the sail, the rig, the layout are all the
result of years spent carving lines.
I get the idea Captain Nat spent some time questioning the need for everything he put on the boat. How little
coaming does a boy need? How many lines to the sails does a boy really need? How deep a keel should it be
to feel like a ship, without being slow or overcanvassed?
Did he stop one day in the Herreshoff yard while one was being built, to wish he’d had one like this when he
was a boy? I hope he felt a certain glee when his son Sidney sailed it for the first time, because the Haven 12
1/2 certain has given great pleasure to boys ever since. Unfortunately for those of us who don’t have the skill
Captain Nat’s great craftsmen did, the Haven 12 1/2 is difficult to build. I certainly could not build one as it
was designed.
Over the years, others have attempted to simplify the building without losing the ecstasy of sailing a Haven. Several years ago, Philip Bolger created a plywood and epoxy version. It has one chine per side, creating two
panels on either side of the keel. Those who have built the Bolger Plywood 12 have said it performs eautifully.
It is not trailerable. The original dimensions of the Herreshoff Haven are 16 feet overall, 6 feet of beam at the
deck. This means any attempt to be faithful to the dimensions and weight make it too big for a trailer. The
plans are $100, the last time I heard from Mr. Bolger.
Joel White drew a popular version of the Haven, but he made it shoal draft with a centerboard. It performs
probably nearly as well as the original, but Mr. White had to change the turn of the molds to shallow them. It
is a successful on its own terms, as the Doughdish is, and other versions. But it isn’t the same slack bilges,
deep long keel and sureness in light air.
So I was thinking, how close could I come to the Haven, and still build it myself? Carvel is out, and I don’t
want to take the time for lapstrake. But a compromise might be possible. What about a three panel per side
plywood hull, screwed and painted in the joint with paint on the outside and glue on the inside? Could that
work—I hoped it would.
What the Haven seems to have is three qualities Herreshoff loved to build into all his ships. A deep keel,
plenty of sail area to move the deep ballasted keel, and depth in the water. The Haven sits in the water with its
slack bilges—somewhat like a dory—so the generous sail are is needed to move it along, and the deep ballasted
keel is there to squeeze it on with all points of wind. The original gaff main gives it power on a reach, while the
jib helps out to windward.
 |
Such slack bilges are usually associated with rowboats. William Atkin
drew a 14 foot rowboat he called, ‘Pixie,’ which shows these lines:
You can see the deadrise, with the single chine above the waterline. |
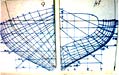
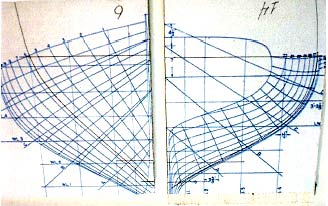
| Now these lines (in blue) are from a Haven build years ago. The
slack bilges are evident, with some softening at the turn of the bilge. |
 |
It’s apparent Haven would row very well, and Herreshoff may have intended
it to be rowed in the tighter spaces of a harbor or yach club. Such a
shaping of the molds means the Haven will sit deeper in the water. It would
be tipsy were it not for the ballast. This also enables Herreshoff to put plenty
of room inside the cockpit while still having a slender shape in the water. So
we have the shape of a quiet rowboat with the power of a swift sailboat.
 |
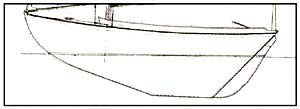
The underwater shape is deep. Here is an advertising image of the original HAVEN 12 1/2, with the tiller
through the stern. |
In 1974 Sidney Herreshoff, the oldest son of Captain Nat, wrote this about the original
design:
While managing the campaign for RESOLUTE during
the trials of 1914, Robert Emmons got my father to design
a small ballasted, sloop rigged boat that would be suitable
for teaching small boys how to sail and to become familiar
with the characteristics of the type of larger boat to which
they would later graduate. The first boat was ROBIN, at
the price of $420.
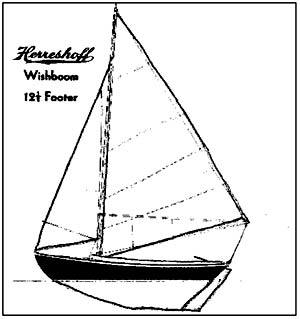
You can see from the drawing the sail area is generous, 140
square feet. In the Joel White version, he gave his 133 square feet
of sail. Skiffs at this overall dimensions usually have around 100
square feet, but with such ballast, the large main and jib are
needed. The marconi style of rig came into vogue at the 1920s
although races show it has no particular advantage. In fact, gaff rigs which have light spars are more versatile in
more points of sail than marconi rigs.
The Herreshoff designs of that era are well known for their beautifully curved sterns. What is interesting is
the similarity of the HAVEN stern and the stern of
Joshua Slocum’s SPRAY. Notice how parallel the underlines
of the stern transom are to the underwater lines
of the molds on the HAVEN, below in blue. With
SPRAY shown below that, you can see the same thing.
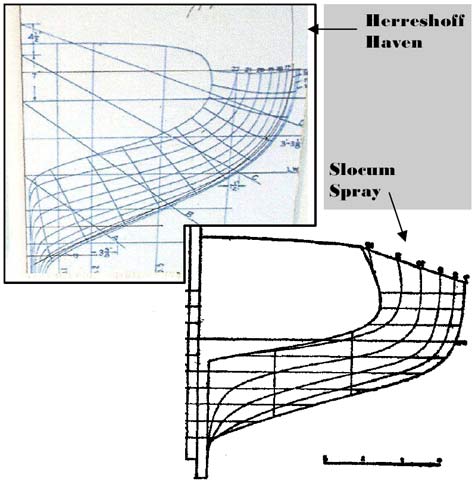
This must’ve simplified the lines by which the water
flowed under the aft sections. SPRAY had very little
underwater surface, so the vertical topsides probably
helped its directional steering. HAVEN had so much
more surface with its deep keel, it could have such flare
at the topsides.
 The boat does sit deep in the water. Evidently the boys around Buzzard’s
Bay where Mr. Emmons lived sailed the first Havens pretty hard because
Captain Nat had to move the coaming in to create more deck space to prevent
swamping. Floatation was provided under the floorboards with a watertight
compartment before the mast. In later years an aft deck was put in—with the tiller coming over the deck—so that the space under the deck could
serve as stowage. Once the boys got away from the dock they probably
stuffed their lifejackets under there until the racing was over; I say this
purely on conjecture having been a boy once in ancient times. The boat does sit deep in the water. Evidently the boys around Buzzard’s
Bay where Mr. Emmons lived sailed the first Havens pretty hard because
Captain Nat had to move the coaming in to create more deck space to prevent
swamping. Floatation was provided under the floorboards with a watertight
compartment before the mast. In later years an aft deck was put in—with the tiller coming over the deck—so that the space under the deck could
serve as stowage. Once the boys got away from the dock they probably
stuffed their lifejackets under there until the racing was over; I say this
purely on conjecture having been a boy once in ancient times.
Finally, the rabbet is dead straight from the stem to the straight level
ballast. This probably makes the rabbet quite strong and easy to assemble.
It locates the weight of the ballast beneath the center of buoyancy,
keeping the trim level.
So we have a boat 16 feet overall with a sail area of 140 square feet, with 700 pounds of ballast. It has slack
bilges, a deep keel, a low exciting freeboard aft and plenty of cockpit space. While I can’t build this to the perfect
shape of Captain Nat’s dimensions, let’s see what we can do.
When Philip Bolger redesigned this classic for plywood in the SMALL BOAT
JOURNAL of 1987, he identified the two problems which an amateur will
have. First the forefoot is quite narrow even though the deck is wide, and second
the stern shape curves so much it can’t be duplicated.
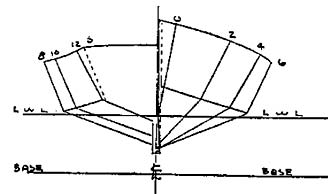
 |
The first mold is concave, the second is straight, but the third begins the convex
arc until the sixth mold is clearly convex. Plywood won’t do that—at least
not one sheet of plywood. And if you look at the lines for the transom on page
one, you’ll see that one, two, or three panels of plywood still would not get the
shape very close. |
 So Mr. Bolger put a single chine in, above the waterline all the way,
and sacrificed the turn of the molds for straight plywood sheets. He
had to lengthen the bow in order to keep the forward section narrow.
And therefore he made the transom narrow, also. He angled the stem
and stern to get some of the beautiful shape back. All of this depends
on stitch and glue. The design does work, and the boat performs
quite well, from the reports of those who have built her. So Mr. Bolger put a single chine in, above the waterline all the way,
and sacrificed the turn of the molds for straight plywood sheets. He
had to lengthen the bow in order to keep the forward section narrow.
And therefore he made the transom narrow, also. He angled the stem
and stern to get some of the beautiful shape back. All of this depends
on stitch and glue. The design does work, and the boat performs
quite well, from the reports of those who have built her.
The one great issue with builders is the keel. It needs to be made
out of plywood so that the bolts are not too long. It also saves the trouble of solid wood warping with time.
However, as Mr. Bolger pointed out in the SBJ article, this removes about 100 pounds of ballast, which compromises
the performance. The plywood keel can be filled.
So this is one solution to building HAVEN out of plywood. As I said earlier, it is not trailerable which
means I can’t have this boat. So I’ve thought about making it trailerable. This means a lighter boat and less
depth in the keel. The Joel White redesign certainly shallows the keel, replacing it with a centerboard, but even
this boat is not much lighter. Can anything be done? Well, let’s see.
 The keel will have to be made of two sides of plywood joined by a 1”x6” pine board. Fortunately the forefoot
keel is straight. We can make two compartments in the keel, or one. With two the lower one can be free flooding,
filled when sailing and emptied when trailering. It will be like the diagram here on
the right. The upper chamber can be empty or filled with solid wood, cut to fit tight.
This will prevent swelling and warpage. That’s what I’d do. Or we can make one chamber,
all free flooding for as much ballast as the water will provide. The daggerboard is
weighted with lead, and you can give it plenty or a little. The minumun would be measured
around 3”x5”, although I have not drawn that in. This arrangement keeps the
weight low while the boat is still light enough at the dock to get it on your trailer. The keel will have to be made of two sides of plywood joined by a 1”x6” pine board. Fortunately the forefoot
keel is straight. We can make two compartments in the keel, or one. With two the lower one can be free flooding,
filled when sailing and emptied when trailering. It will be like the diagram here on
the right. The upper chamber can be empty or filled with solid wood, cut to fit tight.
This will prevent swelling and warpage. That’s what I’d do. Or we can make one chamber,
all free flooding for as much ballast as the water will provide. The daggerboard is
weighted with lead, and you can give it plenty or a little. The minumun would be measured
around 3”x5”, although I have not drawn that in. This arrangement keeps the
weight low while the boat is still light enough at the dock to get it on your trailer.
And yet, more ballast would probably be needed. First, the daggerboard is weighted. Then the space under
the floorboards is available for additional ballast. I would use sacks of sand. Whatever is used needs to be easily
put in and removed.
The board at
the bottom of the
keel is a dagger
board. The shape is
there to enable it to be
lifted easily. It comes completely
up and out when the boat is trailered at the dock.
I’ve given you options here with ballast. Lake sailing
doesn’t need all of the ballast that open water sailing
does, since lakes usually don’t have currents. More
weight does not make for a slow boat or a bad light air boat. Usually it helps.
Hopefully that will get HAVEN on and off a trailer without incident. Now for the shape of the hull. While
plywood certainly can’t get the shape steamed planks get, it can be strong. While steaming a plank does weaken
it somewhat, the laminated layers of the plywood keep the shape of the boat when it’s out of the water. What
we’ll do is divide the hull into three strakes. One will be quite similar to the Bolger version, but the upper two
strakes will have a slender turn to them to create a stern transom which looks better than a simple rectangle.
The bottom strake or ‘garboard’ will be straight until the fifth and sixth molds shown here. The arch can only
be slight as the plywood is being bent around the molds to the stern. This arch just below the
lower chine is really only to bring it into the strake above it and to give the
transom a better shape. Now the strake above it, strake 2, has some
arch but not very much. I would say it’s about 1/2” in a
strake about 10” wide. How much strake 2 will
take is really a building issue. It can be
altered since it’s above the waterline, anyway.
This can be stitch and glue, or a traditional
batten let into the molds. That’s what I’d do.
As to  whether to put epoxy and fiberglass on the
outside, I’m not sure. You decide.
I have been thinking about Captain
Nat’s thinking process and how quickly
he carved models. It has been said he
would carve a perfect model in just a
few strokes, I would say that might be a
minute or two. It seems rather quick to
me. Obviously he did this since he was
a boy, and knew exactly how the wood turned and peeled. Surely the wood was the best wood
available, the same he used on his yacht interiors. Still, that’s pretty amazing to me. whether to put epoxy and fiberglass on the
outside, I’m not sure. You decide.
I have been thinking about Captain
Nat’s thinking process and how quickly
he carved models. It has been said he
would carve a perfect model in just a
few strokes, I would say that might be a
minute or two. It seems rather quick to
me. Obviously he did this since he was
a boy, and knew exactly how the wood turned and peeled. Surely the wood was the best wood
available, the same he used on his yacht interiors. Still, that’s pretty amazing to me.
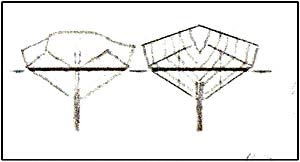
When I look at the HAVEN lines I see three ideas, not one. First the narrow entrance, much like a canoe.
Then the turn of the bilge is always above the waterline, like a dory skiff with two chines above the waterline.
This is amidships. And the third idea is the transom
is just above the waterline, wide and flat like a skiff.
This is what Captain Nat said in a letter dated
1932, published years ago in the Herreshoff
newsletter:
‘My father always advocated boats of good
displacement. His own boats were of the heavily
ballasted keel type. My idea (in 1870) was to shape
the hull so the ballast would be lower, have the bilges
practically out of water so as to get easy lines when
the vessel is upright, and great beam that would give
stability when heeled in a breeze.’
I have on my desk the lines for H-28, twice the
length of HAVEN. All the elements of HAVEN,
mentioned in the letter are there. While the old
Captain made changes as the years went by, the elements he mentions are always there no matter how large the
craft. By the way, Captain Nat invented catamarans, in 1875.
And yet maybe we can simplify it even more, to bring it along the lines of a skiff with a keel. The first few
feet have to be fairly upright before the flare begins. To do this with plywood the stem has to be wider at the
waterline than at the sheer, with the Herreshoff overhang. Otherwise the flare would come too far forward, creating
slapping in the water. What we want is a gentle slipping of the water along the upright sides at the bow.
So I’ve draw the stem in a V-shape top to bottom. It is made in three layers to keep the water from blunting
the boat. Each of the three sections is beveled, although I don’t show that in the diagram below. The idea is to
move the water to be alongside the sides of the boat by pushing the water away from the bow. Each of the three
sections will be glued so the water can’t pound any nail or screw head.
The bottom panel is flat for about 2/3 of the waterline, until the stern begins to lift. The bottom panel’s sides
are fairly straight to accommodate the flare amidships and the stiffness of the chines. Then where I have drawn
a transverse line, the deadrise begins. The rise of the rabbet back up to the waterline has to be
gradual to accommodate this deadrise. I would make the bottom panel
out of one sheet of plywood, and then cut a split from the stern
toward the bow nearly to the transverse line. The cut will have to be
shaped to accommodate the upward turn of the panel as the
deadrise increases. The only criterion for how much the
deadrise increases is the chines at the transom have to be out
of the water.
| As you can see below, the keel is solid wood for rowing, free flooding for
sailing. I have not shown a daggerboard, as the bottom plywood is being
bent enough as it is. I wouldn’t ask it to take any more strain than this.
It’d be like asking a teenager to think on a weekend.
Since this is just a proposition, I think I’d build this shape without
any keel or board to see how it rows first. If the side panels do their
job, then I’d think about making making a sail. |
|
***** |