A tale of three sheets to the wind
and a bit of folding piratical nonsense
To Part One
...Continued from Yesterday.
Now I add some removable bracing with the help of some 15mm dowel
and a drill bit. Oops I cracked the plywood so I had to do a repair
with a small bit of fibreglass cloth and some 5 minute epoxy glue.
The dowels were permanently glued into the ends of the braces.
You should not do this while the braces are in the boat or you
will finish up with a permanent rather than a removable brace.
It also pays to mark your braces so you know where they go and
which way is up. It also pays to not have the dowels fit too tight
in the outer block so that they do not stick and take so much
force to separate that you finish up cracking the surrounding
plywood when you pull them out. Believe me I learned this the
hard way. I reduced the length of the dowels to around a half
an inch (15mm).
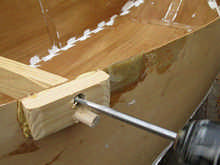 |
A rotary tool with a small sanding drum made
short work of making the holes just that smidge wide enough
and rounding the ends of the dowels slightly.
|
Here it is assembled and folded down. The two blocks n the centre
were supposed to be for oarlocks but I got the feeling that using
oars would crack the sides. Strangely enough they appear to be
in the ideal spot for carry handles when it is folded down and
provide reinforcement to the mid join.
 |
The two blocks right at the back were for a
rudder which never eventuated either. |
 |
Here it is folded out with a couple of masts
for effect and a chair to show the scale. |
To be honest the design may be more in keeping with making a
stage prop or a kid's sand pit than a real boat. For these other
purposes materials and construction methods can vary - For example,
Imagine the fun of knocking up one of these using 3mm MDF and
Gaffa or duct tape one night for the kids to wake up on international
speak like a pirate day morning and find a real live pirate ship
in their living room. Imagine what fun it would be to bring it
into work and set it up in your boss's office.
The one addition it really required to make it water worthy was
to put a boogie board in the bottom to avoid us putting our feet
through through the floor and to give us a bit of a more comfy/dry
seat, not to mention as emergency floatation should the unmentionable
ever happen.
There you go - a totally impractical craft built from untested
and unsuitable materials. I have to admit the plywood wobbles
a bit more than I was initially comfortable with (hence the safety
line to shore) and I did not quite seal the joints 100% but for
a bit of fun in the water it is hard to beat. It easily copes
with my son and even manages to carry both of us without falling
to pieces. With both of us on board there is plenty of freeboard
but not a lot of leg room. I even stood up in it with no ill effect
except to panic my son slightly. Strangely enough all of the cracking
has occurred during dry land testing, before it even got in the
water and it has not cracked since.
 |
Unicorns are very hard to catch. This is why
I have not attached one to the bowsprit. |
The Jollii Ollii
Having made the prototype, I did some more fiddling with the
plan, thinking about using a thicker grade of plywood. This would
mean if I stayed with the folding concept, doing more folding
with the hinging. This design has a splayed transom of four inches
which gives an angle of around 76 degrees from the horizontal.
Feel free to make your own guess as to the best angle to put on
it. To make this design into a folding boat 45 degrees is the
angle to use. If you take 45 degrees from the side, the boat will
fold with the transom folding out - if you measure the angle from
the base then the transom will fold inwards. If you make your
transom fold inwards you will need to allow for twice the thickness
of the transom in the side hinges. My preference is therefore
to make the transom fold outwards. The dotted lines drawn on the
transom plan here are only approximate. When the weather turns
cold and I have finished doing a few chores around the house and
have some more time up my sleeve I plan to make my next version
a little more solid (non-folding) with thicker plywood and some
sails and things. I am also playing with cardboard models which
have had a little bit of shaping in the rear end so that there
will be a bit of rocker and shape to the rear end while still
leaving a sizable transom to give me an elevated poop deck. I
am debating the issues around a fixed relatively shallow shoal
keel or skeg or two, or a dagger board/lee board to limit the
moving sideways problem. The extra rigidity will give me the confidence
to add masts, sails and seats and oarlocks and the like.
FAQs
FAQs
Q1 Why a one sheet folding pirate ship?
A Not sure why this is question number one in the FAQs as no-one
has ever actually asked this question. The reason why must either
be so blatantly obvious that no-one really needs to ask it or
people are just being polite. Personally I think the answer lays
hidden in the haze of one too many Bundaberg OP rums, Pokolbin
Semillons or Marlborough Sauvignon blancs.
Q2 What sailing rig would you recommend?
A It is quite clear that a boat this size is too small to accommodate
a reasonably sized sailing rig. The only option therefore is to
fit an unreasonably sized rig. I personally favour a triple masted
square rig. Unfortunately the need to accommodate crew in such
a small boat necessitates a likelihood that a two masted square
rig with a fore and aft mounted topsail and a little triangular
sail thingy at the front is the closest I would probably go for.
Can you tell I am not a sail expert?
Q3 What is the maximum horsepower outboard motor you would attach?
A I think it would be cruel to put a horse in such a small boat.
They generally prefer to stay on dry land anyway. In the words
of the old proverb - "You can lead a horse to water but you
can't make him drink the rum and go in the pirate ship."
Most people of course only remember the first half of that proverb.
Q4 Is this design suitable for a 7 year old to become the youngest
person to sail around the world solo in?
A No. If you send your 7 year old to sail around the world in
this design you will almost certainly be arrested.
Q5 How much?
A This is design is donation ware. Please make a donation to
a worthy charity, or make it a two way donation by buying a nice
meal at a surf lifesaving club. If you can not afford to give
something to charity just give some of your time.
The usual warnings and disclaimers at the end
You should realise by now that this is an extremely silly boat.
These plans are for extremely small boats for use in extremely
sheltered waters. Please feel free to write "Not a life saving
device" on them just to be on the safe side. Please follow
all local regulations as for recreational boating.
Above all be sensible about the conditions, your abilities and
the abilities of your children. Children should be schooled in
water safety and taught to swim. You are legally responsible for
your own actions and the supervision of children in and around
water. Water is dangerous and cold water more so. I accept no
responsibility for any damages consequential or otherwise if you
attempt to make one of these designs. No warranty is given or
implied. This article is for entertainment and information purposes
this boat is clearly more decorative than practical. Be careful
in the water. Be careful with sharp tools, power tools, glue and
splinters of wood.
No ukuleles were harmed in the writing of this article though
one was left in the back seat of the car on a hot day and went
out of tune. Luckily it was able to be re-tuned and no lasting
harm was done.
*****

|