I have been wanting to sit down and actually write
an article for Duckworks for some time. Today I was out running
my 54' 7.5 evinrude and 58' 18 Johnson seahorse for the first
time this year. I guess I got the bug to finally sit down and
write about the 18hp spark plug hole repair I did late last year.
Before I get to the details of the repair, I would like to give
a brief background on my 58' 18hp Johnson Seahorse. I received
this motor for free from my Grandfather. He had gotten it from
his cousin 15 years earlier, rescued from under an oak tree, where
it had been for an undetermined number of years. Needless to say
it hadn't been run in a very long time and was in rough shape.
 |
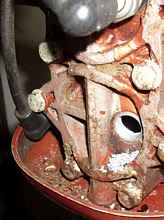
Rough Shape |
When I got it home, I dropped this sad looking little motor into
the test barrel and began a couple of basic tests. It had both
compression and spark, so I connected my gravity fed fuel source
to the carb inlet and began pulling on the blister maker. After
10 or so pulls, nothing, not even a pop. I then carefully drizzled
some fuel directly into the intake, and vroooom away she went.
I tinkered with the fuel settings for a minute or so and had it
idling. I had to shut it down rather quickly due to the water
pump, or lack there of, but I at least now knew it was worth spending
a dollar or two to see if it could be pushed back into reliable
service.
I went to my local NAPA and purchased the water pump/impeller
and a couple of spark plugs. I referenced Max's
article here on Duckworks to install the impeller,
thank you Max and a tip of the hat.
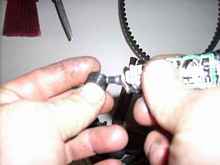
|
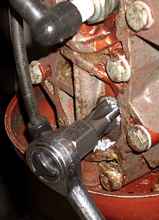
Socket Wrench - Easy Does it. |
My trouble started when I went to disassemble everything to install
my parts. I found that the motor had been used in South Mississippi
in brackish/salt water and put away without any sort of cleaning.
I was able to get it apart with several broken bolts and few choice
French words along the way. I had to make some "modifications"
to get it back together. NO, they aren't pretty and NO, I wouldn't
recommend anyone use them.
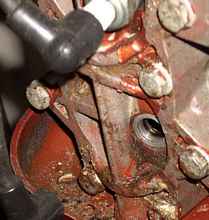
Now that the impeller housing problem seemed to be resolved,
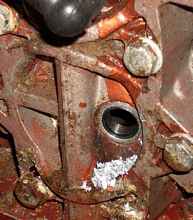
I went to install the new plugs. This is when I discovered that
the bottom spark plug hole was stripped out and only had about
1 1/2 threads actually holding the plug in the head. The new plug
wouldn't hold in the head, as it is just a little bit shorter
than the older plug that came in it. Well I really wanted to see
if my "modifications" were going to work and hold up
so I put the old plug back in the bottom hole and ever so carefully
snugged it up. I completed my test run for the impeller, which
worked out just fine.
Later that night I began to do a little research for spark plug
hole repair on outboard motors and there isn't much info out there
for outboards. Knowing that the plug hole was a standard size,
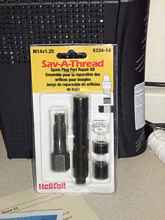
I refined my research to plug size and found several kits. I settled
on the Helicoil Save-a-thread. It cost me about $20 plus shipping.
This is a very simple and easy tool to use. I was able to make
the repair without removing the head. I know that If I ever have
to pull the head on this motor it will probably be relegated to
the parts motor status due to the salt water exposure I mentioned
earlier.
Now on with the repair.
First, lets start with a little safety. Safety glassed are always
a must and gloves would be a good idea also. Clamp your motor
to a stable work station. A saw horse will do nicely and you could
even leave it clamped to the boat, but would be easier on a saw
horse. Remove the motor cover. Remove the plug. Carefully turn
the flywheel so that the piston for the cylinder you are working
on is at the bottom of it's stroke. Now take the tap/threading
tool and find your 3/8 ratchet to drive the tool. Now apply a
light coat of grease to the recessed grooves, this is to help
catch the aluminum shavings you are about to create.
Start the tool carefully and straight in the plug hole by hand,
now use the ratchet to slowly begin to cut the threads for the
insert. Once the tool has cut the hole, remove the tool and inspect
for small shavings that may have fallen into the cylinder or shards
at the bottom of the hole that may break off later while running.
Shavings can generally be removed with a little compressed air
and shards with needle nose pliers.
You are now ready to install the insert. Apply a small amount
of RTV silicone of you choice to the threads of the insert. It
just needs to be of the high temperature variety. Thread the insert
all the way into the newly cut hole. Take the supplied driving
tool and stick it into the insert and carefully hit it with a
hammer. You are only trying to spread the thin mild steel knurled
portion of the insert, so you don't need to get the biggest hammer
you own. Cracking the head would surely ruin your day so don't
get carried away. Wipe away any silicone that squeezed out. Let
the motor sit overnight to allow the silicone to cure.
Now all that is left is to reassemble the motor and give it a
test run. I think it took me about 20min to make the repair, and
this included actually reading the instructions that came with
the tool. I hope this saves someone some aggravation and keeps
another one of these great ole' motors humming.
*****

|