To
Part One
At the request of my adoring hordes of fans (both of them. One
is dodgy and the other I give money). I have decided to conclude
the trailer rebuild article.
Procrastinated as long as I could. The lady of the house informed
me that she had endured enough in our small village concerning
my boat and trailer. She had taken abuse from the children, relatives,
neighbors, even the part time village idiot . Besides summer was
here and she wanted to ride in THAT boat. I gently suggested that
we could use one of the others that I had collected. Did not work.
The next morning I bound out of bed, took a quick shower and ate
a hearty breakfast of eggs, grits, curried octopus in coconut
sauce and toast. About 11:15 A.M. I ambled out to the trailer.
There after considerable contemplation, I attacked the project.
Off with the tail lights and wiring. Grabbed the grinder and the
rust dust flew. After tiring of this I used the sand blaster for
the inaccessible recesses and inside corners. Worked on one side
at the time. The difference the sandblaster made on the rusty
springs and bolts was most impressive. Had thought early on that
these items would have to be replaced.
 |
After the sandblaster the area will be liberally soaked with
the rust converter. This section has had one application.
This section still has rust visible. Possible it may take two
or three additional applications to turn the area the desired
black. Sanding between applications is needed. On areas that are
badly pitted I applied a thin layer of premium Bondo. A little
sanding and the area is ready for paint.
May jump around a bit. Did one side then painted an area. I wanted
to get an idea of coverage and general appearance. The areas were
well treated with the rust converter, then sanded and painted
with aluminum paint.
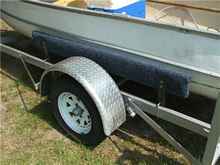
In part one of the renovation project I had photos of two metal
fenders to be used. I had wanted diamond plate but could not find
them locally. Was in Panama City, Fl. recently and walked into
the local Boating World store's final six days. Prominently displayed
were two, yes two, diamond plate fenders for thirteen inch wheels.
Guess who has them now? Anyone one need a pair of metal fenders?
Sand blast and grind, sand blast and grind. And answer less than
Mensa level questions. “What cha doin?”, “Err
sandblasting”, “Oh”. “Why?”, “Beats
scratching”, “Oh”. “Seen my cat?”.
“No, but a guy from the new oriental restaurant was by recently”.
“Oh, bye”.
The bits and pieces are being liberally treated/soaked in the
rust converter solution. In addition to neutralizing the rust,
most times the paint flakes easily. This will shorten the required
sandblasting. After sandblasting they will again be placed in
the solution. A quick bit of sanding and some paint will render
them ready to be installed.
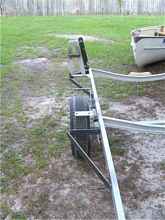
The trailer jack is installed on the wrong side. After a trip
to the local chiropractor I decided to demount the jack and remount
with the lever on the port side.
Off to the welding shop! An exciting day! A before.
And after!
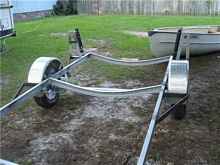
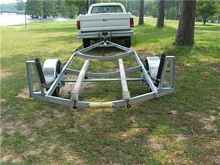
Presently the fenders are balanced on for effect. Soon they will
be permanently mounted, First all the new metal used will be treated
with rust converter then painted.
We had an usually cold, long winter. Spring was short lived ,
both days, then came the rains. One week in excess of 18 inches.
Finally summer. We could wait no longer, had to get on the water.
47 miles of back roads put us on beautiful Lake Blackshear, Ga.
She did her job well.
The tag was removed for the photos. Georgia law states that lights
are not necessary for daytime use if the lights of the tow vehicle
are clearly visible. We met this criteria.
Apalachicola Bay is windy. Most of the very few available boat
ramps are in the tidal flow, consequently side guides are a desirable
option. Two by six treated lumber seemed a bit overkill. Yet one
by six treated material is flimsy and warps easily. After a bit
of searching boards 5/4 inch by six inch, ten feet long were discovered.
This treated lumber is used for decking. Cut in half produces
two five feet boards that fit the requirements nicely.
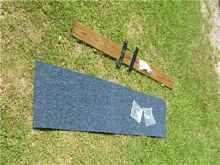
Four one foot pieces were cut from the remaining metal strapping.
These were drilled and attached to the carpet covered decking
producing two five foot side guides.
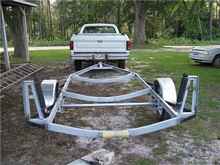
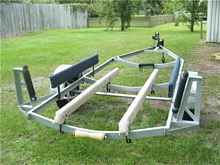
Presently the trailer looks like this. Loose front roller! Tighten
a few bolts, A little paint here and there, lights and a tag and
we are through!
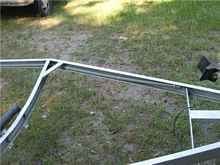
Decided to mount LEDs as high as possible. The wiring will be
run through electrical conduit. Expensive stuff. Had to pay about
four dollars for thirty feet of ¾ inch. The mounting holes
on the trailer did not meet the mounting studs on the lights.
Two options (1) Back to the welding shop. (2) Or cut mounting
blocks. Easy decision for me. A few zips from the table saw and
two nice white oak blocks. They were epoxy coated and varnished.
I purchased a wiring kit for an eighteen foot trailer.
The wires will be run through the conduit and everything zip
tied in place.
The conduit is routed inside the frame. Had promised myself I
would drill no holes in the frame. But, alas, I drilled several
to zip tie the conduit in place. After all this is a boat trailer
not a family heirloom.
Next the lights and tag will be mounted and the final photos.
I want to thank my adoring hordes of fans (Both of them), my
trusty old Dodge truck and my very long suffering wife for the
aid in researching and writing this didactic epistle. I also want
to thank my right forefinger for the monumental task of pressing
the button on the camera. Without the digit's aid and forbearance
these wonderful color photos would not have been possible. Letters
of praise, contributions, and request for instructions for remembering
me in your will may be directed to the web master at Duckworksmagazine.com.
Ahhhhhh-- I see another project on the horizon. Oh well! When
I get around to it.

*****
|