| To Part
One
Back in November when I began the build of Laguna
Dos, March of 2010 seemed a long way away, with plenty of time
to build and finish the boat. My original plan had been to build
her for the TX 200 in June, 2010, with the possibility of using
her for the Everglades Challenge in 2011. That all changed when
my friend Andrew Linn, the Ducker from the TX 200 sailings, wanted
to go along with me as his partner in this years Everglades Challenge.
Suddenly I had to have the Laguna ready a full three months sooner
than my original deadline.
While I had abandoned the pushing, punishing build impetus of
the first month’s efforts, I was still working on Laguna
Dos virtually every day, putting in long days. Even so, I thought
that with the time spent well, I would finish the boat and launch
her no later than the end of January, with plenty of time for
sea trials and sailing practice. Little did I know that Mother
Nature was going to be uncooperative and launch an assault on
the entire country that few of us had ever experienced. Even with
an indoor workshop in the Boat Palace, I just was not prepared
to deal with the extreme cold temperatures we began to have daily.
My build became the slowest of any I have ever completed. Today
I am only eight days from the start of the 2010 Everglades Challenge,
pulling out of the driveway today to launch Laguna Dos for her
maiden voyage in Florida, with just a week of practice prior to
the start of the race.
 |
 |
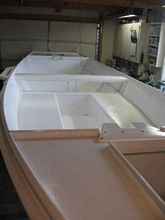
However, in December the saga of Laguna Dos continued. The hull
was still in an upright position and work went on in the cockpit,
specifically the seating. The seating plans had changed dramatically
after Gordo Barcomb reported excessive water in his Laguna Uno
after an unforeseen near sinking. I had planned to use freestanding
lawn chairs, cut down to shorter legs, as Jim Michalak often does
in his boats. The realization that I might need more air chambers
for additional flotation made me decide to put in bench seating
instead.
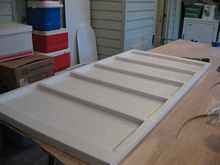
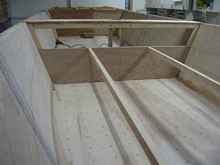 |
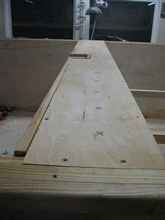
Side Seat Framing |
 |
Side Seats |
Having decided to put in bench seating that doubled as flotation,
I tackled this project next. The forward cockpit would have seats
on both sides running fore and aft. At the aft end, next to bulkhead
11.5 the seats are seventeen inches wide, tapering down to seven
inches at the forward end. This leaves a foot well twenty inches
wide running down the middle, fore and aft. The seats are twelve
inches high at the aft end. Neither the seats or the foot well
are wide enough for sleeping. I will install floorboards that
will lift up to form one large area at seat top level for sleeping
to be installed after completion of the cockpit area.
|
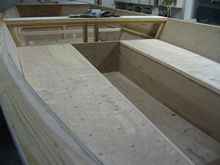
Top of bulkhead 11.5 which is a storage area
for the bilge pumps, batteries for lights etc |
Because the seats are also flotation air chambers the only access
is a eight inch round inspection port at the aft end of each seat
cut through bulkhead 11.5. This storage area will be for long
slender items such as paddles and our oars, along with the telescoping
mast that will fit in mast step three and doubles as our emergency
backup mast, should a mast break or fail. Inspection
ports were purchased from Duckworks.
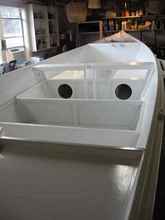
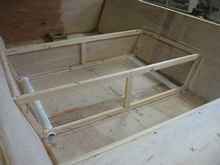
The seat in the aft cockpit runs port to starboard. The aft cockpit
is for the helmsman, who will use a remote tiller attached to
the top of bulkhead 11.5. He will steer facing forward. The seat
is placed thirty-two inches aft of bulkhead 11.5 to allow ample
leg room. The seat itself is twenty-seven inches deep, which leaves
a twenty-eight inch deep area aft of it for iceboxes or other
gear. Once again, floorboards will lift up to form a sleeping
area on the port side of the aft cockpit.
This aft seat will be storage to hold the auxiliary motor, a
sixty-three pound, 24 volt electric motor, and its’ batteries.
When not in use, the electric motor will be stored in this seat.
Because this seat divides the aft cockpit into two areas, I had
to install a way for water to drain from the aft area forward.
To do this a two inch PVC pipe was cut in two and each half was
glued to the bottom with 3M 5200 adhesive. These pipes will allow
water to run through the seat area without getting any water into
the seat area itself. This seating is watertight and also serves
for additional flotation chambers.
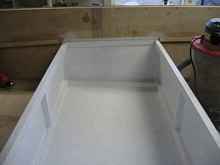
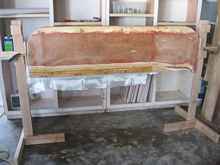
The forward seating/air compartments are framed with one inch
by one and a half inch air dried cypress covered with SurePly
underlayment. The insides are finished with two coats of epoxy,
two coats of primer and two coats of oil based porch and deck
enamel. The only access to the storage inside the seating is through
the eight inch inspection ports which are quarter
turn ports from Duckworks.
 |
Seat Framing |
 |
Inside Seats Primed |
The aft cockpit seating has one large lid/seat on top of the
airtight enclosed seat/air compartment. It is also framed with
the same one inch by one and a half inch cypress. The seat itself,
being a large surface, is reinforced with cross bracing of the
same cypress, one inch frames. The sides and top of the seat are
covered in the ¼ inch SurePly. Inside is coated with two
coats epoxy, two coats primer and two coats of oil based enamel
porch and deck paint.
 |
Seat Lid |
The addition of these three seating/air compartments made it
necessary to purchase two additional sheets of the SurePly underlayment,
which brought the total ply used for the boat to fourteen sheets.
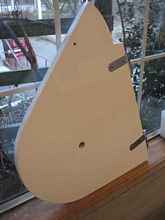
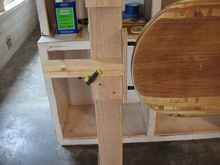
With the seats framed in, I decided to turn to the leeboard installation.
The plans show a stiffener inside the hull about thirteen inches
aft of bulkhead 11.5. This stiffener runs from the bottom of the
boat to the gunwale on the inside. I made mine out of 5/4 by 3
½ inch white oak. The lower leeboard guard will be screwed
and glued to the outside of the hull. The plans do not show it
but I wanted to beef up the hull where the screws would go. I
laminated to the inside of the hull three layers of ¼ inch
plywood four inches wide and longer than the lower leeboard guard.
 |
Upper Guard |
The lower leeboard guard itself was built out of two layers of
5/4 inch white oak. This piece is a large and somewhat complicated
piece, seven inches wide and thirty-six inches long, with a slant
to match the slope of the hull topsides. There is a notch for
the ½ inch by six inch stainless steel bolt that holds
the leeboard on, as well as a ½ inch hole which had to
drilled in just the right spot.
After drilling the hole, I decided to add another piece of 5/4
inch white oak six inches long and three and a half inches wide
on the top and bottom of the hole area. These two pieces are reinforced
with two 5/16 inch stainless steel bolts which should make the
area around the half inch hole very strong. I felt this was good
insurance because of the amount of stress that would be placed
on this area. When Jim Michalak designed the Laguna, it was for
coastal cruising in protected waters, specifically the TX 200.
With the knowledge that my use of her in the Everglades Challenge
would possibly place her in situations where greater wave conditions
or tidal forces might be encountered, I wanted to feel confident
I had built with additional “insurance” of strength
in areas of vulnerability.
The forty-five inch long upper leeboard guard was built next,
again out of white oak. I like white oak as it is a strong wood
for areas with a lot of stress. I built it so it would be horizontal
when installed. The plans do not show this part as horizontal,
but I preferred the look of it as horizontal. After building the
two leeboard guards, I decided to turn the hull over and work
on the bottom.
With the hull bottom side up again, I put a a coat of thinned
epoxy on the bottom. Then I spread out one long piece of fifty
inch wide 6 oz. fiberglass fabric and wet it out with epoxy. That
big flat bottom was easy to cover but it is large! The cold weather
here in Oklahoma had set in now, so the epoxy was taking quite
awhile to cure. The cure time had more than doubled, even with
heaters in the Boat Palace, slowing down the build dramatically.
I had managed to find two twelve foot long ¾ inch by six
inch yellow pine boards with straight grain and no knots. I cut
these up for the bottom stiffener and scarfed them into two twenty-four
foot long by two inch wide pieces. The forward end was tapered
down to l ½ inch at the bow. The two pieces were laminated
in place on the bottom of the boat with glue and stainless steel
screws over the first layer of fiberglass and epoxy. The bottom
edges were bull nosed with a ¼ inch round over bit. After
that, two overlapping layers of four inch wide 6 oz. fiberglass
tape were epoxied on. With the cold weather it took two days for
each layer to set up. All steps at this point were doubling and
tripling from times I usually experienced in a build.
 |
Air dried cypress that I drive 400 miles to
get! (While I do occassionally use yellow pine, I prefer the
cypress and white oak!) |
The outer stem was made out of two pieces of 5/4 by 1 ½
inch white oak, which was glued into a 1 ¼ by 1 ½
inch outer stem. The forward edge was bull nosed with a 3/8 inch
round -over bit. Then the outer stem was installed on the bow
and a stainless steel bolt added for a bow eye.
The next step was to install the lower leeboard guard. I used
a two inch by twenty foot ratchet cargo strap to hold the lower
leeboard guard in place. This strap was one of the two I use attached
to my ceiling beams to turn the boat over. This strap held it
in place while I got under the hull and installed the screws from
the inside while the boat was still upside down.
 |
Lower Guard |
The epoxied hull had finally hardened enough that I could add
two additional coats of epoxy to the bottom of the hull to fill
in the weave in the fabric. After these set up and hardened, I
went back and put on two more coats of epoxy with graphite added
to finish the bottom. All my fiberglass cloth,
tape, epoxy and graphite is purchased from Duckworks.
I had experimented with using this application on my Bolger Cartopper
I made for the TX 200 this year. The Cartopper was dragged over
numerous oyster reefs with almost no scratches. I then used it
on two Oz PDR’s I built last year which were dragged over
rocks and gravel with minimal scratching. I was very pleased with
all three boats bottoms and felt the graphite and epoxy would
certainly benefit the Laguna as well.
While the epoxy on the bottom was drying, I wet sanded the topsides
to smooth out the two coats of epoxy I had applied to them. I
used 220 grit wet/dry sandpaper on a flexible long board sander
to wet sand the entire area of the hull topsides. To properly
wet sand, you must dip the sander in a bucket of warm water with
a little dish soap added. Next you sand about ten strokes and
go back to the bucket. With a wet rag that you leave in the bucket,
you lastly wipe off all the residue from the sandpaper into the
bucket.
The great thing about this method is there is no sanding dust.
Remember, I was working on the sides while the bottom epoxy was
still sticky. All the sanding residue ends up in the bucket and
your hull and boat stay clean. When I finished sanding the entire
hull sides, the area was wiped down with clean water and no soap
this time.
I had to wait for warm enough weather to apply the three coats
of primer to the topsides. I used a three step primer and normally
I would apply all three coats in the same day. Because of the
cold weather each coat had to dry overnight, which meant three
days of application for the three coats instead of the one day
I usually needed. After the third coat dried I wet sanded the
entire hull again with 220 grit sand paper, using the same water
and detergent method, then a final clear water wash and dry.
Next I applied three coats of top coat. I used Glidden Porch
and Floor Polyurethane Oil Gloss, custom mixed blue. Should anyone
like this beautiful marine blue, the color on the chart is simply
“Blue.” After the second coat I wet sanded again,
then applied the third coat. It will need one more coat of paint
to finish, but I will wait until the very end for that one. The
finished boat will have a total of four coats of top coat enamel
on the hull topsides. The last coat requires a clean shop and
warmer weather. These first three coats each took two days to
dry! A total of six days to paint the hull sides, with one final
coat to go!
 |
Mike with Blue Topsides |
Turned the boat over again, now that the bottom was finished.
The ratchet straps make turning her easy, a one man job . The
heavy beams in the ceiling were designed not only to hold up the
framing of the Boat Palace workshop but also to suspend heavy
projects and boat hulls like the Laguna.
The decks had been previously framed with the cypress wood but
had been left open until after they had been epoxied and painted.
The decking covers the forward and aft air compartments which
are air tight and sealed by hatches. They also required two coats
of epoxy, two coats of the primer and two coats of enamel porch
and deck paint each. All of the coats were slow to cure and dry
in the cold, frigid weather. Once the compartments were dry inside
the fore and aft deck covers which had been previously built and
painted were then glued on and screwed down with stainless
steel screws purchased from Duckworks.
For the actual hatches themselves I had to first install a lip
that stuck up above the deck by ¾ of an inch all around
the openings. Then I built the actual hatch covers according to
plans out of cypress and the SurePly. I put on the two coats of
epoxy, two of primer and three coats of the enamel. I want the
enamel to actually look like fiberglass when finished, with a
high gloss. Jackie noticed that she could see her reflection on
the inside of the hatches!
The hatches will be installed with plastic
hinges from Duckworks and elastic
straps also from Duckworks, as per the plans. Marine
grade hatch foam tape is installed around the edges of the lids
to make them watertight, after painting is completed and prior
to installing the hatches. The seat top in the aft cockpit is
finished in the exact same manner with the hinges, straps and
foam tape.
Behind bulkhead 11.5, I built a specially designed box that combines
storage for two bilge pumps, one manual and one electric, and
a 12 volt motorcycle battery. The battery will run the electric
bilge pump, the navigation lights and provide battery charging
for items like cell phones and other equipment.
Each bilge pump will drain through holes in the topsides, one
of each side of the hull. The holes are placed directly under
the top of bulkhead 11.5, as high up on the topsides as possible
and below the gunwales. This is not only common sense, but to
comply with the rules of the Everglades Challenge, which requires
a manual backup to any electric bilge pump on a boat.
I also installed two anchor wells, one in the bow and one in
the stern, both with drainage, to insure proper storage, drainage
and space for the two anchors needed for both the Everglades Challenge
and the TX 200.
Coamings were added to the Laguna above the gunwales, made out
of the air dried cypress. The coamings are one inch thick and
one and a half inch high. I scarfed three pieces of the cypress
into one long twenty-four foot piece, which I then installed above
the gunwales, epoxied and screwed into place with stainless steel
screws. This was not done until after all the decking was completed
because the coamings had to be notched out to fit over the decks.
Stainless steel screws were screwed in through the top of the
coamings and wood plugs were then glued into place to cover the
screws. The plugs were cut with a plug cutter from the same cypress
wood. To insure a proper fit you use a matched counter sunk drill
to drill the screw holes and a matching plug cutter installed
on a drill press to cut the plugs. After gluing into place you
trim them level with the coamings using a Stanley plug-cutting
saw.
The main reason I installed coamings was to cover the raw edges
of the topside plywood and to add an additional one and half inches
of height to keep water out of the forward cockpit. I do not like
to see raw edges of ply anywhere on a boat, so I trim out all
ply edges in some way throughout the entire build. The coamings
will also serve as a place to install snaps to attach a cockpit
spray cover to reduce spray into the cockpit and also provide
a protected area for crew to rest.
As I have said, I do not like raw edges of ply anywhere on a
boat. To cover these edges on the air chambers in the fore and
aft cockpit, I used pieces of wood trim made of cypress along
all edges after I had installed the coamings. These trim pieces
also give additional protection against water flowing into the
cockpit from the decks of the boat that form the covers of these
air chambers. They are one inch by three and a half inch cypress,
rabbeted to fit over all the edges and are facing fore and aft
around the two mast partners as well.
Holes are drilled through the coamings to allow any water on
top of the decks to flow overboard, not into the cockpit or onto
the seats. Like everything else on the boat, these trim pieces
are bull nosed to round off any sharp edges.
After the coamings were installed, I positioned two sets of oarlocks
for rowing, one in the forward and one in the aft cockpit area.
The Laguna Dos can be rowed from either or both positions. The
oarlocks are
made from a three and a half inch block of cypress installed between
the coamings and gunwale with a 5/8 inch hole drilled into the
block. Plastic half inch oarlock inserts from Duckworks were then
installed to complete the oarlocks.
At the forward end of the coamings, just aft of the outer stem,
I placed two handmade white oak anchor rode chocks for the bow
lines or anchor line to pass through. These lines can subject
this area to a lot of stress and abrasion. The chocks allow smooth
passage and prevent damage to the coamings and gunwales themselves.
I have also installed on the top of the outer stem a bracket
for the bi-colored bow lights required for a boat the size of
the Laguna. This is a small wooden bracket of cypress. Electrical
wiring is built into the outer stem and runs through all of the
watertight bulkheads and compartments back to the battery compartment
by bulkhead 11.5. Wiring is concealed as much as possible within
the construction of the compartments.
I had now reached the point where I could begin the final painting
of the cockpit. The extreme cold continued to make any painting
of the Laguna difficult due to drying time. When it was not cold,
freezing or snowing, Oklahoma was also experiencing an extremely
wet and rainy winter. The cockpit required three coats of an oil
based primer before any topcoats could be applied. The care with
which undercoating and primer is applied insures a better finish
on your topcoat paints. I applied two coats of primer throughout
the cockpit. Due to the cold, each coat required a day to dry.
I did not sand between coats one and two, but following the third
coat of primer I completely wet sanded the entire cockpit before
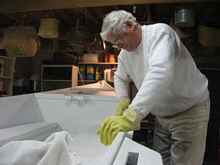
beginning a top coat application. I followed the same exact method
I used on the hull in wet sanding, removing the dust as I went
and rinsing with clear water thoroughly, then wiping down.
 |
Painting Cockpit |
After the third coat of primer and after the wet sanding was
complete, all remaining cracks or areas such as seams were filled
with polyseam sealant. This filler cannot be sanded, so no sanding
should be done after it is applied and care should be used when
applying or filling seams.
The final topcoats of enamel paint for the Laguna Dos are pure
white oil based porch and deck enamel from Glidden, purchased
at Home Depot. I painted two coats for my finished top coats,
but sanding again before the final coat, using the same wet sanding
methods as before. I do not use any dry sanding in any of my boat
painting because the wet sanding not only gives a better finish
but it just does not create the mess of dry sanding to clean up.
When painting, I like to use little, small, stubby short handled
brushes with angled bristle ends. I like the two inch wide brushes
with handles about two and half inches, either natural or nylon
bristles. These brushes fit better into tight places, the angle
edges better fit those places as well. You should just barely
dip the brush into the paint about ¼ inch deep and gently
stoke the paint onto the surface, softly caressing the surface.
I am particular about cleaning my brushes as well, using a three
step method, with three bathes of paint thinner in a disposable
plastic sixteen oz. drink cup.
|
 |
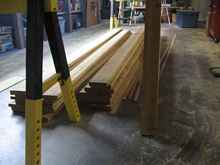
Earlier this month, I had gone down to Texas to a specialty saw
mill that I purchase most of my lumber from to get additional
cypress. I had underestimated the original amount needed and had
fallen short on the cypress for the build. It is almost two hundred
miles each way to this mill but their materials are high quality
and air dried, so I feel it is worth it to obtain good wood for
a build. I was able to hand select some really good rough cut
ten foot lengths of cypress, in random widths. I dressed these
to one inch thick and made up enough to make the parts of my masts.
The cypress was not free and straight grained so I was able to
get by with just one scarf to make up my sixteen foot blanks.
Three one inch by three inch by sixteen foot blanks were epoxied
together to form each mast. This gave me a solid three inch by
three inch by sixteen foot piece for each mast. I tapered these
by laying out their lines with a chalk line first, then rough
cutting with a Skilsaw and finally finishing the shaping with
a power planer and a belt sander. I finished one mast at fifteen
feet and the second at fifteen and a half feet. This makes the
Laguna into a schooner, my favorite. However, this was not the
real reason for doing this. The taller mast in the aft cockpit
will serve to provide extra headroom for the helmsman, as the
aft boom in the event of a jibe could present a danger.
The finished masts weigh eighteen pounds and eighteen and a half
pounds each, unpainted. I did not use any fiberglass or epoxy
on either masts or spars. The finish on the masts will be my usual
three coats of primer and two coats of enamel porch and deck paint
for the top coat.
Because I have little experience in sewing and making sails,
I was extremely grateful that my partner Andrew Linn offered to
make the Laguna Dos’ sails for the Everglades Challenge.
Andrew is a veteran sail maker with many different sails to his
credit, all made from polytarp. He worked out beautiful sails
for her twin masts from heavier six ounce polytarp in pure white
according to Jim Michalaks balanced lug sail plan. They are double
reefed to meet the rule requirements of the Everglades Challenge
and also for the strong winds encountered routinely in the TX
200. Andrew also made a third lighter weight sail to the identical
specifications for our third backup mast. Should we encounter
extremely light air, she can be sailed with a third mast and sail,
but most importantly this third sail is a backup insurance for
any damage to either of the two main mast sails. Here are links
to Andrew Linn's sail making sites:
Design
of the sail
Sewing of the sail
and
Building Hollow Masts for the Laguna
For steering the Laguna Dos, I made a tiller to fit on top of
bulkhead 11.5 which can be reached from either the aft or forward
cockpit, allowing either crew member equal access without changing
position. She can be steered facing forward from either seating
position. This is a wooden tiller, made of the cypress, which
will be attached to the main tiller by ropes leading around the
inside of the aft cockpit to the main tiller.
Because the Everglades Challenge rules require an additional
means of propulsion for the boat other than sails but does not
allow a motor to be used, the Laguna Dos is equipped for both
paddling and rowing.
Two extra long wooden paddles of sixty-six inch lengths are
carried in her forward seating/air compartments, along with oars.
The oars are made from take apart oars I already owned from last
year’s TX 200 that have been lengthened with clothes pole
dowels to get the necessary reach.
An additional modification was due to rules of the Everglades
Challenge that require that any materials used to launch the boat
from the beach be carried the entire length of the route. We will
use inflatable boat fenders to launch over the sand. These fenders
will be suspended horizontally just below the gunwales after we
have used them as rollers on the beach, thereby taking their bulk
out of the cockpit. Stainless steel screw eyes are mounted below
the gunwales on the port side only and the ends of the fenders
will hook into these, from both ends of the fenders. Besides getting
them out of the way from the cockpit, this method serves two additional
functions. The first is as fenders, as due to the leeboard mounted
on the starboard side, the Laguna should be docked only from the
port side and they will prevent scraping and scarring at docks.
The second is in case of a knockdown or capsize. The fenders being
placed only on one side of the hull and high alongside the gunwales
will create an asymmetrical flotation, making her float higher
on one side than the other. This will make righting her and boarding
her easier, should she capsize. I have also made a rope and wood
ladder that attaches to the stern by the motor well, to make reboarding
easier in a recovery.
One additional use of the cypress wood was to make the floor
boards for the cockpit areas. There are two wooden slatted floor
boards which raise from the floor deck to the height of the seating
to form sleeping platforms for both fore and aft. One or both
can be positioned for sleeping and also incorporate foot rests
for the rowing positions. These I have left natural and have not
painted or sealed, as I think I will prefer that the floor boards
weather to a natural gray finish as cypress does. The floor boards
also serve to keep trash, sand or debris below your footing in
the foot wells, allowing water to flow beneath and help keep your
feet dry.
Other details include a chart table for the charts that Andrew
has laminated for our use in the Everglades Challenge. This table
will fold against the inside cockpit and be out of the way when
not in use and has elastic straps to hold down the charts, along
with a lip to help hold them securely. I have also made a small
holder for the top of bulkhead 11.5 to hold our SPOT securely,
as they require facing directly upward to function properly. The
Everglades Challenge requires the use of SPOTs and tracking capability
for all boats. Chuck at Duckworks who is helping sponsor our Laguna
Dos graciously donated two SPOTs for Andrew and I to use.
To finish her look with professionalism, I made number plates
to screw onto her topsides with stainless steel screws, rather
than just gluing her registration numbers directly onto the hull.
I made plates from four inch by twenty inch SurePly that I then
painted white and used black vinyl stick on lettering/numbers.
These plates attach to the bow on each side of the boat.
Because Jackie insisted we use her full name, “Laguna Dos-The
Blue Laguna” she purchased professionally made vinyl decal
lettering for her hull. These letters are four inches high and
five feet long , in white vinyl to match her trim, and will be
placed on the stern of hull below the gunwales on both sides of
the boat. To finish the complete Laguna “look“, she
ordered they be finished at the end of each name decal with a
eight inch tall palm tree, setting sun and a lagoon beach, to
represent the Laguna class and the Laguna Madre of Texas for which
they were named. We will hold a proper naming ceremony in Florida
before she is launched to insure good fortune from the gods of
the seas in her maiden voyage and while sailing the Everglades
Challenge.
 |
 |
Last year I had previously purchased a used trailer that I intended
to use for the TX 200 to haul my restored Paceship 23. I had purchased
this trailer from a company in Georgia advertising on e-Bay and
driven there to pick it up last summer. Because of the time constraints
the bad weather presented this winter, I did not have time to
build the new trailer I intended for the Laguna Dos. I was forced
to modify the older trailer to use to haul Laguna Dos to Florida
but will build her own custom trailer prior to the TX 200 in June.
All rigging
and hardware were purchased from Duckworks. Final
rigging and installation will not be completed until I reach Florida
with her and actually put the masts, sails and spars together
for her launch.
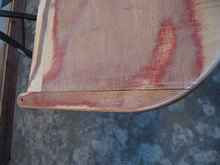 |
Top of Leeboard |
Much preparation has gone into this boat, both in building and
outfitting her with the required equipment for the Everglades
Challenge. However, since Andrew and I will also be sailing her
in the OBX-130, then I will take her to the Florida 120 and last
on to the TX 200, the efforts to build her as best I could from
the beginning will be time well spent. She should be extremely
seaworthy and well fitted for all adventures she may go on this
spring and summer. As Andrew said, he feels confident that we
could take her around the Horn with safety. I won’t go quite
that far but it is nice to know your partner has confidence in
the boat when you embark on adventure sailing voyages.
Look for photos and more on the launching and test sailing of
Laguna Dos in her week prior to the beginning of the Everglades
Challenge and please follow her, Andrew and me during the Challenge
here on Duckworks Magazine.
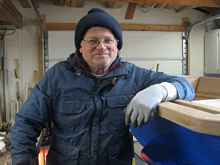
Mike Monies
*****
Duckworks will be following Mike, Andrew, JohnHWright and Gary
Blankenship live from the Everglades Challenge beginning on Saturday,
March 6 with daily reporting, along with other challengers sailing
and paddling.
*****
Plans for the Laguna
are available from Duckworks.

|