| Having decided on which boat to build
(after much deliberation - see previous article
and this one as well)
I started to get the garage in order for the build. Although the
assembly will take place outside in the spring, in the yet to
be built boat shed, the preparation will start in the garage which
is also where my tools are stored. At this point I decided although
I had all the tools I needed, it would be a good idea to update
some of the older hand-me-downs and the poorer quality ones that
I bought when I needed the tool but couldn't afford a decent quality
one.
While most boat builders know what follows, and many are far
more experienced than I, this article may be valuable for a beginner
or may offer the intermediate builder some different insights,
or merely confirm his opinions. I want to take a look at what
tools and the quality required to build a boat.
No point in using up all your budget to get top of the range
in two or three tools and struggling with rubbish for the rest,
when a mid range set of tools would do an excellent job for the
same price. Most of my older tools belonged to my father, who
was a cabinet maker, working for a small shop fitting company.
He would have loved to have used Lie Neilson tools but sadly the
cost was out of his reach, and also out of mine. Well that's not
quite true I could stretch to it year by year but for the price
I would rather go for more economically priced tools which would
perform the task just as well, or maybe 97.5% as well.
One tip I will share with you is don't buy cheep quality Chinese
tools. I have done this on several occasions and always regretted
it. Most things seem to be made in China nowadays (even named
brands like Record and Axminster), when they build to a standard
the quality can be good but the unbranded stuff is built to the
lowest price possible and is some of the worst rubbish you could
buy, disguised to look like the real job. I recall about 12 years
ago I needed a saw set, so I bought one for a very good price,
it looked just like my dad's Record saw set, which was made of
brass and had 25 years hard use, this one made it along half a
saw before the inferior cast metal handle broke off.
The tools you will require depend to a small extent on what boat
you intend to build, and to what standard. Obviously a 26' cruiser
expected to last for 30 years will require more care than a small
rowing boat designed to last a couple of seasons and stored in
the garage when not in use. This major difference will be reflected
in the quality of the materials and workmanship, not necessarily
in the quality of the tools you use. You will still need the basic
tools like saw, plane, chisels, sand paper and screwdrivers, the
better the quality the easier they will be to use and the longer
they will last and stay sharp. For example, If you buy poor quality
chisels you will have trouble getting a sharp edge and will need
to hone the edge more often but they will still work even if they
give you a lot of hassle to use.
A possible option may be to buy second hand, often the tools
on offer are antique, but provided they are in good condition
and still work, the quality of build and the steel used may match
or exceed the quality in today's tools. Just try them out before
you buy to make sure all the adjustments work and screw threads
have not been stripped.
Let's take a look at the basic tools you will require and see
what to look out for:
Saws
Saws come in a number of shapes and sizes and you will require
some of each to cope with various cutting requirements.
Handsaw
Some may think in this age of power tools and instant results
hand saws are no longer required, you couldn’t be more wrong.
A good quality handsaw is worth it’s weight in gold. Having
over a dozen in my workshop I find that my favourite is a Japanese
Dozuki saw. It is razor sharp and will make a very fine cut, making
joints and final fitting easy, but only cut on the pull stroke
otherwise you will buckle the blade and take great care of the
cutting edge when not in use as the teeth will be damaged by rough
careless handling and cannot be sharpened. But be warned if you
have one of these saws, I find that the other 12 hand saws don’t
get used much, as I can’t be bothered to sharpen them.
Table saw
If you intend to buy planks of lumber and cut it to size you
will need a good table saw, no good trying to rip down 2 seasoned
oak with a cheap one, it won’t last long and you will need
to buy another. In addition a better quality saw will be more
accurate. The big question is ‘How much lumber are you intending
to cut?’, if it is a small amount go with the cheap saw
or buy it ready prepared at a premium price. I recently upgraded
my table saw to a Jet JTS-600 at a cost of £909, even at
this price, on the size of boat I am building, I can recoup the
cost by buying planks of white oak and sawing them down rather
than buying ready prepared timber, I then have a good quality
saw at no extra cost to last for the next 20 years.
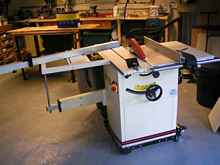 |
My new pride and joy, which works a
lot better than the previous one. Note the wheels which make
life much easier. |
Jigsaw
For cutting irregular shapes in plywood this is the only saw
to use, but a sharp blade is required and don’t try to cut
thick plywood exactly to size as the blade may bend leaving you
with the underside of the cut on the wrong side of your line.
Rather trim back with a plane if the size or finish is critical.
A cheap saw will do the job but may be a hassle to adjust, you
don’t need all the fancy facilities like laser lines and
an air jet to blow away the dust, the vibration will get rid of
some of the dust and just blow the rest away as you go.
Mitre Saw
A compound mitre saw can be useful for cross cutting timber,
but if you have a good table saw you don’t need one. For
me the table saw will be in the garage a long way away from the
boat shed so I will take the mitre saw up to the top of the garden
for use on site.
Chisels
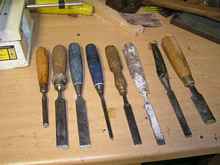 |
Some of the old abused chisels waiting their
turn for cleaning and sharpening. |
I have a large set of old chisels I cannot bear to throw away,
as most belonged to my father. Some are warn down almost to the
handle and others have split handles but all are very sharp and
all continue to give good service even though none are top quality
tools. I do notice that some require honing more often than others
due to the quality of the steel. The main two points to watch
with chisels are; don’t chip the blade by hitting metal,
usually old screws or nails, otherwise it will take a time to
regrind the damage out; don’t overheat them if using a grindstone
or you will never get a good edge on the burnt metal and will
need to grind down quite a bit of the blade to get back to good
metal.
Planes
You will certainly need at least one plane for boatbuilding
and possibly a few others. As with all tools the main key is keeping
the blade sharp, I would suggest a No. 4 to be the most versatile
size to go for. In addition a low angle block plane is also very
useful for small amount of trimming in tight places, and particularly
for end grain which proves very difficult if your blade is not
sharp. Many people find a spoke shave vary useful, but it is not
a tool I use very much, just for trimming curved holes in plywood
bulkheads. A good quality blade which holds its edge is most important
for a plane and a good sharpening guide, see below.
Tool sharpening
The key requirement is that all tools be sharp, don’t
compromise on this. I have tried several methods over the years
and although an expensive Tormek grinder will give an excellent
edge the same can be achieved by a block of plate glass and a
couple of sheets of 3M Imperial lapping film along with some elbow
grease and attention to detail, at a far cheaper rate. I use the Scary Sharp system which cost me £89 for the
whole kit, the Tormek grinder would have cost £249 for the
basic system. The only difference between the two systems is the
small amount of time put into the manual system to learn how to
get the best results from it. The sharpening guide provided is
the Kell No.3 Mk II which is a great improvement on the basic
Stanley guide I was using, mainly because I inherited 3 of these
and didn’t like to just get rid of them, even though they
did a very basic job.
 |
The new sharpening system, I find it works very
well. |
Screwdrivers
Nowadays most people I know seem to use hex bits in a drill
rather than manual screwdrivers, I was converted about 4 years
ago when I suffered a bit with Carpel Tunnel Syndrome, a good
drill can get far greater torque on a screw then you can, no matter
how hard you try. The only proviso is that you use the correct
torque setting to prevent slipping and a good quality bit, either
titanium nitride (TiN) or diamond coated. Once the ordinary metal
bits have slipped a couple of times they will be more inclined
to chew themselves, and the screw head, than sink the screw. No
matter how careful you are this always seems to happen sooner
or later. I still use manual screwdrivers but more often than
not for taking paint tin lids off and stirring paint or varnish.
Drill
All power hand drills I have used have had brushed motors, I
suspect to get the torque at low speeds, these eventually wear
out and sound very rough I currently have 3 corded drills like
this. I could have replaced them with a new corded drill at a
far lower cost, but decided on a battery drill. Working with a
cord 200’ from the house in between the supports of the
boat is not ideal so I chose to go for a battery drill. The 9v
Bosch screwdriver I had for the last 15 years was not up to the
job so I got an AEG 18v Lithium Ion drill. Why did I choose this
one? Well mainly because I could not afford to buy a Makita,
De Walt or Blue Bosch for about £330.
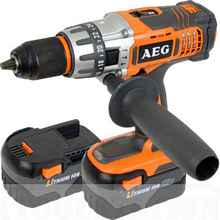 |
The AEG at £199 is of similar quality, has sufficient torque
with the 18 volt battery, and has 2 good quality batteries 3.0Ah
with fast charge and most importantly for me is a metal chuck
as I don’t like the plastic ones. If you see what looks
like a good brand battery drill for sale at a low price it will
almost certainly have cheap 1.3Ah batteries which always seem
to need recharging.
Drill bits
For many a year I struggled along with a mixture of various
mongrel drill bits which were intended for wood or metal, they
drill a good enough hole but sometimes slip if drilling at an
angle, and almost always leave untidy breakout at the other side
of the hole. So I invested in a brand new set of Colt Lip &
Spur wood bits with TCT tips, the difference is so amazing for
such a modest outlay that I wish I had done it many years ago.
They don’t however cut through MDF very well, but that is
something you won’t ever use on a boat.
Cramps
You often hear boat builders say that you can never have too
many cramps, I can attest to this. I have about 35 of various
type and sizes and find that I could do with more. I found Machine
Mart were doing a package deal of 12 assorted cramps so I bought
two packs, not the best quality but they have worked well over
the last 4 years. At the same time I got several packs of plastic
spring clamps from B&Q two of which have exploded with great
force in the first few months of use. They were replaced free
of charge but that is not the point, it was a good job that I
wasn’t bending over them at the time or I would be minus
an eye, again cheap quality Chinese products.
Levels
Why mention the level as a major tool? Because it is
for boatbuilding, where great accuracy is required possibly over
long distances. A small spirit level is often needed to check
for levels on interior furniture and the like but don’t
use this method for lining up frames because you won’t get
the accuracy required over long distances, use a water level instead.
The ancient Egyptians used water to level up the bases of their
pyramids and they still work and give accurate results today.
I am not a great fan of technology for the sake of technology,
aka laser levels, yes I know they work and can be very useful.
Just call me old fashioned if you will, but I prefer to use a
plumb line and water level, it is the perfect low tech solution
that always gives accurate results and never needs the battery
changing when you need it most.
Sandpaper
When you come to the end of your woodworking your will always
need to smooth up what you have made, the most versatile way I
know is a sandpaper cork powered by elbow grease, again old fashioned
but it will always work, provided you don’t suffer from
tennis elbow or arthritis. A good quality random orbital sander
is also very useful if you need to do a lot of sanding it can
take the drudgery out of what at best a very boring job. If you
want a good finish on a hull a long board is required but be warned
it is very hard work and you may be tempted to go for the matt
black expoy/graphite finish which will not show up the unevenness
so much.
Safety equipment
I have left the most important section till last to make an
impact. It can take the edge off life if you have to face the
rest of it with one eye or several missing fingers, and this is
something which can happen so quickly. Before I was born, over
60 years ago, my father was working on a large table saw with
a chip of wood caught in the blade, in those days safety was not
such an important consideration, the chip of wood was making an
unpleasant noise so he took a thin strip of wood and tried to
knock it off, the blade caught this strip and pulled his hand
in and cut off his right index and middle fingers at the second
joint. The hospital managed to sew the fingers back on but he
could only bend them at the knuckles after that. He was a man
who believed in learning from ones own mistakes so he never cut
anything else off. When I was 16 and wanted to make myself a crossbow,
at the same factory, where he was shop floor manager, he casually
put me on a large 8’ high bandsaw with no guard with the
warning “mind your fingers”, needless to say I was
VERY careful as I believed in learning from other
peoples mistakes.
With boatbuilding more often than not you will be using epoxy
resin to glue and coat your boat, while it does not smell unpleasant,
unlike polyester resin which stinks, nevertheless it is a very
unpleasant substance which WILL ALWAYS
cause an allergy reaction given time, sooner than later
in susceptible individuals. So always wear the appropriate vapour
mask and gloves. I know it’s a fiddle getting them on and
off but don’t ever be tempted to work without them.
Also always wear goggles, this is particularly important if you
don’t wear glasses, which may give some protection from
flying chips of wood and dust.
It may sound like common sense to say ‘make sure you can
see adequately’ but lighting is not always adequate, my
workshop has 4 double strip lights and 3 x 60w incandescent bulbs
and I still struggle in some spots as the light does not spread
adequately to all parts due to the ceiling being low and the lights
being recessed between the rafters.
Working with wood for a long time has more serious consequences
than splinters, cutting dust can be very fine and cause lung problems.
It can escape the extraction system even on the best of saws,
an air purifier and a dust mask should be used when cutting. Don’t
use the vapour mask you use for epoxy as the dust will clog it
and then you will need to replace expensive charcoal filters.
 |
I also invested in a dust filter, suspended
over where I park my saw. Some hardwood dust can provoke an
allergic reaction and can be toxic. |
To sum up these points:
- With machinery always use guards, guides and keep
your fingers out of the way
- Always use a vapour mask and gloves for epoxy
- Protect your eyes with goggles
- Put in extra bulbs if the lighting is not adequate
- Ensure you breathe clean air
In addition my proof reader has added two extra points. She doesn’t
let me go into the garage unless I comply.
- Take frequent breaks and don’t work when tired
- Always have a mobile phone ready for an emergency
if working alone
Keep your tools sharp and stay safe, that way you also stay happy.
Click HERE for a list of articles by Mike Machnicki
*****
|