|
After reading a recent article in the Duckworks ‘January Treasure Chest’ on freezing epoxy resin for later re-use, it got me thinking of all the tips and tricks I have picked up over the years and I decided that it would make an excellent article. This is a general purpose article based on the use of glass cloth and epoxy on wood. I have not applied epoxy to metals, nor have I used more exotic materials like carbon fibre. There are many Do’s and Don’ts with epoxy resin and everyone has their own method of working they prefer because it works for them. There are some general rules we can all follow and which make sense in all situations, but you may find that some of these other ideas, which I find helpful, may not suit your way of working, if so please feel free to discard or set them aside to try on another project. I have endeavoured to split the bulk of information into easy to understand groups, with a few pictures for illustration.
Safety
Lets get the important bit in right at the start!
- Always wear gloves and an appropriate respirator when working with epoxy resin. Even though it may not smell much, it WILL ALWAYS cause allergy reactions given time.
- Never remove epoxy from your skin with a solvent as this will allow it to penetrate through the pores of the skin. Use a cream cleaner which incorporates an abrasive, and plenty of cold water.
- Use a barrier cream if there is even the remotest possibility of skin coming into contact with wet resin.
- Try to work clean, keep a rag to wipe gloves and drips etc. If you get resin everywhere, sooner or later it will get on your face or arms.
- If you can ventilate your workplace do so.
- Don’t use compressed air to blow the dust off clothes, it is more of a hazard airborne and can blow the dust into the pores of your skin, depending on air pressure. Use of a vacuum is OK.
Choosing epoxy and fashion accessories
We all have a favourite or most convenient supplier, who only supplies a specific resin, or offers a good discount, which is a good incentive. But try to keep an open mid on other resin manufacturers products. I have tried several and there can be quite a difference between them in terms of price and ease of use
- If possible select a resin with a 2:1 resin to hardener mix ratio, it is a lot more forgiving of mix inaccuracies, which can easily happen if the pump splutters.
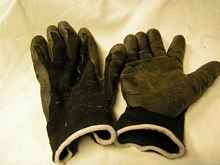
- Most companies recommend the use of latex, vinyl or nitryl gloves I find the pretty blue nitryl gloves are stronger than latex, but both are not much use and fall apart after an hour or two of use. Try cotton gloves where the fingers and palms have been dipped, they breathe at the back, are very robust and last for many months, they are also very economical to use and a lot easier to put on.
- Always have some solvent to hand for cleaning work and tools.
- When sanding dry resin use a face mask, it doesn’t need to be a vapour mask, get a cheaper dust mask to prevent breathing the dust
- Epoxy may not stick very well to some dense woods like white oak so use a sealer first to get a better grip. In the USA they have CPES which almost everyone seems to like. In the UK it is not available but we do have Eposeal 300, it is thinner than water and dries within 30 minutes. Apply a couple of coats, let it stand for a few weeks for all the solvent to evaporate, sand with 80 grit to rough the surface then coat with a couple of layers of normal epoxy/hardener mix, most varieties will be compatible.
- Don’t buy glass cloth with too tight a weave. I had some that you needed to leave for over an hour to wet out. In addition to the difficulty working with it, the fibres are probably crimped by the weave and hence less strong
- If you are doing a stitch and glue build and have some scrap 2.5 sq mm 2 core + earth power cable fine, use this, but you will not be able to use the earth strand as it is too thin. If you intend to buy the wire go for green and yellow earth wire, it has many strands of identical size and is more cost effective.
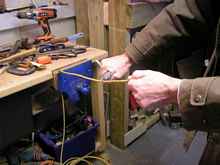
- The easiest way to strip the wire is with a Stanley knife, use a vice to hold the wire with about three feet available for stripping, then run the knife along the wire, always AWAY from yourself, to take a slice of the insulation away. Its a lot harder to explain than do, so here is a picture. Cut the wire into six inch sections, I find this is the best length for ‘plywood to plywood’ stitching, or longer if your joint incorporates any other components.
- Always choose the right speed of hardener for the local working conditions or a medium hardener as a compromise.
Mixing epoxy
- Pumps are an easy way to mix resins as they are already calibrated, but they can get gummed up so you may need to take them apart every 3 months or so and clean them out.
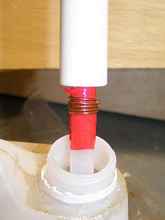
- All the pumps I have used consist of a plastic tube which pushes onto the pump sitting in the top of the resin drum or bottle. Always the tube splits and then fails to pump correctly. Twist several turns of copper wire round the top of the tube to prevent splitting, Or electrical tape then wire to repair a split.
- For large mixes a 2:1 ratio resin is much easier to measure in a plastic measuring jug
- Don’t mix more than you need, better to make two smaller mixes, particularly in hot weather when the mix may exotherm.
- Always have some small jobs pending to hand to use up any excess resin.
- If you need to mix a large amount spread it out across the bottom of a large flat container.
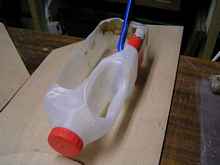
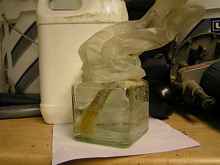
- I use a plastic 1litre milk bottle with the side cut out for mixing, not only will it hold a lot, but it has a holding handle and large footprint so the mixture can be spread out. The dried mix can be easily cracked off next day for reuse if required.
Application
- The selvedge on glass tape can leave a ridge which is difficult to hide. Put a strip of polythene on top of the tape and run a wooden roller over it, the polythene can easily be removed when the epoxy is set to leave a smoother edge, how smooth depends on how much excess epoxy is at this transition point, (don’t overdo it)
- Remove all excess resin from the layer of fibreglass. This makes a lighter stronger bond and ensures the cloth is in contact with the substrate, not floating.
- When you have applied a layer of fibreglass and removed excess resin with a squeegee (I prefer the polythene hard plastic type), you will need to fill the weave of the material, do this when the resin has gone off but is still slightly tacky. If you wait until it is fully dry it will have to be sanded causing a lot of extra work and you will probably damage the fibres of the glass mat.
- Always try to apply subsequent coats of resin horizontally, this gives a smoother even finish. The first layer on wood will sink in and on fibreglass should be squeegeed out.
- Plan your work carefully so subsequent layers go on while the previous layer is still a bit tacky.
- Don’t try and sand resin until it has completely dried. It will only clog the sandpaper
- Two methods of applying fibreglass, wet or dry, try both to see which you find easier. I prefer the dry method with 600gsm fabric, but it can be difficult to use this method with heavy weave fabrics.
- If you can’t wet out the wood because the fabric is too tight or the wood too porous, apply a coat of resin to the wood before laying the cloth down.
- For a good quality clear finish, ensure the work piece is warm to prevent outgassing, which will cause small bubbles in the resin. Working in the morning if the sun is warming the boat can cause problems here.
- Keep your resin/hardener at a constant temperature, try for 20°C, an old fridge with a room thermostat and 60w incandescent light bulb make a good storage unit. The resin is easier to measure and mix at this temperature and ready to go.
- When strengthening a joint with tape apply the tape and resin while the filet is still damp, this will bond the filet to the reinforcing and save on sanding.
- If you need to drill holes through wood or insert screws, particularly below the waterline, give the hole a good dose of epoxy.
- If you need to insert bolts, drill an oversized hole, fill it with epoxy, when hard drill the smaller hole in the epoxy to leave a bush of impervious epoxy round the bolt.
- For articulating surfaces like hinged rudders mix some graphite (up to 10%) in the epoxy coating to lubricate the movements.
- When working in cool weather an infrared bulb will add a bit of extra heat to harden the epoxy. Don’t do as I did and put the heavy bulb in a light weight angle poise, over several hours the weight pulled the lamp down until it go too close and burnt the surface of my dagger board case.
- Even in a freezing garage you can still work if you erect a small polythene tent over the work and place a heater inside. Take care to set the thermostat so you don’t over heat things and keep an eye on it.
- Think about your build steps and what needs coating with epoxy before assembly. Places that are hard to reach are a good example, like inside flotation chambers maybe, or long thin hulls.
Cleaning up
- Keep your workplace clean, try to vacuum up all dust as that is also a health hazard.
- Wash your work clothes regularly and preferably wear an overall.
- I use a wooden ice lolly stick for mixing and to apply small amounts of glue, if it is wiped clean after use it can be reused many times.
- Brushes can be cleaned and reused many times. First squeeze out all epoxy with a newspaper, second place the brush in a small jar with enough methylated spirit or epoxy solvent to almost cover the bristles, cover the neck of a jar with an old nitryl glove (the handle sticks into a finger) which will prevent evaporation. To use the brush wipe any excess solvent out thoroughly on newspaper and you are ready to go. You can keep several brushes in the same jar, size permitting (as most gloves have five fingers).
- When filleting remove all excess mixture and tidy up as you go, once it hardens it will be a long and tedious job sanding it.
I know every single one of you will look at this list and say “how could he have overlooked ….?”. As previously mentioned I have developed one way of working with epoxy (mainly through trying to do things the hard way) and I find that it works very well for me, if you have some other good ideas, how about putting finger to keyboard and sharing them, more choice is better in this respect!
Click HERE for a list of articles by Mike Machnicki
*****
|