|
I have a confession to make to all you loyal readers. I know by now you all think me widely accomplished and knowledgeable, but this is not so. While I have a good deal of experience with wood and can hold my own on any branch of DIY you care to name, metal is not my ‘thing’. It’s not that I don’t like it, it’s just that, well, I guess I never got to grips with it. Either having a father who was a cabinet maker gave me a warped childhood, or I am wood orientated just like some people are left handed. Now the time has come to correct this oversight, or natural perversion.
It is undeniable that owning a trailer boat also requires ownership of a trailer to get the best out of it. I suppose I could hoist the sails in the back yard and pretend the grass was blue, but I suspect that would not quite ring my bells. With purchase costs of £3,000 plus for a sturdy trailer (and that not tailored to the boat yet), its time to look elsewhere. A web search discovered Metals4U, doing mild steel U section at a reasonable price, a further search for trailer components revealed many companies selling at roughly the same price. While the trailer is not need yet it’s a good idea to source parts and learn the necessary skills at this point. No excuses, so all that is required is to acquire a welder and find a welding course. I don’t know how things are where you live but in the UK things never seem to be quite that easy or reasonably priced, not that I am complaining as they could be a lot worse. Welding courses in this area seem to be very specialised, geared to employees trying to get qualifications and very expensive as their employer is footing the bill, and everyone knows that companies have a limitless supply of money. Local colleges don’t have the funds they used to have so most courses are either not offered, or if offered, not run due to a small numbers of applicants – don’t ask, the logic defies me also. After eventually locating a welding course offering beginner welding at a reasonable price I phone them up:-
“Hello, I see from the internet your course AJ53B-MIG is suitable for beginners, is that correct?”
“Yes”
“There isn’t a date on the internet, when is the course running?”
“I don’t know”
“Will it be this year?”
“I don’t know”
“Will it be next year?”
“I don’t know”
“I am a bit confused, could you explain that????”
“We put your name on a list and when we have enough people we run a course.”
“So it could be two or three years”
“Yes, that’s correct. It could be”
“err … I see…, thank you very much. Goodbye!”
As I don’t know anybody who can weld competently that leaves one option. An instant DIY course on welding taught by yours truly. Laugh, well you could split your sides at these antics. Unless you have the patience of a saint, the stubbornness of a mule and a VERY good sense of humour, better enrol on a ‘Beginners Guide to Welding’ course or get an experienced friend to help/teach you. How hard can it be? Put two pieces of clean metal together, switch the welder on and touch where you want the seam to be. In essence it is as simple as that, but the description leaves a lot out and ‘the devil is always in the detail’.

Deciding what you want to weld.
Can’t I decide as I go on? No, not if you want to do the welding with a welder, you need to decide now, before you buy it or risk getting the wrong machine. OK, I needed to weld 5-7mm mild steel for the trailer; 1.5-2mm stainless steel for boat rails; and 3-4mm aluminium for fuel tanks. If that sounds optimistic, it’s because it is, no point in starting at the bottom and working up, just aim for the where you want to go.
As I haven’t got to the point of needing any of these things welded yet I will practice building a small handrail in the garden.
Choosing your welder and supplies
Welders come in several varieties, bottle gases (oxygen, and acetylene or a similar gas) which can also be used to also cut holes in metal. Stick welders which have metal rods and put a current through the rod to melt it forming the weld. TIG welders that use a tungsten tip to melt the metal together, MIG welders which use a spool of metal wire to form the weld, they may use gas to shield the weld and prevent it from oxidising, or this function may be performed by flux in the metal wire. Let’s take a quick look at each of these in more detail:
Gas welders use a mixture of pure oxygen and fuel gas such as acetylene or propane to provide temperatures up to 3500°C to melt the two pieces of metal to be joined. It didn’t appeal to me due to the need to have large bottles of dangerous gas around and to be constantly paying for more gas as they are used. One big advantage is that this is a versatile system that has many uses if adjusted to the correct temperature; cutting metal; silver soldering; case hardening; and starting the barbeque.
Stick Welders, again another method that didn’t appeal, I have heard that it is a bit easier to do, but you need to buy a lot of welding sticks as the weld you make will only be about as long as the stick. Sticks are made of many different substances and leave a layer of slag that needs to be chipped off as well as toxic fumes. It just sounded a bit messy.
TIG (Tungsten Inert Gas) welding requires a greater outlay on the welder and needs greater skill to perform due to the operator having to control the arc size by holding the torch at a precise distance from the work. It gives very good results, even on thin metal, but the cost put it beyond consideration for me. One advantage is that no spool of wire or rod is needed as the tungsten tip melts the work pieces together.
MIG (Metal Inert Gas) welding is a very versatile and quick process. The prevalence of machines sold for non industrial use attest to this. Because of the volume sold the initial cost of the machine and ongoing cost of consumables is also more affordable. In addition I suspect the machines may be simpler and cheaper to build. Whether I would have been better with some other method who knows, this method was chosen as Roger, who helps with the gardening, and has every tool he could conceivably need, lent me his welder to do the job (practice with). It has the option to use wire containing flux or use wire without and instead shield the weld with gas – this is to prevent oxidisation during the welding process.
|
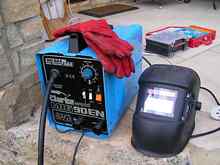
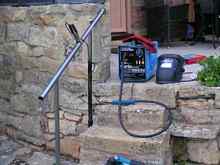
A mixture of borrowed and bought gear. I am very pleased that I borrowed the welder to try it out first. |
Safety and gear
Hot metal burns, not only can you feel it but you can also smell it, burning flesh and hair has an unpleasant smell, particularly if it’s your own. You will need a lot of safety gear, no one said this was going to be the cheap option, just less expensive than buying a ready made trailer. As one might imagine molten metal splattering about requires a lot of fire and heatproof gear, aprons, boots, gloves. In addition to the hot metal there is also light at ultra violet wavelengths and above, which are a serious health hazard. Last but not least the fumes are not good, in fact if you are working any metals with zinc or aluminium involved, either as alloys or as coatings they are downright poisonous.
Welding Mask. A must for all welding involving electricity, (you can get by with goggles for gas welding though I have not tried it) it not only protects your face from splattered metal droplets but also from UV. They come in two types a cheap one, which may be given free with the welder, that has glass with a fixed UV blocking capacity. It may be of useful for someone to watch you, but not to do the job as you can’t see with the shield down and can’t weld with the shield up. As I will need to buy one at some stage and as Roger didn’t have one I could borrow I decided to buy a more expensive one (£60) which darkens automatically when the welder generates an arc.
Apron. A good quality chrome leather apron is just the job if you intend to do a fair bit of welding. They are not as expensive as you might think, you shouldn’t need to pay more than £18. I decided not to bother for the hand rail.
Boots. I have an old pair of hiking boots that I use and they seem to do the job OK. Just make sure you have some protection between the bottom of your apron and the top of your boots.
Gauntlets. This is where splattered metal will mostly be a problem so get a good pair that covers your forearms. Prices start at £3 and go up to about £15. Make sure they fit well and that you can work in them. My pair were excellent at £2.99 from Machine Mart.
Jacket. I could use an old sheepskin, ideal for winter, not so good for summer so I soon discarded it. With care I only got a few small burns on my upper arms.
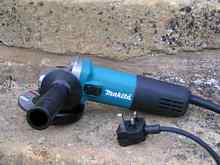
Respirator. These start at £2 for a simple dust mask involving no toxic substances, useful for angle grinding also. I will use my epoxy mask for welding anything with toxic fumes (haven’t got that far yet), it cost £19 from Screwfix and is made by 3M for use with paints and resins.
Ear protectors. I use my woodworking ones again from Screwfix, Peltor Optime 2 at a cost of £14. Having tried a few varieties and not got on well with them I find these particularly comfortable. The were ideal for use with the angle grinder
Fire extinguisher. Always have one to hand and a bucket of sand. Kiln dried sand is the best sort, as it flows a lot better than the damp stuff.
I also have a few concrete slabs and blue bricks in the garage as a base for welding small items on
You think that is the end of it when you have bought the welder and safety gear, but not quite. I put the power supply into my garage many years ago, before buying most of my equipment, which has got steadily more and more powerful. The supply is directly from the main fuse box and is a very thick armoured wire, unfortunately the core of this wire is not so thick and will only just about deliver 13 amps, that’s not so good! A 20amp welder is a bit too optimistic for it so consequently I may need to add a 32 amp socket and extension lead from the main fuse box to the garage but that is a job for the future as this borrowed Mig welder is not so powerful.
Disclaimer
Having got this far I think a disclaimer is required before describing what happened when putting welder to metal in an attempt to make a seam. As previously stated I am a rank beginner, so don’t whatever you do take this as the gospel truth. This sad article is only intended for encouragement; discouragement; amusement; or whatever you want it to be, provided you do NOT hold me responsible in any way for death, injury or loss of finance; income; property; or wife.
Before turning my expensive and beautiful mild steel into expensive scrap I thought it would be a good idea to practice on a few bits of spare angle iron to get the feel for it.
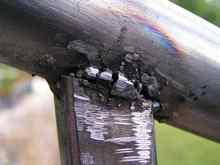
It proved to be more difficult than anticipated. The first attempt was starting to look like a porcupine with bits of wire sticking up from the weld. After adjusting the settings on the machine I tried again, this time it looked like a rat with a bad case of diarrhoea had crawled across the metal. After 15 minutes practice, adjusting the wire feed speed and power as I went, a reasonable line of weld started to emerge. “Good” I thought lets get the job done, no way, my rodent friend had returned and left a nasty mess on the good bits of metal I was trying to join. Maybe it was the fact that I was using fluxed wire instead of gas that made it so difficult, I can’t believe a competent welder could have done much better with this gear, there must be more to it than I am seeing.
After sever hours struggling with rodent dropping and burning holes in the metal posts, grinding off the detritus and burnt flux to try yet again I came to the conclusion that this method would not be suitable for building a boat trailer. What I really need is an introduction to welding course that will allow me to try out various welding methods, one of them must be easier than this. If I can’t find such a course locally maybe I can find someone with a stick welder I can try.
|
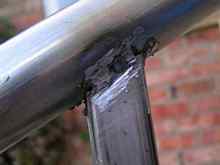
Before adjustment with the angle grinder |
|
After adjustment with the angle grinder |
|
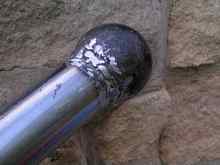
I am particularly proud of this weld, its classed as a ‘good’ one |
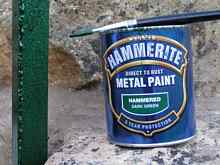
What became of the hand rail? Well fortunately we British have developed a special gap filling cellulose based paint for disguising bad welds, its called Hammerite.
|
One of the best products on sale in the UK. Cellulose based weld disguise paint. |
Many folks use it for painting metal garden furniture, fences and gates but this is not its intended use. Just trowel it on thick and work it well into the gaps between the welds and no-one would guess what a hash you made of the job, In fact my wife commented on how “elegant” the new handrail looked.
|
The finished product. Not a bad result. Just needs a metal ball to finish off the bottom of the hand rail. |
Click HERE for a list of articles by Mike Machnicki
*****
|