|
Sometimes good ideas come in small packages, and so it is with this little clamp used at the Northwest School of Wooden Boatbuilding in Port Hadlock, Washington.
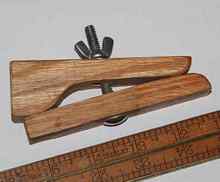
| White oak clamp side view. |
|
It is easy to make, since you can use just about any small piece of hardwood scrap 2 inches wide and five and a half inches long. The clamp pictured was made out of a piece of white oak, and is ¾-inch thick. If you need to pad the jaws of the clamp for delicate work, a small piece of leather or perhaps a scrap of thin mouse pad glued on the bearing surfaces would work.
We use clamps like this to hold in place small pieces of molding as well as long runs of inwales on small craft. Of course, you might use short lengths of split PVC pipe, too, but where is the craftsmanship in that? The clamp shown can open as far as an inch, and will, when tightened, exert a surprising amount of force - more than you’d need, in all likelihood.
|
White oak clamp quarter view. |
To make the clamp, you'll need a block of hardwood 2 inches wide, ¾ of an inch thick and five and a half inches long. Naturally, you can alter these dimensions to what your work demands. A 3/16-inch carriage bolt at least 2 ¼-inches long as well as a nut and a washer is also necessary. A ¼-inch carriage bolt, wingnut and washer would work, too, though you'd have to be more careful when drilling its holes.
The clamp itself, as you can see, has two arms. The straight arm is 4-3/16 inches long, one-half inch wide, and ¾-inch thick. The L-shaped arm is 4-1/16 inches long and ¾-inch thick. It is 1-1/4 inches long at the wide end, and necks down between ¾-inch and 1-1/2 inches down the arm from the wide end. Both arms are rounded at their far ends. The exact dimensions aren't critical.
Begin by squaring your block. Then, strike a pencil line across one face two inches from your reference edge. The line marks the location of the bolt hole when marked across the narrow side of the block. Draw out the shape of the arms. You can follow the shape we use or make your own to fit your work. The L-shaped arm's pivot point, at the wide end of the arm, is what makes this little clamp work.
Next, cut out the two pieces of the clamp. It might be best to use as narrow a bandsaw blade as you can, but the clamp can be cut out using a scrollsaw, a fretsaw, or, in a pinch (catch the pun?) a jigsaw. If you need to use a jigsaw, I'd recommend making sure the little block is held securely by something other than your hand. Chamfer the edges of the two pieces with a block plane and a sanding block. Then, using a drill press if you have one (a power or hand drill would work as long as the pieces of the clamp are held securely), drill a 3/16-inch hole to match the bolt's diameter through the pieces one at a time. Carefully elongate the edges of the hole in the L-shaped clamp arm to about 3/8-inch in length so that the bolt can easily slip in the hole relative to the straight arm of the clamp. It is best, too, to wear the hole in the L-shaped arm just a touch bigger than the bolt diameter so that the bolt can move easily in the hole.
| White oak clamp showing elongated bolt hole in L-shaped arm. |
|
That's all there is to it. Carefully drive the carriage bolt through the straight arm of the clamp, slip the L-shaped clamp arm in place, thread the washer and wing nut on the other end of the bolt, and your clamp is ready to go to work.
For more information about the Northwest School of Wooden Boatbuilding, this year celebrating its 30th anniversary, head on over to www.nwboatschool.org You can follow us on Facebook at https://www.facebook.com/NWBoatSchool
|