| To Part One
To Part Two
Part Three of Three
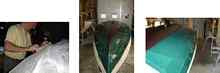
Planking done, it was time to focus on the what kind of finish was appropriate (while it was still upside-down) for the main hull as well as the more noticeable 'garboard' plank. Two ways to go here which was basically dictated by the 'existing' finished plank surface; get the undercoat on and topcoat 'er with basic marine enamel and be done with it OR fair out the surface with high build undercoat and a reasonably long board sander and spend the extra bucks on a good polyurethane that would shrink tight and shine in the light. Having come through a background of spending hours board sanding in a professional yard as well as on my own 40 ft cold-moulded creation, I went for the 'finer finish' end of things.
Having worked with Interlux high build and polyurethanes with good results, I decided to give the "Pettit" brand a go with equally satisfying results (I found the topcoat actually easier to apply as it was somewhat 'thinner' than the Interlux counterpart and flowed out a little more easily as these polyurethane products tend to set up fairly quickly compared to regular enamels).
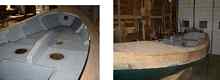
So board sand it was to the bare hull, 3 coats of high build undercoat, working 120 grit to 220 and then three layers of a nice dark " emerald" green for the finish, wet sanded between coats. The lighting definitely played tricks with the 'shade' of green, all to the good, however. The sheer plank would wait until she was flipped over again which was done in the same fashion as the last flip... Time for the deck and final bits and pieces of coaming and trim. It was now close to mid June and things were moving reasonably well outside of it being the 'boater call' time of year where attention had to be paid to one's pocket book - "can you fix this and get that ready as we're off cruising tomorrow.." etc. etc Not to be deterred, however, it was time to get things completed so as to enjoy some of the end days of autumn hopefully sailing before winter set in. Once the painting was in order for the bottom side she was flipped once again to "finish" her off. In all my years of working on boats, it never fails to underestimate the time needed to " add the final touches", particularly when a sub deck is part of the structure compared to an open bilge arrangement which precludes the tedious "picking up" of the shape of that sub deck. Buckle down and get it done and we were on to the smaller upper deck which could easily be overhung and trimmed to shape without too much fuss.
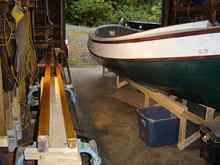
With the decking done, it was on to the bits and pieces that were left to do. All the spars had been made up intermittently during the course of the hull construction which was well received at this stage of the build. Five spars and a bowsprit were required for the gaff rigged yawl, with the main mast being a 'box' spar and the others shaped from solid pieces. Time could have been spent on a round mainmast with 'bird-mouth' joints but a box can work just as well and look fine if the other spars take a similar shape. The only slight glitch is where the gaff jaws meet the mast to ensure the gaff is able to swing side to side smoothly. The solution was to add four pieces of ' rounded' mahogany, one piece on each side of the box that approximated the radius of the gaff jaws. This provided the 'round ' needed in that area of the mast as well as providing a harder wood to take the working of the jaws. The scantlings for the wooden spars were calculated from those of the aluminium measurements indicated in the plans
(the bottom line ensuring that the wooden counterparts have adequate "moment of inertia" to withstand the compression the metal spars were designed for..)
The fun part of any build is adding the bits and pieces of hardware that have been waiting on the shelf to adorn your creation. Wisely, most of the hardware had been ordered a few months earlier as well as the gaff/yawl rig sails. The folks at Duckworks in Texas were exceptional in their timeliness and ability to have ALL the required pieces shipped in one episode. First time in a long history of boat building that everything needed was available in the same order... so much for the plug but credit is due when credit is due.
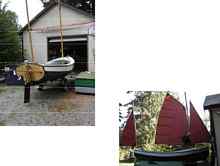
The first time you get your creation out of the building space is when you get the opportunity to have a hard look at 'lines' from all sides at a reasonable distance, something that is not possible in the confines of the workshop. And the perspective provided by real world viewing as to the 'shape' is one of the dilemmas of the designer when working on the flat drawing board (unless of course you are playing with a computer that can 'visually' swing the hull 360, up and down, perspective in and out etc, etc.) but there seems to be something missing compared to the challenges of putting pencil to paper and picking up a table of scaled offsets to be sent to the lofting floor.
From start to finish the Pathfinder is a fairly simple construction and moves along at a pace that should not unduly break up any marriages that more ambitious projects tend to do. The monetary outlay was very reasonable even when choosing good marine grade mahogany plywood. Not usually willing to keep an accurate tally of expenses, I ball parked about $5000 max for this project and actually came in around $4200 including the hardware, sails, epoxy and paint. The trailer was an extra $700 bucks but well worth it when considering the ultimate goal of a decent camper - cruiser of this size - to be able to get to those spots and sailing grounds that would be a major effort for a fixed keel of the same size or larger but without a whole bunch more practicality.
All in all, a big thumbs up for the Pathfinder. Winter had closed in early this year to we had limited chance to " see how she goes" without dodging the customary torrential rains and high winds here in the Pacific Northwest (and this year, an unprecedented amount of stuff called 'snow' which when reaching a precarious depth of an inch or so, sends cities and countryside alike, in utter chaos.)
But spring is close by and we are looking forward to not only many evenings of pleasant cocktail cruises in our protected harbour here but beginning to venture out to some of those spots we were unable to reach in our converted troller in previous years.
The End.
 |