| To Part Two
To Part Three
This is written to simplify the building of a small catamaran, so that others could get in the water who want to give it a try. My first boat with this method took about 40 hours to build. I did not build either saw horses or table or use sanding sealer, as per this method. My second one I am building, and have encountered too many problems to keep accurate hours. I have changed the way the deck is attached, how the beams are attached, and type of platform, and in all cases, went back to boat number #1 method - after MUCH experimentation. I have been using the first boat over 15 years.
When I was a kid, I got hooked on sailing, going out on a 90' yacht on lake Michigan on a July 4th. I distinctly remember the fireworks that night from a small plane going home over the lake shore. My dad had worked on the boat and we were there by special invite. When my dad realized I really wanted to build a boat, he came home with planes for a 28' Thunderbird, which presented for me way to many problems. I had no experience, no tools, no place to work on such a thing, and worse, no money.
Eventually I got plans and the strongback to build a boat on, at the place I was ordering marine ply. The shop owner listened to my desire to use paper and trace the sides and bottom of a friend's 8' dinghy. He had just finished building a dinghy and had the strongback, so he sold it and his plans to me. Looking back, it would have been a lot harder than I anticipated, doing that paper thing.
I built and sailed that dinghy in the Fox River, in Elgin, Ill. Many years later it was destroyed in a wharehouse fire. But, always being somewhat on the downside of the economy, the realization of my dreams would come about only if I built it myself - generally speaking, the materials are 1/3 of the cost, labor the other 2/3. Actually since I am not that good, it takes longer than it would for most, so I have more hours in the building than I should have.
Rot is always a problem, and so is maintenance. While most of the articles today are about "traditional" boats, and "woodworking" they use epoxy. Epoxy was not used at for 1,000s of years, so that isn't very traditional, and what is the wood after it becomes plasticized? I also found out that you can chip the top coat, or not seal a drilled hole, and the wood will rot anyway, despite the epoxy. Stitch and glue is not very traditional either. For myself; let's build and go the easier the better. I live in the tropics. I have come to the conclusion: fiberglass is the best route to take.
Most want to have a boat that lasts, and won't rot out from under them. Living in the Caribbean I can say, a year here is worth three or more in the United States. I have a boat under construction, and the wood has already sprung up mushrooms, or some kind of fungus. Then there was the boat that got termites in it - they like wooden boats. However, the fiberglass is doing fine, and that is what I am going to write about. In fact I have left my fiberglass boat full of water and the biggest problem is the mosquitoes like to breed there.
Nothing is new here - the ideas are not mine. I just incorporated some ideas, and built a boat that has lasted over 15 years. From time to time I have had to do repair work - most caused by the wood on the boat. But for 15 years I have had a boat that waits at the beach for my use. Sometimes it is months before I see it. I have even had green algae in the bilge of the boat!
First define what you want your boat to do - before you do anything. Mine does fine. It sits at the beach, kids jump on it, play on it, do other things to it that I can't write about in family publications. However it is there when I want to go out. It has a 2.5 hp engine, and goes about 4-6 knots. Just fast enough to beat out rowing. I can take about 4-5 people, food, water, etc. For me, it is the first, and so far the only boat that I have owned/built that was not sailed. A day trip will consume less than a gallon of gas, with lots of stopping, snorkeling, picnicking, etc.
It is designed for flat water, and 1-2' waves can prove problematic depending on number of people on board, and direction of waves. We go out, the phone doesn't ring, nobody comes to the door wanting something, there is no rush to go somewhere, and it is just a cool thing to ride around in flat water to a private beach. We swim off it, drift around, or pull it up on the beach and have a picnic. Over the years I have had over 200 people (not at the same time) on the boat. Only once have I gone beyond the limits of the boat, and had a problem - solved by everybody jumping out, and bailing the boat while swimming beside the boat.
Basically my boat has no plans, no lofting, no butt joints. Midsection is about 8" wide at the keel, 2 ½ feet wide at the top, and two feet from keel to gunwale at the midsection. (Two feet being the size when you cut a 4'x 16' piece of fiberglass in two pieces, the long way.) Weighs somewhere around 150 lbs, and is 16' long.
The pictures, bring on the pictures.
|
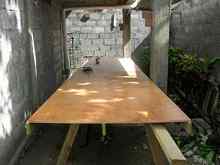
Setting up the three saw horses |
Setting up the three saw horses:
I try to make a "table" 4'x16'. Two pieces of 3/8" ply that will be used later in the hulls for bulkheads, or platform between the hulls. Two coats of sanding sealer applied on the top. You could add more. Sanding and coating, sanding and coating, until you can see your reflection. This dictates how smooth your outside skin of the boat will be. I quit at two coats.
I built in three locations. Here, inside, is the best place: you can work despite the weather. Outside under a mango tree sounds really great, but when the rainy season comes, it means rain, every day. Under the mango tree - you would be surprised what comes out of a mango tree, really ripe mangoes, green mangoes, leaves, twigs, and then there are the birds who think they are going to buy it, cause they leave their deposits on it all the time. Inside is good.
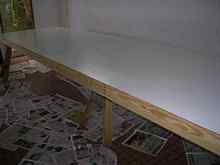
Fill in all cracks and screw holes with modeling clay. I guess you could use some kind of bondo, and fill and sand, and fill and sand. My boat has a line where the ply joint was, and wherever I used modeling clay, the modeling clay color got embedded in the gel coat.
Then you need a good mold release wax. There are other things that might work. Some stuff that maybe work. Use the real deal and get some mold release wax. Follow directions, and then add an extra coat. You do not want the fiberglass to stick to the wood table top. You really don't want that to happen.
Apply the gel coat. Use a roller. Probably takes a little extra hardener to make it "kick". When you can write you name on it with a pen, you are ready for the cloth. The first layer is 1.2 oz matt, and the second layer 22.5 ounce biaxial cloth. All go down at once on top of the hardened gel coat.
|
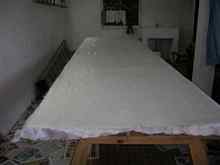
Glassing on the table top |
There are three basic kinds of cloth. Matt, with strands going every which way. Woven, looks like it is woven together. Then biaxial where two layers of cloth are sewn together at 45 degree angles. There is also tri-axial. I used biaxial that came with matt and for good measure, used matt also.
First layer is the matt, the second layer is the bi-axial. Gets kinda messy and you have to work quickly. Both go down while everything is wetted out, together. I rolled the cloth up, two rolls. I wetted out the table top with resin, rolled first layer of matt, worked out the bubbles and added more resin. Then I added the second layer of the biaxial. Generally I worked about two feet at a time, smoothing out the cloth and getting rid of the bubbles. After the initial two feet, to get the rolls out of the way, I laid the rolls back on the area I had just finished. I wetted out the next section on the table top, and unrolled the matt cloth into that area, then the biaxial. I repaired any damage done when I laid the cloth on top of the finished section. Continue to the end.
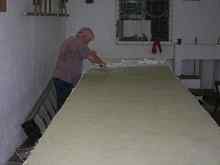
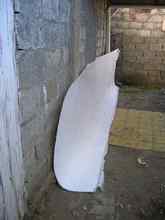
| Finished product, note the red modeling clay line, and how flimsy, bendy this stuff is. |
|
You will do this three times - once for each hull (two hulls) and another for the decks of the hulls. If you are going for a fiberglass deck in between the hulls or fiberglass bulkheads you will probably need a least another section 4'x8'.
Clean your "mold" between pulls. Wax it good, follow directions.
TOOLS:
|
Roller tool. Special for fiberglass. May have to shop around. May have to order. Very important to get out bubbles. |
Small roller with throwaway cover for the resin. Same kind as used for painting walls.
Hypodermic needle for applying hardener to the resin. I calculated how much resin, and how much hardener. I had to switch from mm to cu. Inches, to ounces, etc. But the hypo needle was the best thing I have EVER done in fiberglass work. I knew EXACTLY how much hardener I was using, and since it is much hotter here, I could control exactly the hardener necessary for setting the mix off in about 30 min time.
When working the long panels, I worked in two foot segments, and by the time I got to the end, the beginning part was starting to set up. Get a needle. Druggies can get them. Diabetices can get them, doctors have them, pharmacists have them. You'll need one if you want to control your hardener volume, and therefore your work time.
I mixed less than ½ a can of a one lb coffee can at a time. By myself this is all I can handle. I have been in a shop where they were laying resin into a mold out of 5 gallon containers (plenty of help!).
If you are scared of this system, make a couple of 3x4 panels first. You can use them for seats, bulkheads, etc.
 |