 Custom Search
|
|
| sails |
| plans |
| epoxy |
| rope/line |
| hardware |
| canoe/Kayak |
| sailmaking |
| materials |
| models |
| media |
| tools |
| gear |
 |
 |
| join |
| home |
| indexes |
| classifieds |
| calendar |
| archives |
| about |
| links |
| Join Duckworks Get free newsletter Comment on articles CLICK HERE |
|
|
| Out There |
by Paul Austin - Dallas, Texas - USA Classic Ship Construction Notes - Part Two |
 |
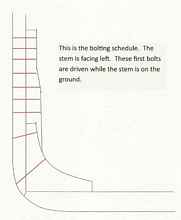
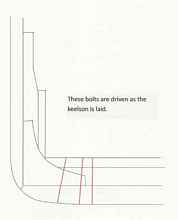
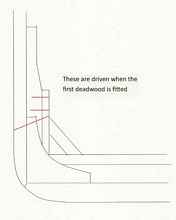
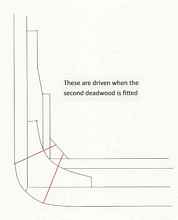
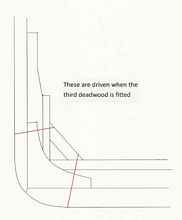
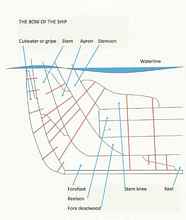
Part One - Part Two - Part Three - Part Four - Part Five- Part Six StenpostWith the keel laid down, scarfed and set with the inner keel we are ready to look at the stenpost. If there is one aspect of tall ship construction which is not duplicated on smaller craft, it is the complexity of the sternpost. The ship above water must have some width, but at the waterline the rudderpost and rudder have to exhibit a narrow strength. This is not only for speed through the water but also for the captain's accommodations directly above the rudder. The helmsman needs to be as close to the rudder as he can without his steering cables interfering with the captain's cabin. The sternpost is made up of three parts - the sternpost, the false post and the inner post. The sternpost itself is straight, sitting on top of the rear of the keel. Usually a tenon kept the sternpost in line on top of the keel. In previous centuries the sternpost was as thick as the keel where the two joined, but tapered at the top. While a vertical sternpost was easiest to fasten, one angled 8-15 degrees was the normal rule. The inner sternpost was simply another layer of wood inside the sternpost for strength, often not needed on steamships. Still, when a sternpost stood at an angle, the inner post was almost mandatory. The inner sternpost was wider at its bottom with the keel than at the top: The wing transom is a horizontal members across the sternpost, near the top of the sternpost, reaching out to two fashion pieces. The purpose of the fashion piece is to extend the ship's planking from very narrow at the waterline to wide at the deck above the wing transom, what in small boats would be called a wineglass stern. The fashion piece was upright as the last frame but then an extension of it angled out behind the sternpost. This extension was called the counter. The joint between fashion piece and the counter could be a complicated angle, depending on the design. With good joinery, the pieces shoved into each other, but still at this angle the shipwright and loftsman were really earning their money. The amount of overhand depended on the length of the ship, 1/4 inch for every foot of waterline. The counter timber leg was 50 degrees to the horizon. The width of the wing transom piece itself could be 2/3 of an inch for every foot of keel length on smaller schooners, but this was not the rule for the great warships. That would make the wing transom on a ship of the line huge. On some ships the wing transom was bolted to the stenpost and the fashion piece, but on most the wing transom is received into a rabbet on the inside of the sternpost. Below the wing transom piece was called simply the tuck or transom since it was in the water. This corresponds to transoms on daysailers and other small craft. However, above the wing transom big ships added construction to support additional decks. Parallel to the wing transom and above it was the helm port transom and the counter rail. They framed a stern section that reached out aft of the sternpost, giving these ships their own unique look. Bolting and ToolsWhile the keel was being assembled, laying on its' side, the bolting schedule could begin. As you see, some bolts could be installed before the keel was raised upright to sit on its' chocks. Some bolts could be installed after it was upright on the chocks. The bolt heads were sunk beneath the surface of the wood, usually sunk on both side of the wood. Rings covered the bolt heads inside the ship, but not outside.
This drawing below is for a steamship bow.
Looking at the bow, this seems like plenty of bolts in a small area. However I have to remind myself these sections of wood are huge by today's plywood and trailerable boat standards. The bolts which extended from the top of one member through another were pre-drilled. Those which extended into but not through a section were not pre-drilled. This was hard labor, not for the faint of heart. Carpenters and shipwrights usually had many tools. Here is a list: Broad axe, folding rule, horse iron with handle, reeming iron, caulking iron, carpenter's hatchet, inside calipers, brace and bit, small bevel crab iron, rule, pincers, auger with screw, handsaws, mallet, adze, chisel, gouge, chalk line, draw knife, making iron, scraper, compass saw, chopping axe, compass with crayon, dividers, grease well for caulking and rave hook. Remember, there is no tool you can do without. If there was, God would not have created it. If you ever feel depressed, just go to Home Depot. Walk around, smell the paint, inhale the wood fibers, feel the saw blades. It'll set you right in no time. That's my story and I'm sticking to it. *****
|