 Custom Search
|
|
| sails |
| plans |
| epoxy |
| rope/line |
| hardware |
| canoe/Kayak |
| sailmaking |
| materials |
| models |
| media |
| tools |
| gear |
 |
 |
| join |
| home |
| indexes |
| classifieds |
| calendar |
| archives |
| about |
| links |
| Join Duckworks Get free newsletter Comment on articles CLICK HERE |
|
|
| Mike's Maritime Meanderings |
|

A scarf joint is needed in boatbuilding so many times, for keel, mast and spars, gunwale, battens… Even when you can get timber longer than your boat you still may need to cut out a shake or knot to get clear timber. Over the number of years I have been reading boat building articles on the internet I have noticed a number of articles on scarf joints and jigs. So being no different from all these other authors I feel I need to add my two cents worth. Even Duckworks Magazine has posted quite a few with details of how to make these jigs. https://www.duckworksmagazine.com/11/howto/scarfjig/index.htm https://www.jimsboats.com/1sep11.htm#Scarf%20Joints%20In%20Lumber https://www.duckworksmagazine.com/11/howto/joining/index.htm https://www.duckworksmagazine.com/11/howto/jig/index.htm https://www.duckworksmagazine.com/11/howto/jig/index2.htm Everyone has their favourite tool, you know, the one that will just about do any job bar drilling a hole. All of these tools can be used to make a scarf joint, with the right jig.
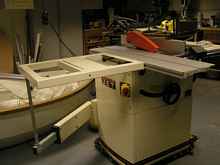
There is no right tool and right way to cut a scarf joint, providing it is safe to use, all of these methods can make a good scarf joint, some are simple and some are more complex. What really matters is what tools you have to hand and your preference. All of these methods rely on two factors, some means of holding the wood and some means of guiding the cutting tool in a repeatable manner. As I have a Jet table saw with a sliding table to the left of the blade it would seem that half of the problem was already solved. All I needed was a means of holding the wood at the right angle, and if I could make it adjustable so munch the better for versatility.
A good solid piece of oak was the best choice I had to hand for the jig base, the next problem was holding the jig to the table. Down the centre of the table is a slot for holding fittings and jigs. The usual method of fixing is by a lug with a threaded hole in it. I figured I could do better with two coach bolts with the side of their heads filed to fit the slot, the square head on the bolt would also help as a guide. A couple of holes through the wooden jig and the first problem is solved. Next we need a fence to hold the jig at the required angle, I would prefer to make it adjustable as then it can be used for other jobs.
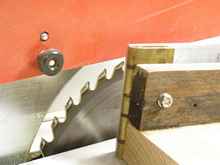
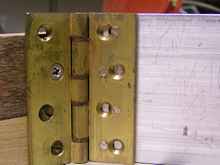
A hinge and a piece of 4” x 6mm aluminium bar are to hand and seem to be suitable. The only problem is that it will not quite fit under the blade guard so 3 options are available to me
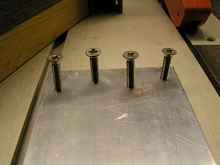
The next problem to overcome is connecting a 6mm aluminium plate to a sturdy brass hinge. I can’t use nuts as I want a flush finish on both sides, so tapping the holes in the aluminium plate and cutting down the bolts to size seems to be the only way. As with most things its not until you try it the wrong way that you then decide to do it the right way, it’s a great pity that we can’t save time and do it right the first time.
Having assembled it I remember other times I have had problems with steel bolts in aluminium threads. As the aluminium is so soft it has a tendency to strip the threads if over tightened, and I have a tendency to over tighten everything. So the second attempt is to countersink the aluminium holes to take the bolt heads and drill and tap new holes in the brass hinge, where the threads will be much more sturdy.
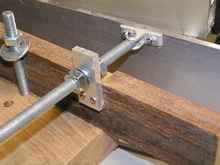
Taking shape nicely, how do I make the angle adjustable? After reviewing what stays are available I decide to take the support hinge from a cheap window stay and attach a piece of threaded rod as an adjustment. The securing method is to clamp together a nut either side a fixed tab with a hole in it. Note the hole must be made slightly oval horizontally to allow the rod to move freely.
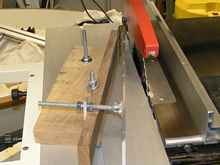
I could attach some clamps to secure the wood against the table, but I find it easier to hold as I slide the table. Note the cut is made at the far end of the jig for a 1 in 8 scarf, but still take care where you place your fingers. For long pieces of wood I will support the end on a roller support adjusted to the height of the saw. The final result is an easy to cut repeatable scarf joint for timber up to three inches (which is the thickness that my saw will take, I doubt that I will need to scarf anything larger than this, if I do then it looks like making another jig. This jig was made from bits and pieces that were to hand and works very well, if you have a table saw with a sliding table its worth considering, but as already stated other jigs and tools work equally well.
***** |

To comment on Duckworks articles, please visit our forum
|