Part 1 - Part 2 - Part 3 - Part 4
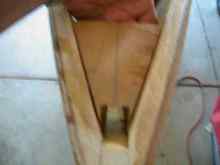
By June 11th it was time to close up the bow and stern section. I bought the 3rd 4x8 of birch plywood and most of it is still sitting in the garage. One more worrisome details remained first, which were how to make hard points for attaching bowline, bow handles, tie downs, and similar items on the stern, including a desire to have removable wheels for solo launch. I settled on a block up in the bow, shown below, and two round bolts in the stern passing through the sheer stringers, which would accept the axle for the removable wheels (shown above in Figure 37), and I calculated I could just reach under the stern deck to put the nuts on those bolts after the deck was on, so no need to do anything else under the stern at this point. I decided I'd put a 4" deck port over the center of the bow section forward of rib 1, and could reach in after the foredeck was on to put nuts on a U bolt that would be the primary bow attachment.
|
Fuzzy picture of mahogany block under the deck in the bow, hardpoint for u-bolt later |
With those items settled, the same plywood technique made it pretty easy to make and install the deck plywood (paper pattern rough cut leaving the edges hanging over to be shaped and covered later by rubrail and cockpit sides).
|
The deck pieces glued on In the same session |
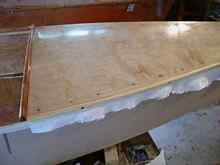
I finished cutting the cockpit trim pieces to fit, rounded and sanded the edges, and glued them onto the hull, giving them a coat of epoxy at the same time. After shaping the edges of the deck plywood flush to the sides (carefully-don't want to damage the finish on the sides and transom) and removing the screws, I installed rubrail (pine half-round molding) and put a coat of epoxy on, filled the screw holes, sanded, and it was once more fiberglass time. I put some masking around to protect the finish on the hull.
|
Decks ready for fiberglass |
A veteran by now, I squeegeed the epoxy onto the glass on the decks, and 3 hours later each the 2nd and 3rd coats to bury the weave.
|
Ready to epoxy the glass onto the decks |
I was really happy with the look of the finished birch and the contrasting mahogany cockpit trim.
|
Three coats of epoxy in the glass, and ready to trim, sand and urethane |
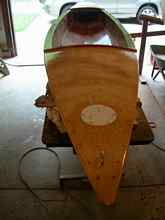
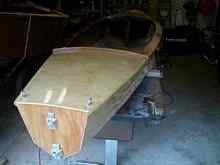
Hardware, Cartop, Kayak Vacation By June 16th, I'd installed the bow deck port, u-bolt, and stern round bolts, and Deb and I had a 3-day vacation to Niagara-on-the-Lake planned.
|
Bow hatch on, and something to tie to on the bow |
|
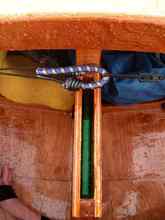
Stern rings to accept "trailer", and plenty of stern tie-down options too |
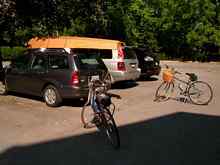
So with some scrambling to get the cartop ready to receive the boat and figure out how to safely tie it on, we decided to take it with us, and ended up kayaking out into the Niagara river and onto Lake Ontario. It was a relief that the boat didn't fly off the car on the freeway (and a relief, no doubt, to the other drivers in the vicinity).
|
The cartop rig survived the acid test, and we're in Niagara-on-the-Lake |
|
Early morning kayaking at the mouth of the Niagara river on Lake Ontario |
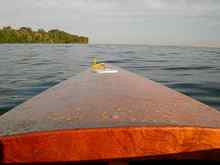
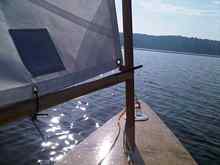
The second morning I launched the kayak (the "trailer" worked beautifully, getting it down a rocky beach for a solo launch, and retrieval). The trailer is shown in Figure 37, but I'll describe it here: ¼" threaded steel rod, with copper sleeve between the eyes, two more sleeves that go under lawnmower wheels, with PVC spacers to keep the wheels from rubbing on the rubrail Paddling out onto Lake Ontario was a wonderful experience. Deb and I paddled it together (two paddles by now), and had a great time, though we were stopped by the U. S. coastguard, and had to return to shore for proper life jackets (in Canada, my boat didn't need registration, which I didn't yet have, but the cushion flotation didn't pass muster for Canadian rules, and so we failed to comply either way with the Bureau of Compliance). I had rigged a tiller locking mechanism, two thin cords routed through screw eyes under the cockpit sides, with a loop over the tiller. I've tweaked it since, but with the rudder partially down and locked, the boat tracked beautifully. Here's a shot down the daggerboard trunk with nothing but deep clear water underneath!
|
Lake Ontario through the daggerboard trunk, with tiller lock version 1 (bunjee cord) |
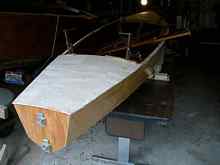
It's a Sailboat At this point, I had a wonderful kayak, but not yet a sailboat. I was waiting for the sail from Duckworks, but as usual got impatient and decided to make the mast and boom anyway. As I said, I had some serious doubts as to whether it would turn out to be a manageable sailboat, so although I'd scoped some clear pine boards that were quite pricey, I went and sifted through 12' 2x6s at a local lumber store, and found one that was remarkably clear, though with a bit of a warp. I figured I could live with warp in one dimension, especially for these "trial" spars, so ripped it into 1.5" pieces, cut to shape, rounded with a router and finished rounding by lots of muscle.
I installed some pulleys for the sheet on the boom, made and installed the jaw at the tack end of the boom, and put a pulley into the head of the mast for the halyard, and as that was just about done the sail showed up, 3 weeks before expected!
|
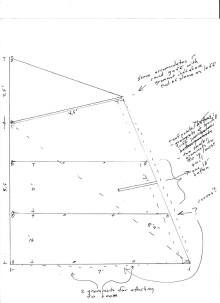
The sail arrived early, just as i drew it |
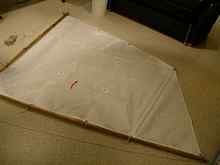
The sail has a sort of gaff, a 4' dowel in sleeve, to help keep the sail area as low as possible. It has two reef points, and at the second reef point would be reduced to a very small area indeed.
|
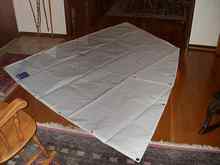
The sail plan i sent to Duckworks |
And with that my story is just about caught up to the present. One nasty task was to cut the whole in the foredeck for the mast to pass through to the mast step below, but very carefully I got that done so that the mast, when stepped, was sufficiently straight and in proper position.
|
It has a mast and boom and looks like it could sail... |
I tied the sail to the boom, rigged some rope loops for the luff of the sail, and decided the next morning, early, before anyone was at the reservoir to see any spectacular failures that might occur, I would see what happened.
|
Bending the sail onto the spars, cutting the sheet and halyard |
There was no one around at 7 am when I put the boat in and tied it up on the end of the dock. I carried the mast down, stepped it, and waited to see if the boat would just fall over, and was relieved that it floated perfectly happily. There was no wind, so I took the mast back out and had a nice paddle. By 8 there was a bit of a breeze coming, so it was time. Back at the dock I ran the mast through the luff ropes on the sail, rigged the halyard and stepped the mast with the sail/boom laid into the boat. I tied the sheet onto the two stern eyes making a traveler there of sorts, ran it through the blocks on the boom, and climbed in. Inching forward I grabbed the halyard and raised the sail. still no disaster. Daggerboard in and pinned full down, tiller extension in one hand, sheet in teeth, untie the bow line, and let go. and start sailing!
***** |