| Back
to Part 1
As I said at the end of the last
story on building this prototype hull;
I was going to talk about installing strong corner
braces and how to tie the rails into them. For me,
this has been an evolutionary process, as I have been
changing the way that I install them from boat to
boat. I can't even say that I am getting close to
finalizing my approach, or even that I will stop thinking
about how to do it better. My next prototype hull
may use a system that is completely different, but
this is the method I use now.
As a designer, I am always interested in what the
old timers did with widths and depths and the placement
of seats and oarlocks in the hulls. So I try to go
to as many of the wooden boat shows in the Puget Sound
area I can; to see whats old, whats new, what worked
over time and what didn't. The Port Townsend Wooden
Boat Festival is a good place to go; where I can see
a lot of old and new ideas in the boats on display.
The Center for Wooden Boats at the south end of Lake
Union in Seattle, is another great place to go and
see up close what the old timers were doing. When
looking at "real" old boats, and their modern
replicas, I like to take my tape measure along. That
way I can gage the "size" of the various
components in the boats, and compare them to the many
others tied up along the docks, or sitting on the
hard. I always find it interesting to see how they
installed their corner blocks and rails, and the various
ways they used to fit everything together.
The thicknesses of some of the components seem over
sized by todays standards, and I think that had more
to do with the materials they had available to them.
But you can see that they spent some time fitting
the rails and corners into their boats by the quality
of their work. Even a plain row boat for fishing had
more workmanship put into the corners and rails than
a lot of new fiberglass production boats have today.
A well made set of corners and rails can make a huge
visual difference in the appearance of a boat, and
it's not that hard to do. You will have to take some
time to make it so, but the payoff in the Oh's and
Ah's when people look at your boat will be well worth
the extra effort you made.
The following instructions should work on any design
without modifying. The main thing to remember when
using this method on your hull, are the angles involved
and their relationship to each other. You have the
vertical angles of the side panels near the ends (should
be the same), and the different vertical angles of
the stern and bow panels (pram). There are also the
horizontal angles between the transom/bow panels and
the side panels. Hopefully this is the same on both
sides if the hull was set up square in the wiring,
filleting, and glass taping. I go on and on about
making sure the hull is square and level in my plans,
and that the height (tops) of the two side panels
are the same on both sides at the stern/bow. The stern/bow
panel can be off a bit from the side panels, BUT "should
be higher at each end" than either of the two
side panels. This can be leveled and trimmed later,
but can't be corrected easily if one of the side panels
is higher or lower than it's matching stern/bow panel
corner. The port and starboard ends of the bow/stern
panels always have to be even with or slightly higher
(better) than either side panel at the corners. Always!
I add an extra 1/4" to the top edges of any bow
or stern panel measurements just to be safe.
Note: Make sure that the stern and bow panels are
still straight from side to side. I always have a
stiffener (2x2) attached at the tops of the bow and
stern panels until all the fillets, glass tape, and
the corners and rails are installed. The panels will
take a curve if you don't!
 |
|
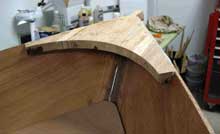
For this hull, I modified my approach by going to
a greater thickness for the corner blocks. I was able
to get some true 1x6 material at EdenSaw Woods in
Kent, WA, when I picked up my marine plywood for the
hull. To help increase the thickness, I also added
a layer of 1/4" ply to the bottom of the corner
blocks after I had them shaped. Then I could install
the tops of the blocks higher in relation to the side
panels than I have before. I wanted to do this to
help in the final shaping of the transition between
the ends of the rails and the corner blocks. I succeeded
in the stern, but not at the bow. It would have worked
at the bow, but "I forgot" what I was doing
when I installed the bow rails (not wide enough).
Building boats has become automatic to me, and things
happen fast if I don't remember to stop at a certain
point in the construction of a new design. This was
the first pram design I had used the spaced rail system
on. The brain was on at the stern, but got turned
off at some point when I started working on the bow.
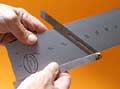
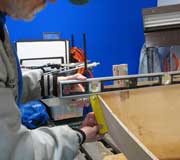
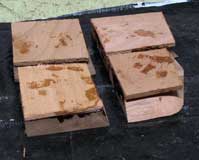
To get the stern corner blocks ready for cutting,
you need to know the vertical angle of the stern panel
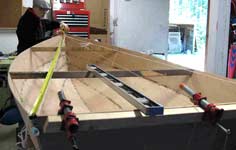
first. Place something close to the stern panel, that
will span the distance between the stern ends of the
side panels. Use an adjustable gauge
to find the angle between the bottom of this "spanning
board" and the inside of the stern panel. This
will be used to set the "blade angle" of
your table saw. I like to cut this angle in both corner
blocks at the same time; and the best way to do that
is to just cut one block. On this hull, I started
with a 4" x 8" x 1" blank (the 1/4"
plywood can already be glued in place to speed things
up). That left behind enough wood for the strength
I wanted, after all the cutting and shaping was done.
Set the rip fence so you cut just the bevel, and not
narrow the blank any more than is necessary. Mark
this bevel cut as the "stern edge" on both
half's of the blank .
 |

|
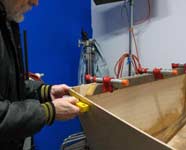
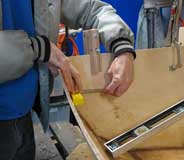
Next, measure the vertical angle between your "spanning
board" and the inside of the side panels near
the corner. Use that angle to "reset" your
table saw to the new cut. It will be different from
the stern angle cut. Check to see that both sides
match, or are close enough for GelMagic
to fix. Don't cut them yet! You still need to find
the "horizontal" angle between the stern
and side panels. Use your adjustable gauge to find
this, and check the angle with both sides. You will
have to do this on the outside of the hull because
of the fillets and tape. Some error can be allowed,
but this is one of the reasons you wanted to make
sure the hull was level and square when you filleted
and glass taped it.
 |
|
 |
Take that horizontal angle and use it to set the
"miter gage" on your table saw. That horizontal
angle and the vertical angle of the table saw's blade
are used together in one (hopefully only one) pass,
and for only one end of the blank (port or starboard).
The cut at the other end of the blank will be a mirror
image of the other. You only need to reset the miter
gage to the "opposite mirror angle" and
not the blade. The blank will have to be "rotated"
180 degrees (not flipped) for the next pass through
the saw with the new and opposite angle set in the
miter gage. I like to add pencil marks to the blank
as a check to see that I am actually doing things
right. I have made some fancy kindling for my fire
place by not thinking things through. Make a "thin"
pass along the very outer edge just to check yourself
that you have the correct angles in the right directions.
Better yet, do a complete corner block cutting test
on a piece of scrap.
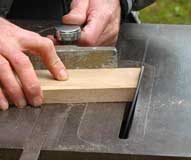 |
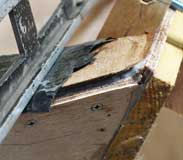
The next cuts to make are at the forward, outside
ends of the blank; perpendicular to the edge that
attaches/lines up with the side panel. You want to
make a 90 degree cut here so the ends of the inside
rails, and spacer blocks if you use them, are square
where they meet the corner blocks. How "wide"
a cut you need to make will be determined by how thick
the combined inside rail set is. Hold up some sample
stock(s) of the "true" inside rail thickness,
and mark the "width" of the cut needed for
the rail ends to have a full match. Do this to the
forward outside corners of both blocks, and remember
that they are mirror edges.
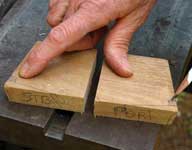 |
If everything came out as planned, you have two
different, but mirror image cuts at the ends of the
blank. All you need to do now is to cut the blank
in half and mark which is port and which is starboard.
On a pram, just repeat everything again for the bow
corner blocks, but remember that "all the angles
will be different"! With a "V" bowed
hull, laying out the angles for the breast hook is
similar, but different. You still have to measure
the side panel vertical angles, but the sides may
have some horizontal curve in them that will not allow
the use of a table saw. Tell the better half that
you need a band saw for Christmas; she'll understand,
right? I still have to bum a cut from a friend.
 |
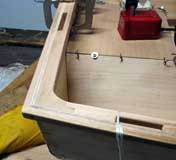
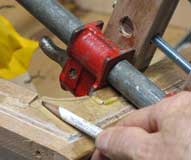
With the corner blocks cut to the angles of all
the hull panels, it's time to fit them to the hull;
but first you need to round out the blocks to fit
the radius of the fillets and glass tape in the corner
seams. Take your time and get a reasonably good fit;
really good if you are using glue; close enough if
you are using GelMagic or your own home cooked thickened
epoxy. For some things, I like
to go out to eat.
As I said earlier; I added a layer of 1/4"
plywood to the bottoms of the corner blocks. Mainly
to be able to increase the mounting height of the
blocks for shaping later, but also to give extra strength
to resist splitting along the grain of the wood. I
GelMagic them in place and trim after curing. The
addition of the plywood greatly improved (reduced)
the shaping of the rails in the transition to the
corner blocks. It even helped at the bow corners,
where I forgot what I was supposed to do to the bow
rails on this hull.
 |
|
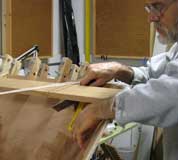
Hold the corner blocks in their respective positions,
and check the fit. The tops of the corner blocks are
set to the height of the side panels (or 1/4"
higher if adding the plywood to the bottoms) and "not
the bow/stern panels". If the heights still look
good, drill some holes for the stainless screws you
will add for extra strength. I usually have the corner
blocks loosely clamped in the "spanning board"
when I drill the first hole in each corner block.
Then I know that they are level with each other, and
at the correct height. I like to use two screws on
the ends, and two on the sides of each corner block.
Just make sure you mark their locations. You will
need to "miss them" when you add the stainless
screws for the outer rails later. I place a pencil
mark for each screw location on the outside of the
hull panels, and under where the rails will go. I
erase the marks later when I do the bottom, since
I am completely finished with the rails and interior
of the hull by then. The marks are always there and
never get lost while shaping or sanding the tops,
sides, and bottoms of the rails.
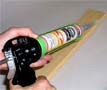
Put a good coating of GelMagic on the edges, and
reinstall the corner blocks (one end of the hull at
a time). Install and tighten up on the stainless screws,
but not too tight. Just enough for some squeeze out
of the GelMagic. Use the spanning board and clamps
to make sure the tops of the corner blocks are even
from side to side again. Remember to cover the GelMagic/epoxy
oozing from the corners with plastic so the spanning
board doesn't become part of the hull.
 |
|
 |
On my earlier boats, I used a simple inside/outside
rail system. Starting with the PUD-g,
I have gone to what I call a "spaced rail"
system. There is probably a nautical term for it,
and I am sure someone will let me know. The short
spacer blocks that fit tight against the corner blocks
are glued in place. Their lengths are variable (to
fill the distance between the last standard "open"
space and the corner block) and are determined by
the block and spacing lengths you are using. Attach
the spacer blocks so that the tops are even with the
tops of the hull panels. The inside rails will be
even with the tops of all the spacer blocks when you
install them.
 |
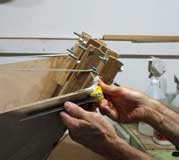
Next we want to inset the end of the inside rail
into the corner block so it covers the joint between
the last spacer rail and the corner block itself.
You can go with an inset cut of either 3/4" or
1" depending on the size of the corner block
blank you started with. Hold your saw next to the
inside face of the spacer block and match the angle
for the cut into the corner block. Do this for all
the inset cuts in all the corner blocks. Installing
the bow and stern inside and outside rails, and battling
the fit of the inside rails along the sides of the
hull is covered in my build and study plan text instructions.
Once everything is installed and all the epoxy has
cured you can do the final shaping of the rails and
the transitions into and out of the corner blocks.
Just take your time, and don't remove too much wood
at any one place, at any one time. Go around the hull
and do a section at a time, but remember to do the
same thing on the opposite side. Look and shape, look
and shape.
As I alluded to at the beginning of this story,
things tend to change from prototype to prototype
at the Red Barn. As I was futzing around with the
corners and rails of the 10ft Nuthatch, I thought
of another way (simpler I think) to do all this without
needing to make all the fancy tablesaw cuts. I will
try the idea out on my next boat, the double ended
12ft O&P
Pod (Owl and Pussy Cat) with the asymmetrical
pea green hull. Even though it won't have right angle
corner blocks, the idea if it works will transfer
to a standard transomed hull.
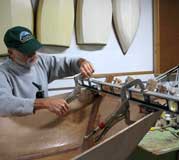
The 10ft Nuthatch should be in the water or close
to it, around the time this story is published in
Duckworks Magazine. So look for the launch story in
early November. Hopefully under sail with the new
64sq ft sprit sail that I designed. Bob Pattison at
Neil Pryde Sails International, finalized the shape
of the leach, and the cut of the sails individual
panels for me in 3D Cad. It's an in stock item for
them now at https://www.neilprydesails.com/
Check out my flickr account at https://www.flickr.com/photos/10ftnuthatch
I've added a lot more photos of the construction process
since the last story. With over 1800+ Duckworks Magazine
and https://www.washingtonflyfishing.com/
visitors todate.
Thanks again for reading my stories.
Warren Messer
Red Barn Boats

Other Articles by Warren Messer
|