|
To Part One
To Part Two
To Part Four
To Part Five
The Pathfinder Hatch
I have mentioned the tool involved in each process of a build, mostly to show that it don’t have to be a fancy or specialized tool. For this cabin build as before when I built my Pathfinder, the main tools have been the Dwalt jig saw, Cordless drill, Belt sander, and occasionally the table saw in that order. I’m comfortable with these tools so their used more often, especially the belt sander which has taken on the role of wood shaper once it’s clamped to the bench. Other tools are used like the palm sander, chisels, routers and even a grinder, but to a lesser degree. By the way, has anyone looked for ideas for sliding hatches online? I have had only minimal success and the best idea I found was a sketch exploded view, but it was enough to make the point and it makes for a nice easy to build hatch and slides.
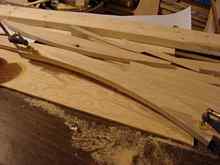
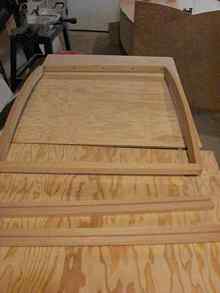
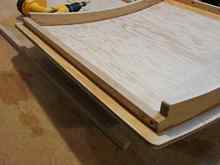
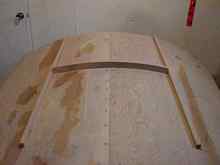
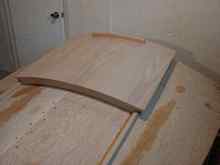
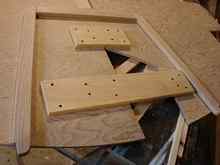
The assembled cabin sits on the shop floor and is being used as a form for making the hatch sliding rails and the hatch assembly. The hatch is drawn up with the same curve on the cover as the cabin roof. It will keep the whole look flowing from one part to another (that’s the plan anyhow). The hatch cover has the rails ride under the sill of the hatch and an outside cap that will have a slot to hold the overhanging slide that will be cut from Teflon/plastic. This cap is removable from inside the hatch. All of this is cut from oak and will be varnished after.
After the initial hatch frame was screwed/epoxied together the holes were drilled for the outside cap and the ¼” plywood cover was bent and fixed in place.
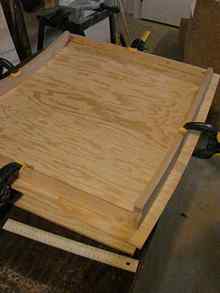
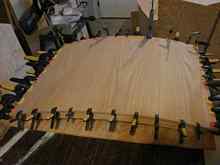
After the epoxy cured, another ¼” oak plywood was epoxied to the top of the previous with a generous amount of clamps.
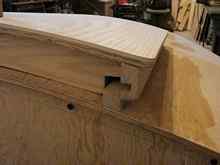
This will give me a hatch cover with no exposed screws.
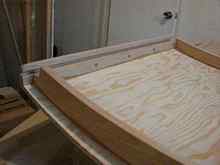
The overhanging ply was trimmed off and finish sanded to be varnished later.
The outside hatch hold down/cap made from oak has a slot cut with the table saw that’s slightly larger than the poly strip rail.
This is held from inside the hatch cover with stainless steel screws for now and with the addition of 3M 5200 compound when I do the final install.
Again, no exposed screws.
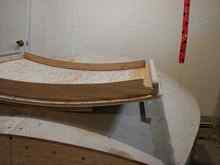
The oak hatch rails were placed with the aid of the completed hatch, it determines the final position after all. They were held and the roof marked for installation later.
The hatch roof opening end casing was fitted and cut as well. While I was placing it I noticed that it being a piece of hardwood and being permanent, it could serve as a roof support beam, though on the outside. If at all possible I would like to eliminate the interior roof support beam but likely I’ll just make it a partial pair of beams that act like a knee on each side.
With all things lining up as they more or less should, the pieces are set aside for final work later.
With the hatch work as far as I can take it I’m moving on to building the aft bulkhead. The one that sits on the shop floor is merely a jig.
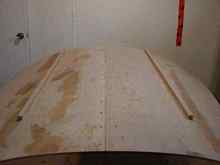
The rear bulkhead that will be used in the final installation of the cabin is now being made from ½” plywood, the very same piece that was used as a ramp when the Pathfinder was dragged out of my basement two years ago. I’ve gotten into the habit of trying to use as much of my leftover scrap material on this job and so far only the oak pieces are new. The scrap ½” ply was barely big enough and the hatch opening helped in the nesting of the pattern.
The bulkhead was held together with wallboard screws and scrap wood in an area that will be cut for the door when the time comes. Some softwood pieces were cut and epoxied in place that will serve as doublers for the walls and roof to fasten too. I sanded off the footprints and rubber boot marks and marked out where the frame #4 battens and doublers will likely be cut out. This is the last major piece built before the destruction of my deck and rebuild with the new cabin.
But before all that, I have to clear snow from my yard space and erect a 10ft x 20ft tarp car shelter that will serve as a boat shop for the rest of this project. I’ll also need to build a wood stove for this and a discarded hot water tank will do the trick.
(WARNING: do not put a woodstove in any tarp shelter, which is basically a large tent)
The next time, you’ll see the shelter, stove and the damage I inflict on my Pathfinder.

|