
 Custom Search
|
|
| sails |
| plans |
| epoxy |
| rope/line |
| hardware |
| canoe/Kayak |
| sailmaking |
| materials |
| models |
| media |
| tools |
| gear |
 |
 |
| join |
| home |
| indexes |
| classifieds |
| calendar |
| archives |
| about |
| links |
| Join Duckworks Get free newsletter Comment on articles CLICK HERE |
|
|
| 50th Anniversary Boat Build - Part Three |
by Jeff Jouett - Houston, Texas - USA |
Part One - Part Two - Part Three Before I start commenting on the build, I want to make a few comments about the 50th anniversary of the Texas Water Safari which has already come and gone. My boat build was originally for this race, but it will have to wait until another time. Since I was unable to paddle in the race, I was the team captain for a tandem team that had high expectations for the race. They were doing well and feeling great leaving Gonzales (80 miles into the race). They planned to stop and sleep somewhere on this long stretch so I knew that I wouldn’t see them for 7-8 hours. I was asleep in Hocheim when my phone rang about 4am. A race official told me that my team had broken their boat in half and was out of the race. I drove back to get them, relieved that they were both ok. They said that within 1-2 seconds they had hit something in the middle of the river and that they were both in the water holding on to half a boat each. Our team was one of about 3-4 other teams that had their boats broken during the race. These broken boats pale in comparison to the tragedy that happened in this year’s race. Brad Ellis, a novice racer, passed away due to complications from hyponatremia (an electrolye disturbance in which the sodium concentration in the serum is lower than normal). This was the first fatality in the race’s 50 year history. We are very saddened as a paddling community, and hope that this never happens again.
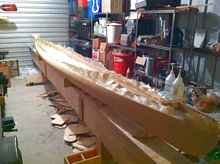
The build is progressing nicely, though it’s never as fast as I would like it to be. I didn’t think the day would ever arrive that I’d be putting cloth on the boat. I was lucky that I got help from the designer/canoe builder extraordinaire. Skip met me at my shop in the morning and we jumped in on the fabrics. We knew we would need to work quickly as the Texas heat would start climbing after 10am. We laid the Kevlar over the core and rough trimmed it.
We also pulled out the fiberglass and cut it to length, then set aside. When we were ready to start with epoxy, we rolled half of the Kevlar back on itself and coated the foam with epoxy. The Kevlar was carefully pulled back in place and we pulled the other half back and epoxied the other half of the boat. Once the piece was all spread out over the core, we carefully worked the fabric down the way we wanted and started to spread epoxy on the entire outside. Once coated, we used spreaders to even everything out.
Next we placed the fiberglass over the Kevlar, rough trimmed it, and got it epoxied and smoothed out. Now it was time to tackle the Peel Ply (per Skip’s recommendation I bought polyester dress lining fabric. I got it from Hobby Lobby with a 40 percent off coupon. Total cost of about $15). We got it placed over the top of everything and smoothed out, and trimmed it after the fact. Mission accomplished. Skip and I headed our separate ways for the day. I came back the next day to remove the Peel Ply.
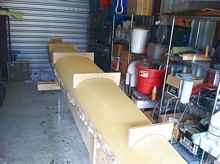
At this point, I wanted the epoxy to set completely before removing the boat from the forms. Once a couple of days passed, I made some cradles for the outside of the hull prior to removing it from the interior forms.
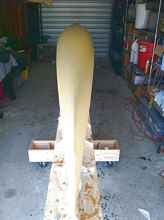
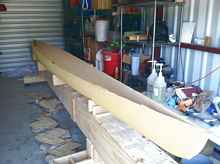
It was time to get to work removing the hull from the forms which went quickly.
I was amazed at how light it was. I did a quick initial trim of the excess fabric so that I could get to the inside easier and planned to finish trim the edges later.
I started with a scraper on the inside to deal with any glue that expanded on the inside, and then moved to sanding blocks.
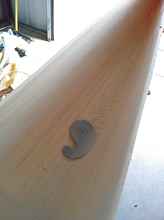
One of the first things I wanted to do was to deal with the stern and how I planned on working in my rudder. To address my plan, I did a small stern pour of epoxy and wood flour. I wanted to make sure to contain the pour, so I glued in a small piece of foam to make a small enclosed area for my pour.
I’ll be cutting a section of the stern out later when it’s time to start mounting the rudder. I was expecting to make this pour in 2-3 sections as I didn’t want it to get too hot if I did this all in one pour. I mixed the epoxy with as much wood flour as I could and still have it flow. I mixed just enough to fill about 1/3 of the cavity, and begin sanding on the inside of the hull. After about 20 minutes, I looked up and the end was smoking and the mixture had expanded to what shows in the picture. I knew it was hot outside that night and that my small batch would heat up, but not to the point that it did. If I had mixed any more at the time, I would have had on overflowing mess. When sanding the outside of the hull to get everything faired out correctly, I got a little thin on both the bow and stern about 1-2 feet from the ends. To help with this I did two separate pours of epoxy and wood flour.
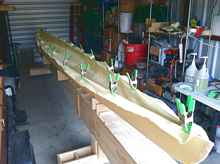
After each set up, I did all my final sanding on the inside of the hull. For the inside of the hull, I laid my fabric across and overlapped to get a better yield of the material and rough trimmed it.
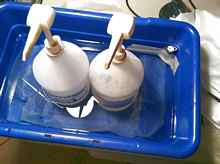
To help with any mess during gluing, I masked off the outside of the hull just below the top edges. The Texas heat had really kicked in by this point so I got a very early start. I arrived at my shop about 5am and got everything ready to go. To combat temperature issues later, I got bags of ice and had them in a cooler. I put my epoxy in a container with water and slowly added ice. Note the thermometer in the corner of the tub.
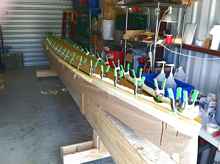
I tried to keep the temp at 60 degrees. I worked in small batches and as quickly as I could, working from one end to the other.
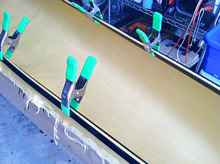
I knew the Kevlar wouldn’t like being wrapped around the edge of the hull, but I tried it anyway. I used abs plastic strips on both the outside and inside that were held in place by clamps.
Stay tuned... |


 |